software.
Unreal Engine 5 • ZBrush • Maya • Blender • TopoGun • RizomUV • Marvelous Designer • Substance Designer • Substance Painter
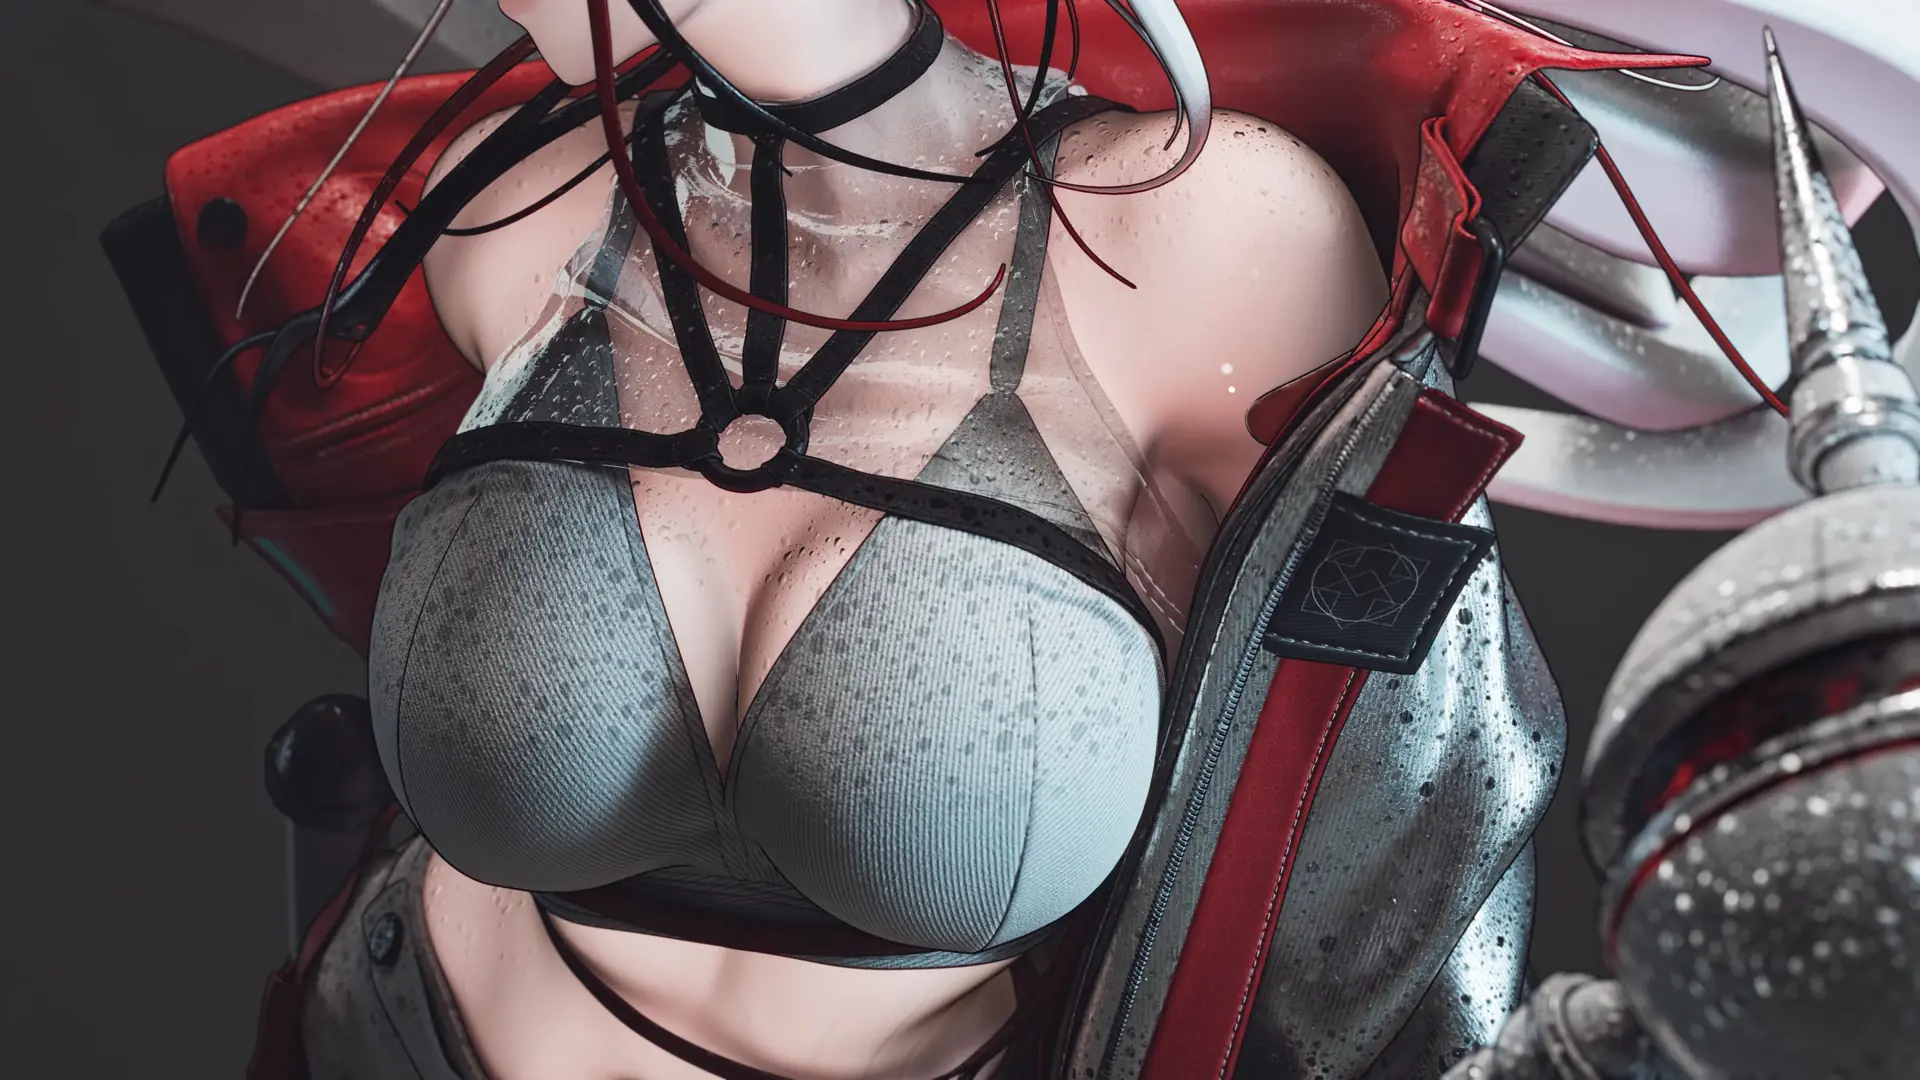
breakdown.
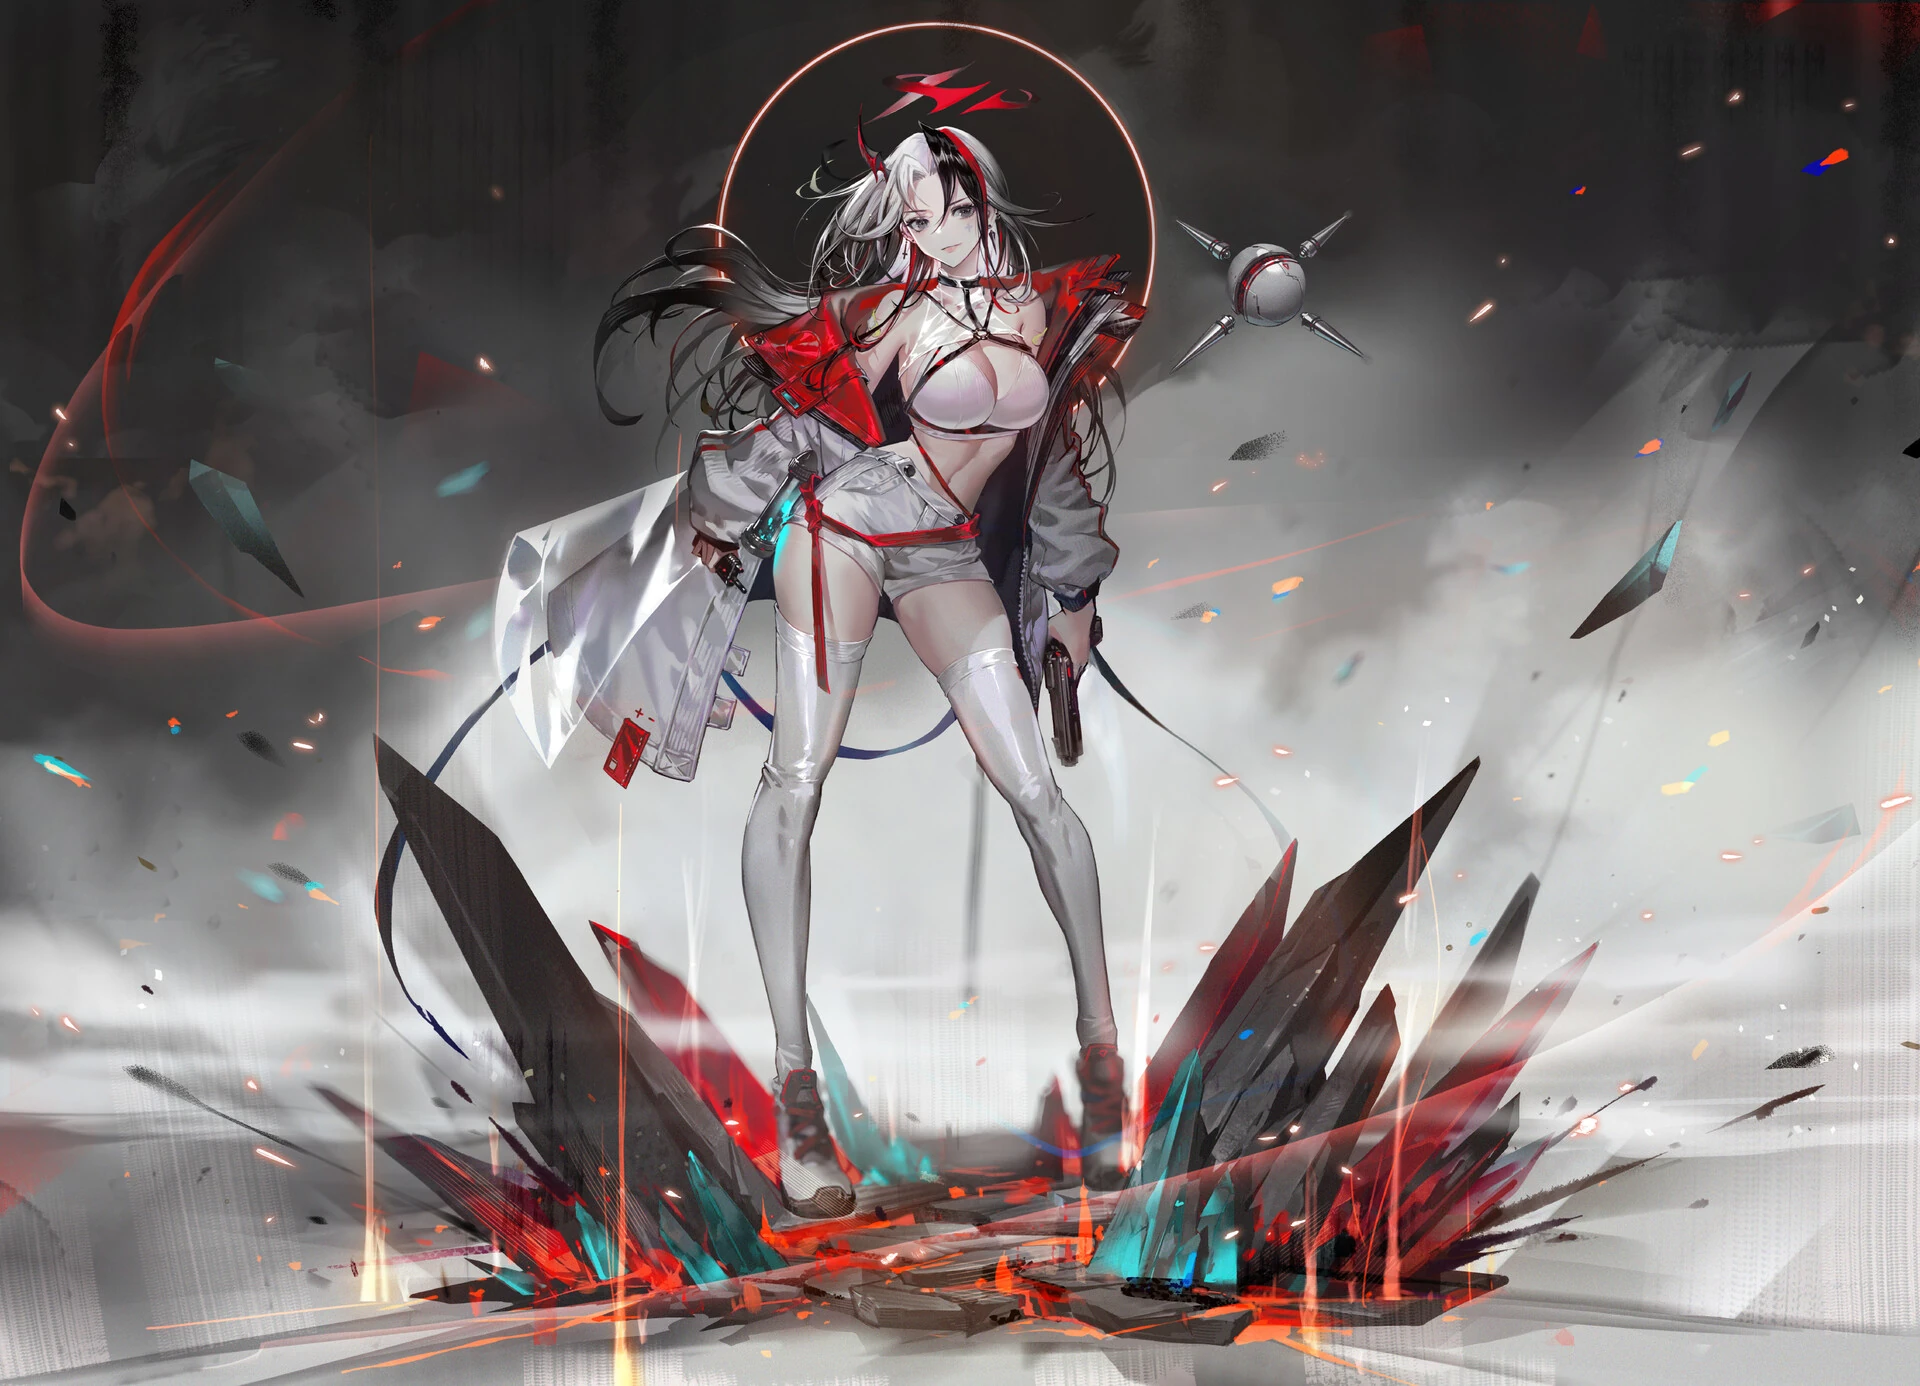
First, I would like to give credit to the original concept by MOCCA (Sohee KOO), who has graciously allowed me to use their concept art for this 3D character.
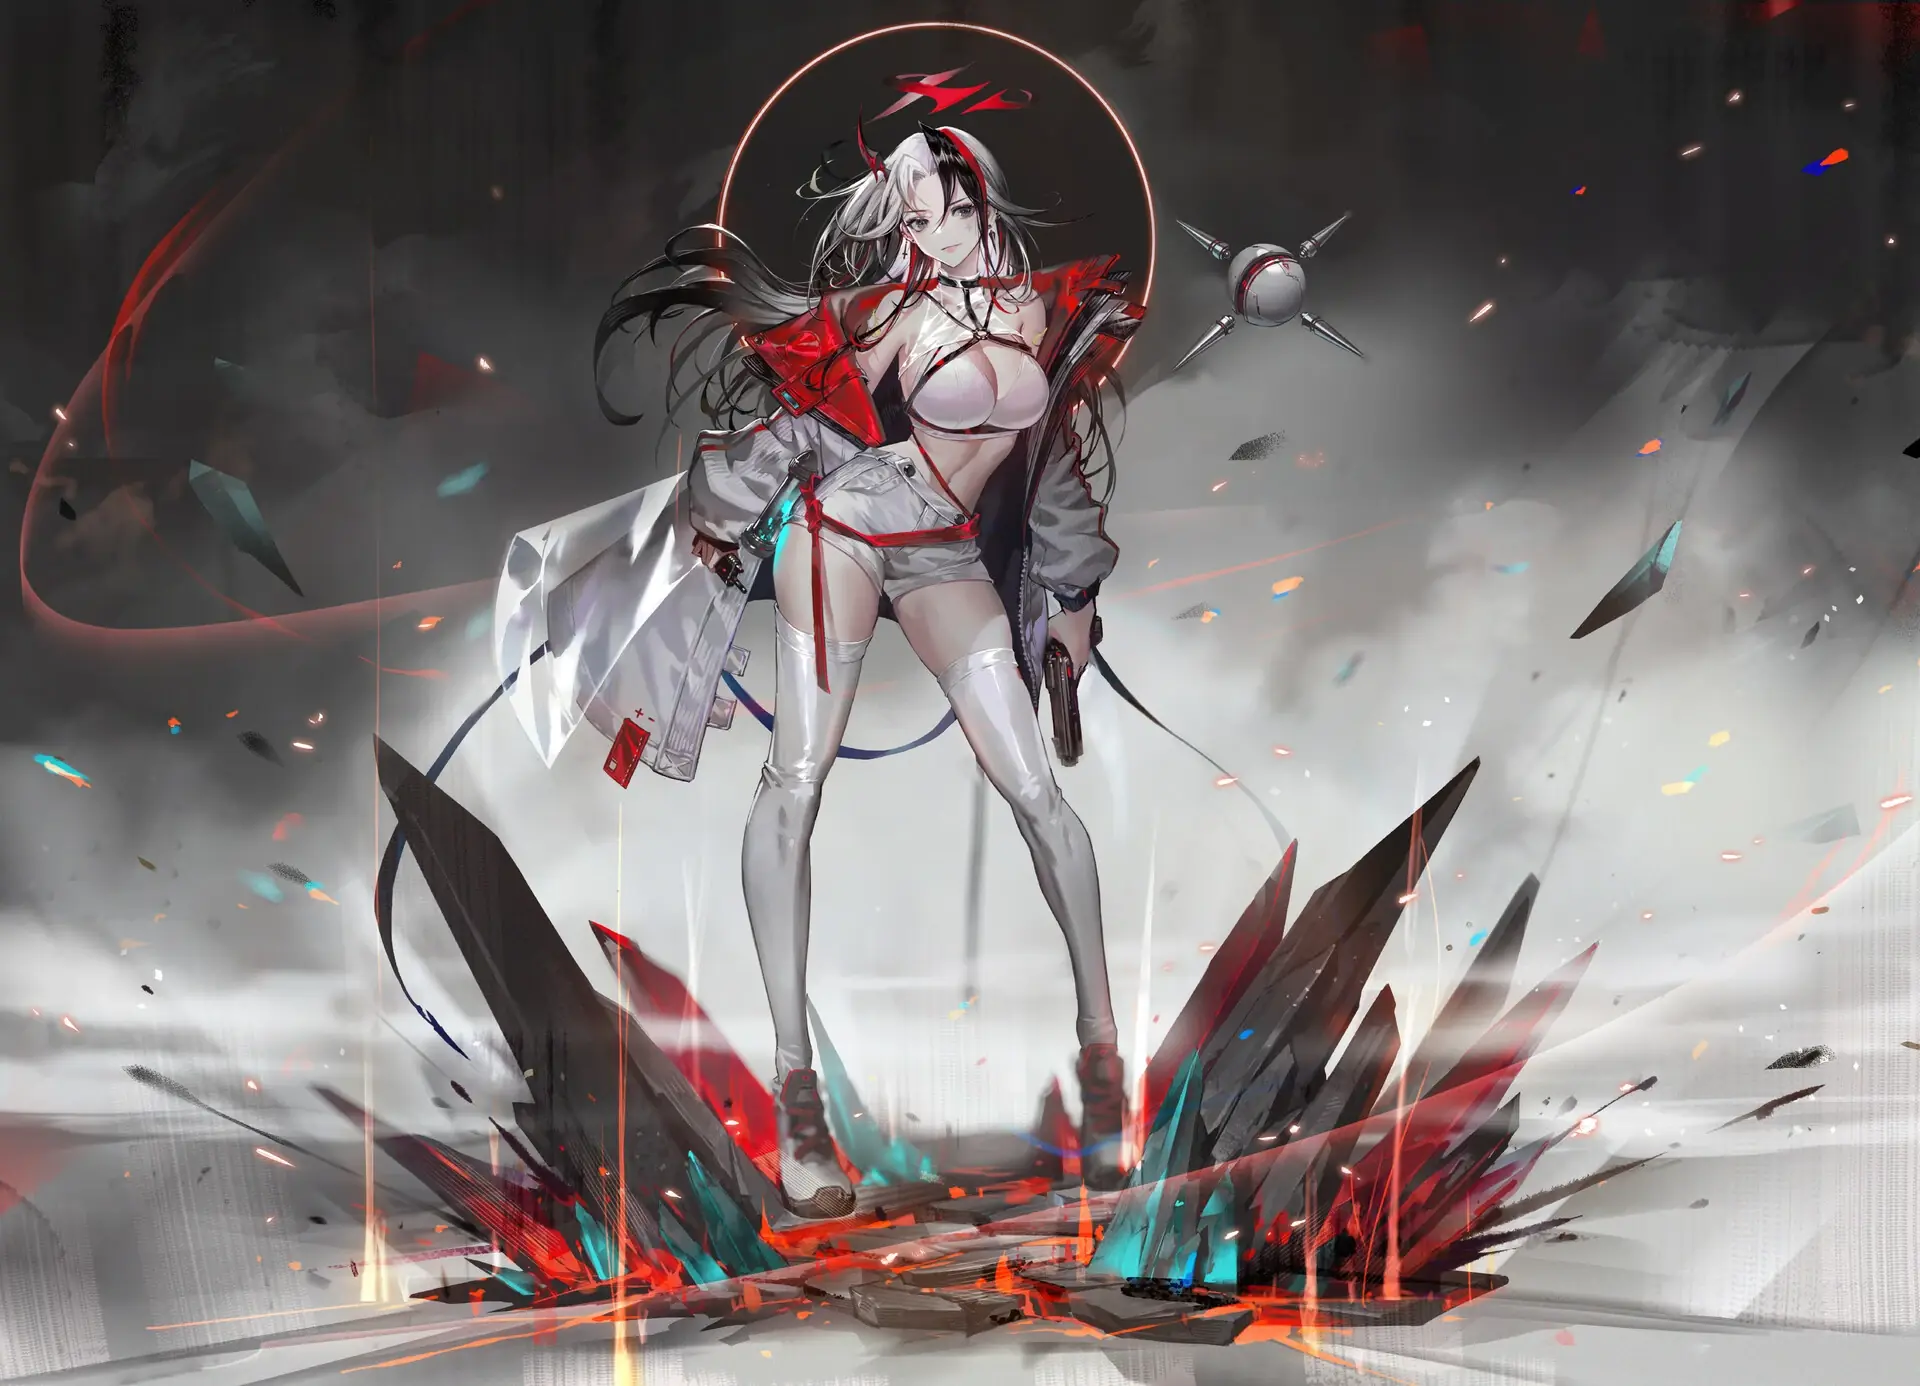
Concept by MOCCA (Sohee KOO)
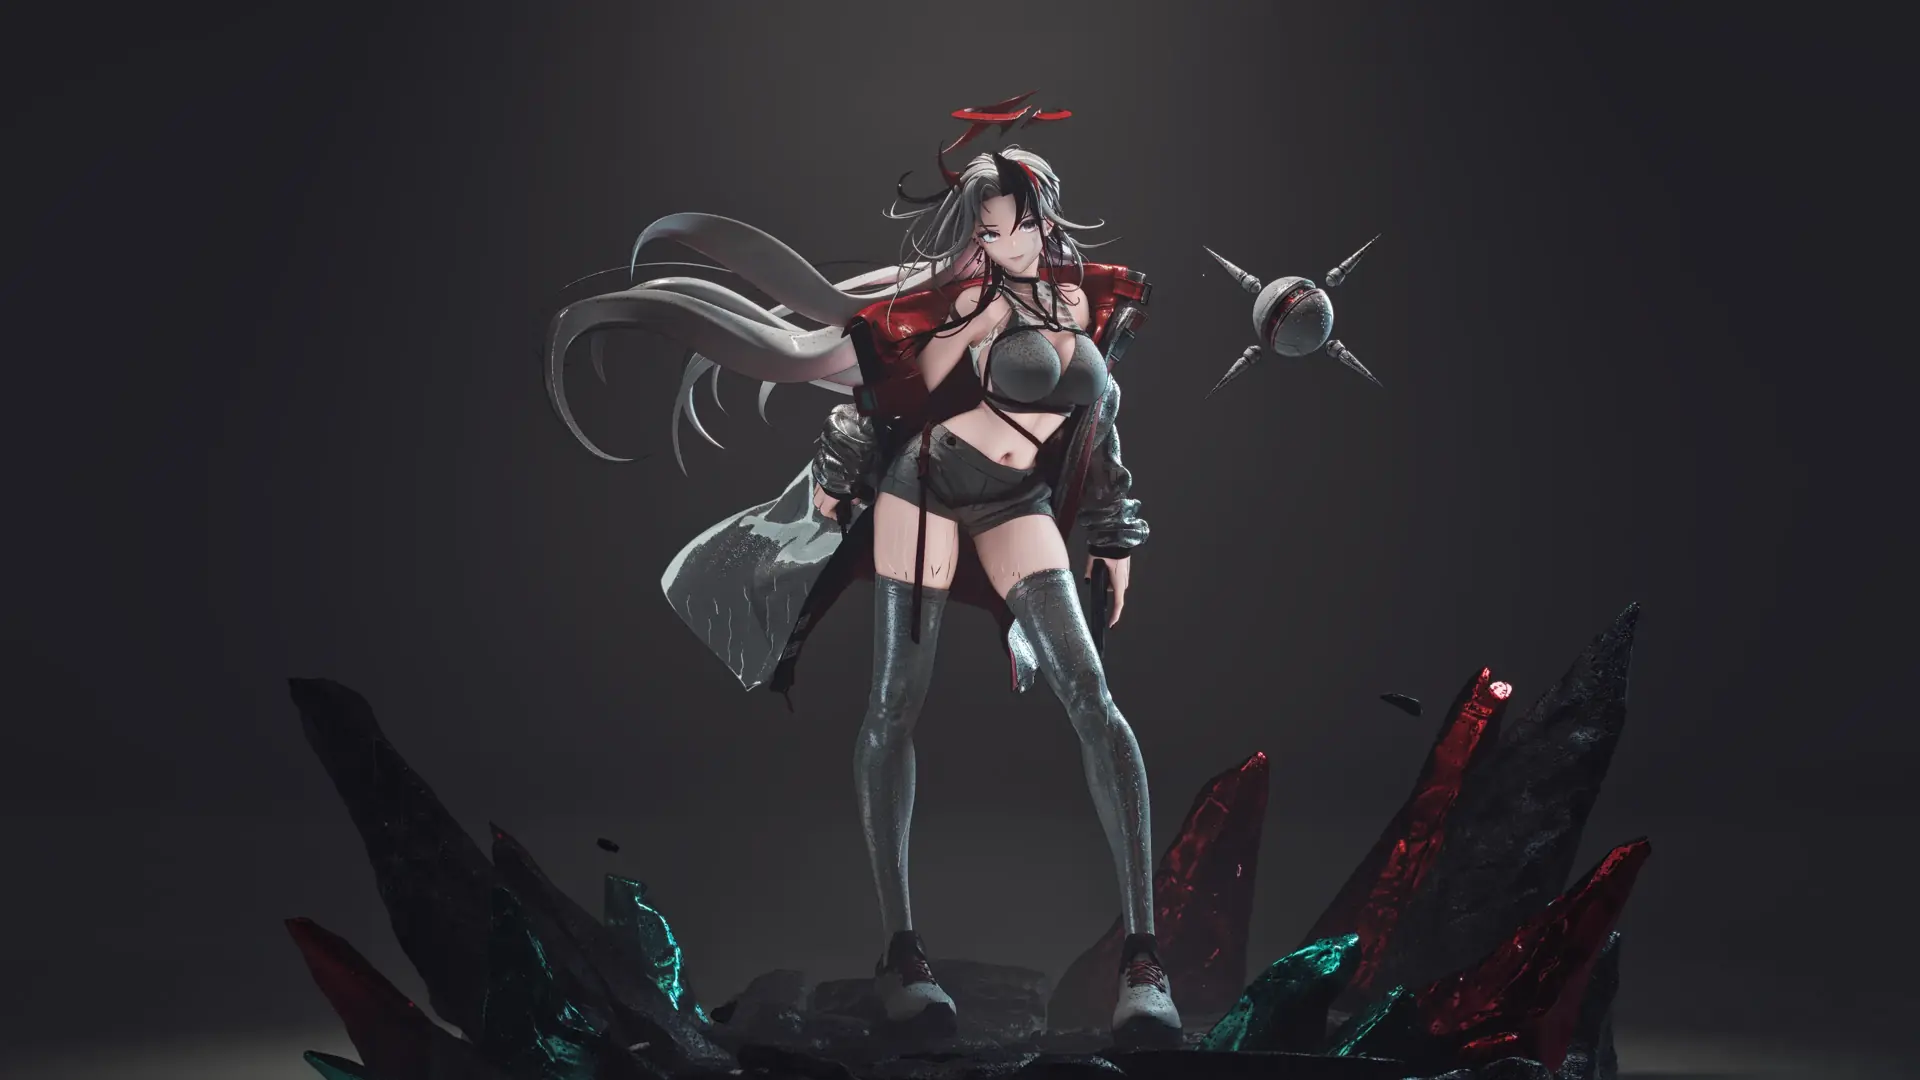
This project was the most recent one I've done as of making this website, and I've tried so many new things compared to all previous projects, so this writeup will be the longest one for now.
I started this character project looking to try something stylized, and to create a portfolio piece on the side while going through an internship. The goal was to stick to a style inspired by Arknights: Endfield. The key points I wanted to accomplish at this point were as follows:
- Mix of NPR skin and PBR clothing
- Thin outline
- Sculpted hair
- Skin fresnel
- Face SDF shadows
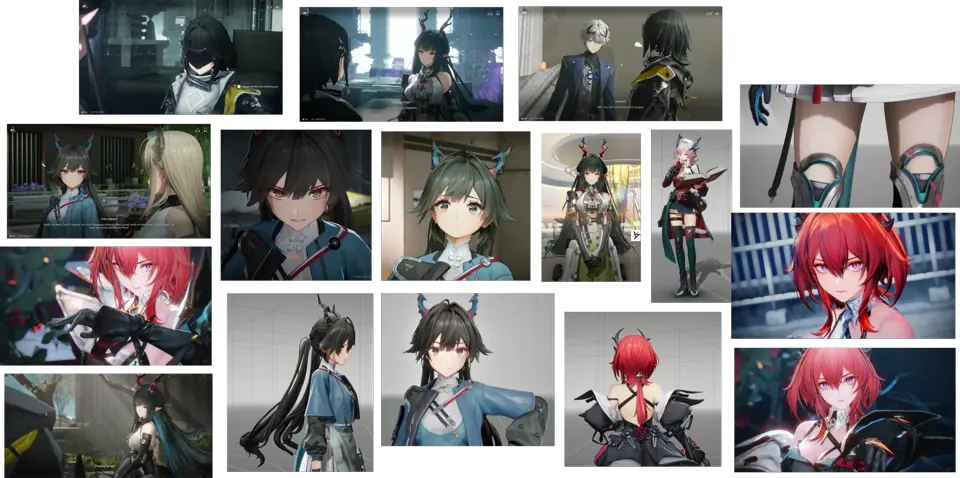
Endfield references
basemesh.
Before I begin, it's worth noting that I keep my ZBrush project at 100x scale, since it gives me a more usable brush size range.
I use ScaleMaster to ensure my mesh is measured at around 170m, and whenever I export it out to other programs, I manually resize it to 1x in Blender before importing it into the other program. I like to use Blender instead of Maya nowadays for simpler DCC tasks because it's faster to open.
I started with a basemesh derived from my previous character project, and adjusted its proportions in ZBrush. Here, I separated the head and body so that I could have enough density to work with in Dynamesh.
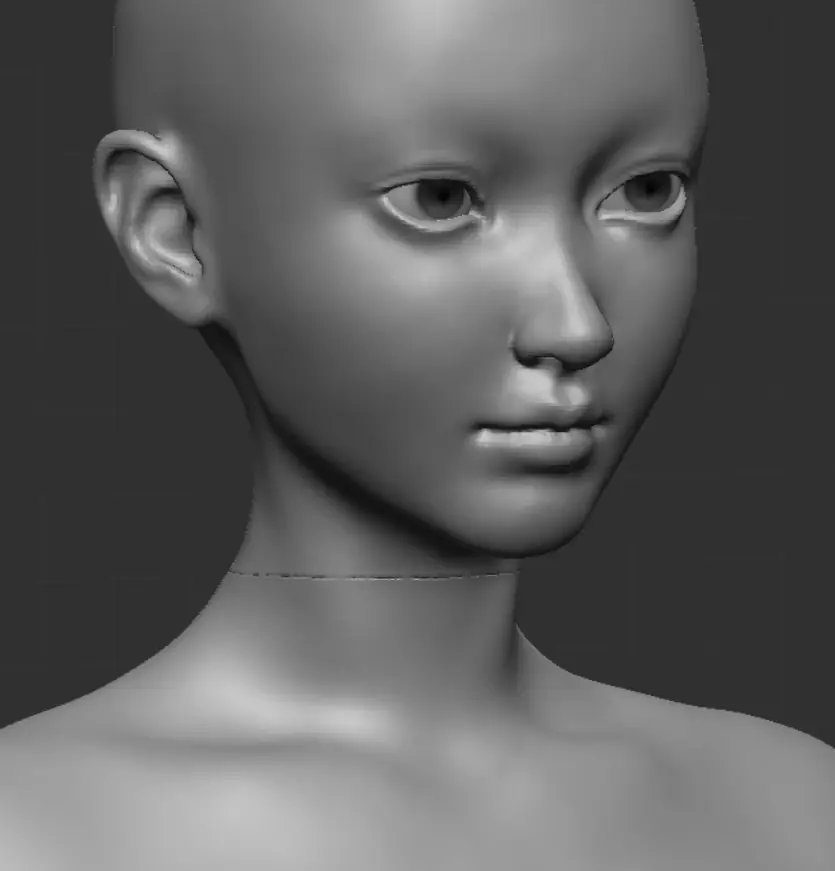
separated head and body
After I was done, I merged the head and body into a single mesh, and imported the mesh into TopoGun for retopology.
This was my first time using TopoGun as opposed to Maya's Quad Draw, and these are my thoughts on the software afterwards:
- Patches Tool was really efficient for blocking out generic areas of topology
- Performance was insanely fast. I didn't even need to decimate my Dynamesh model (1mil polygons) to get usable performance
- Unsure if Create/Edit tools for basic topology block-in is faster or slower than Maya's
- I didn't like that I needed to select an edge ring first before I could insert edge loops
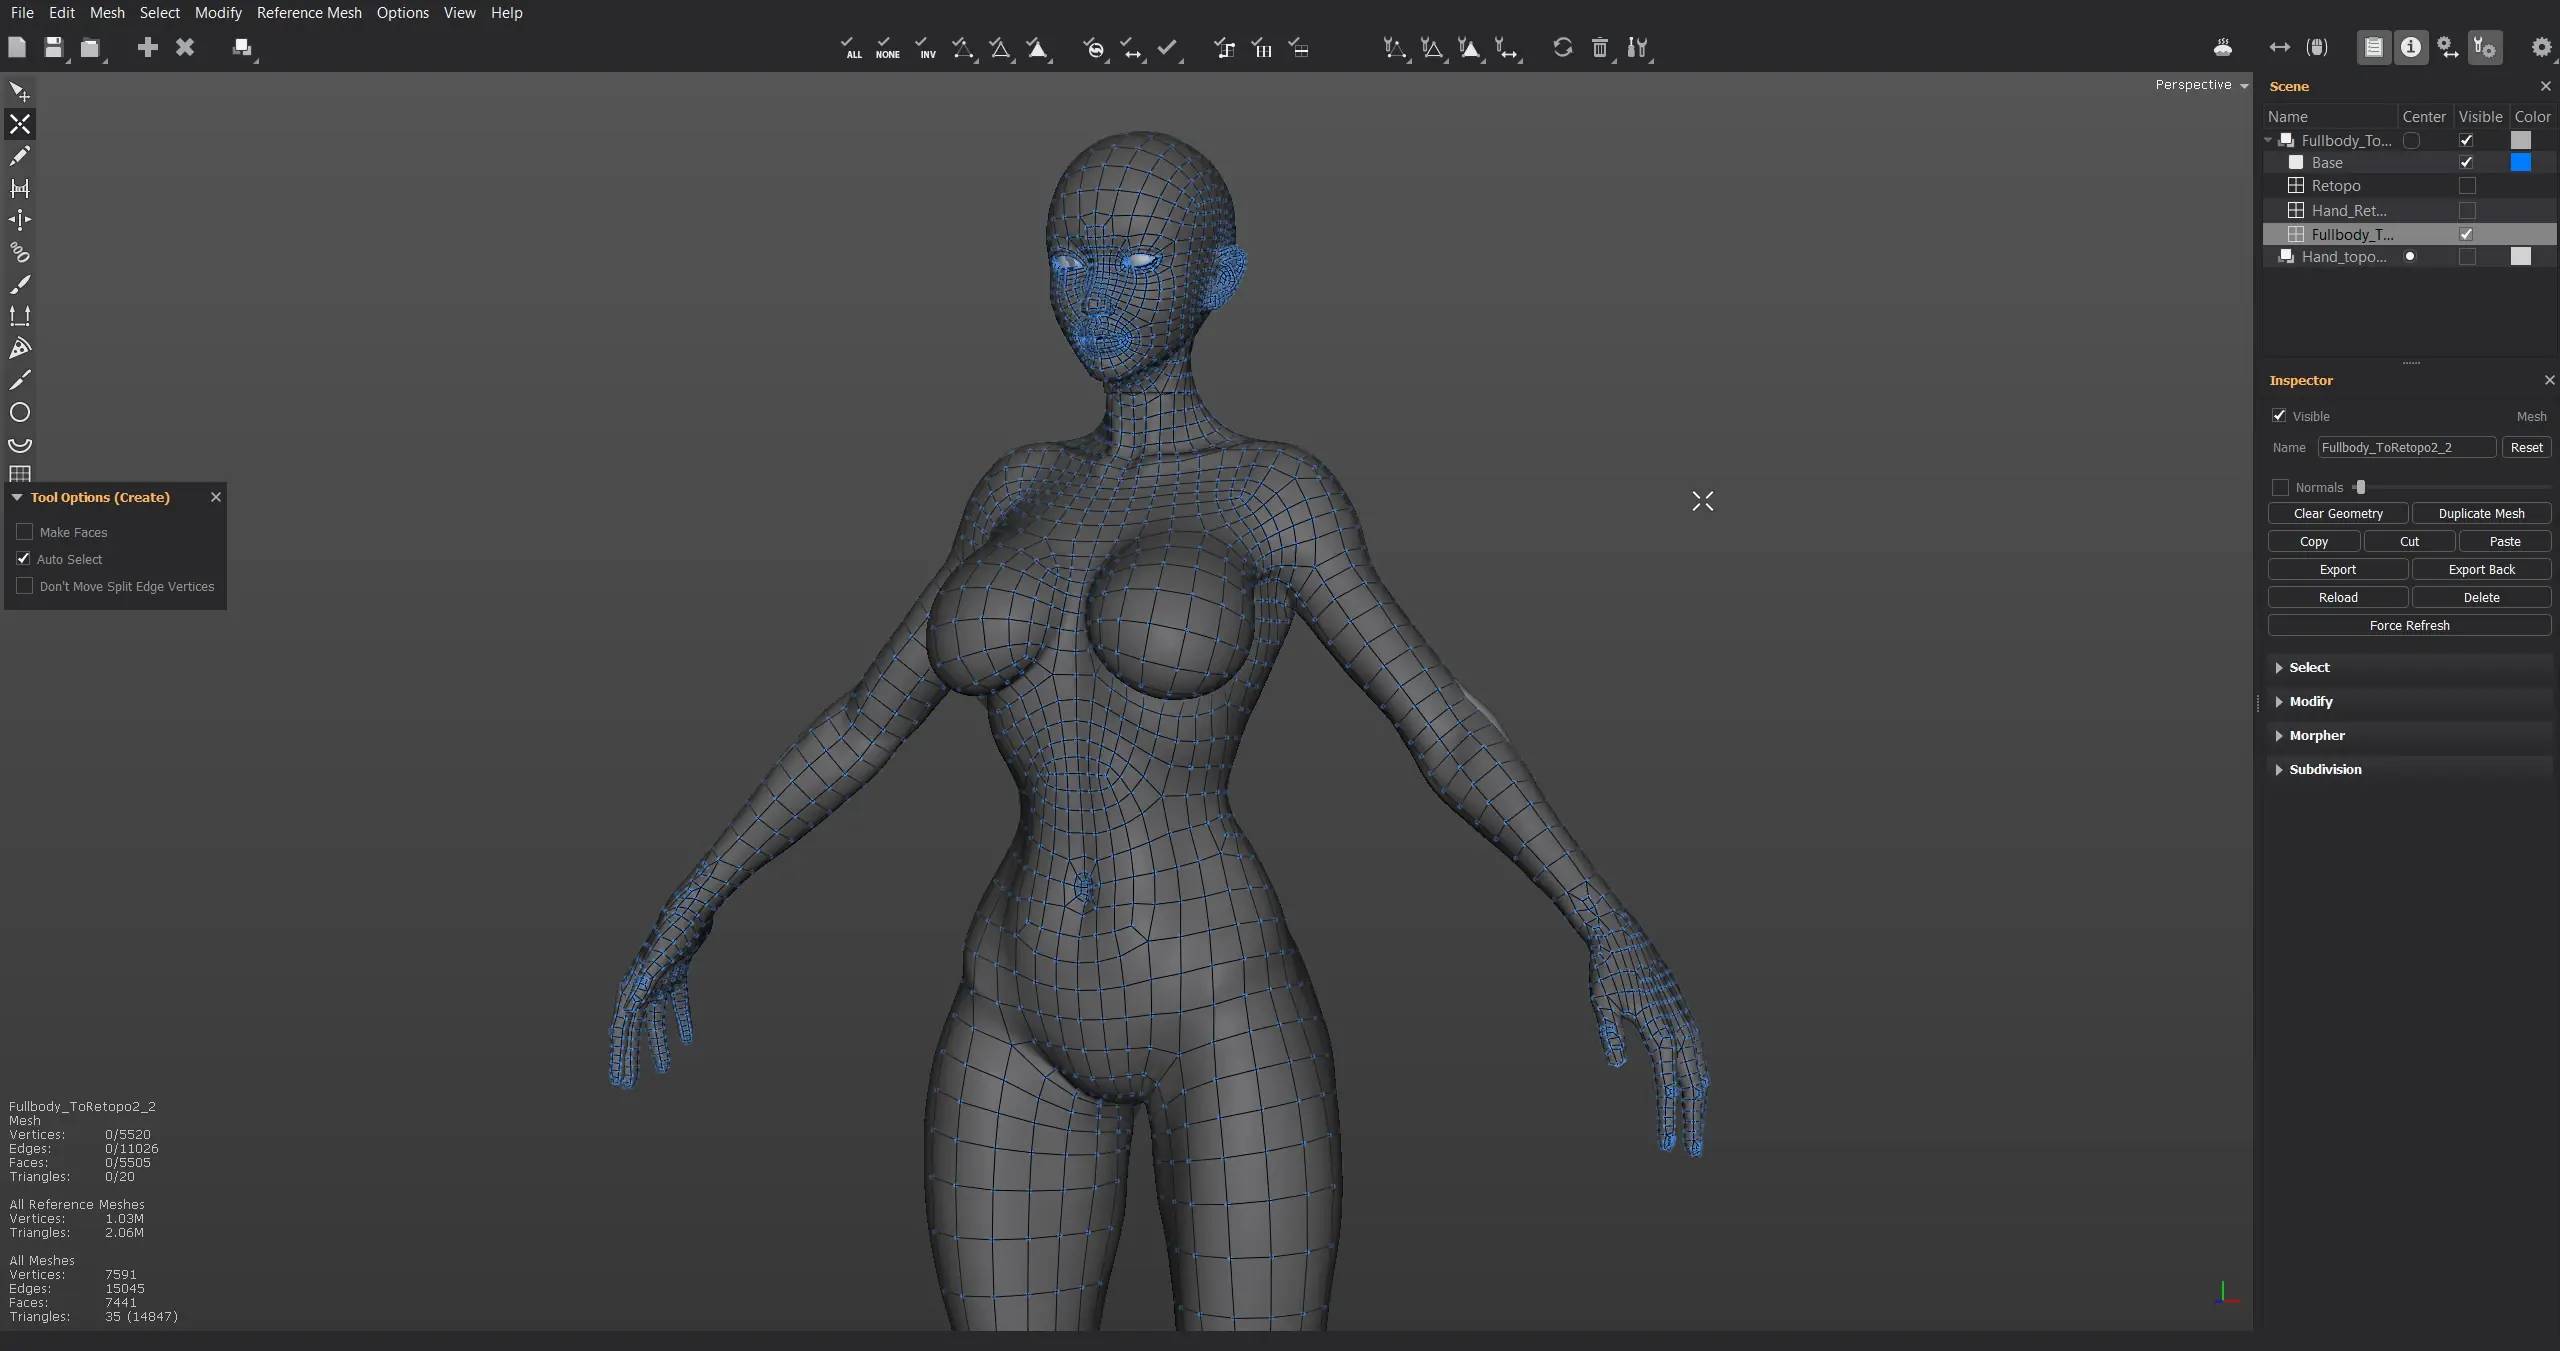
finished retopo
I made a few mistakes, the main one being that I forgot to ensure the edge loops for my UV seams were clean, but I didn't think it was significant enough of an issue to go back later.
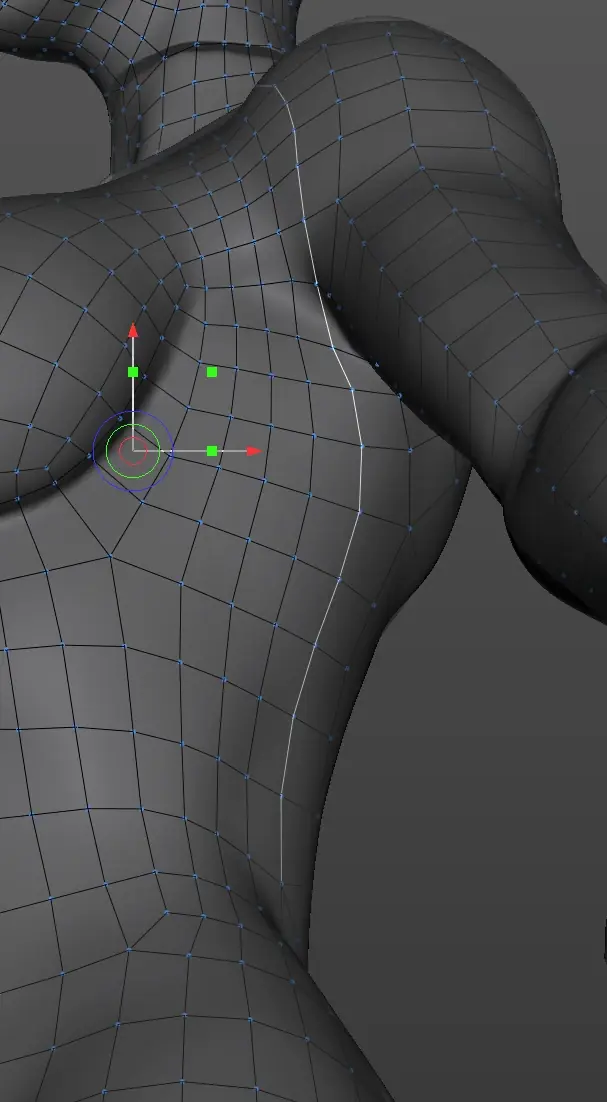
the edge loop in question
I also learned how to create a mouth bag for this project, just in case I wanted to open the character's mouth for posing.

mouth bag
However, creating a mouth bag at this point in time caused some difficulties, as reprojection in ZBrush afterwards had issues around the mouth area since the original Dynamesh didn't have a mouth bag.
In an effort to skirt around this issue, I reprojected the Dynamesh details onto the retopologized mesh one division at a time, while manually smoothing out the artifacts each time.
Later, I decided to commit to a fully-stylized head and went to resculpt and retopologize it, then attached it back on. I kept it as half of the head in TopoGun since I like Maya's Mirror a bit more.
Since I imported the realistic head version for Marvelous Designer, I waited until I settled the clothing touch-up in ZBrush before attaching the head.
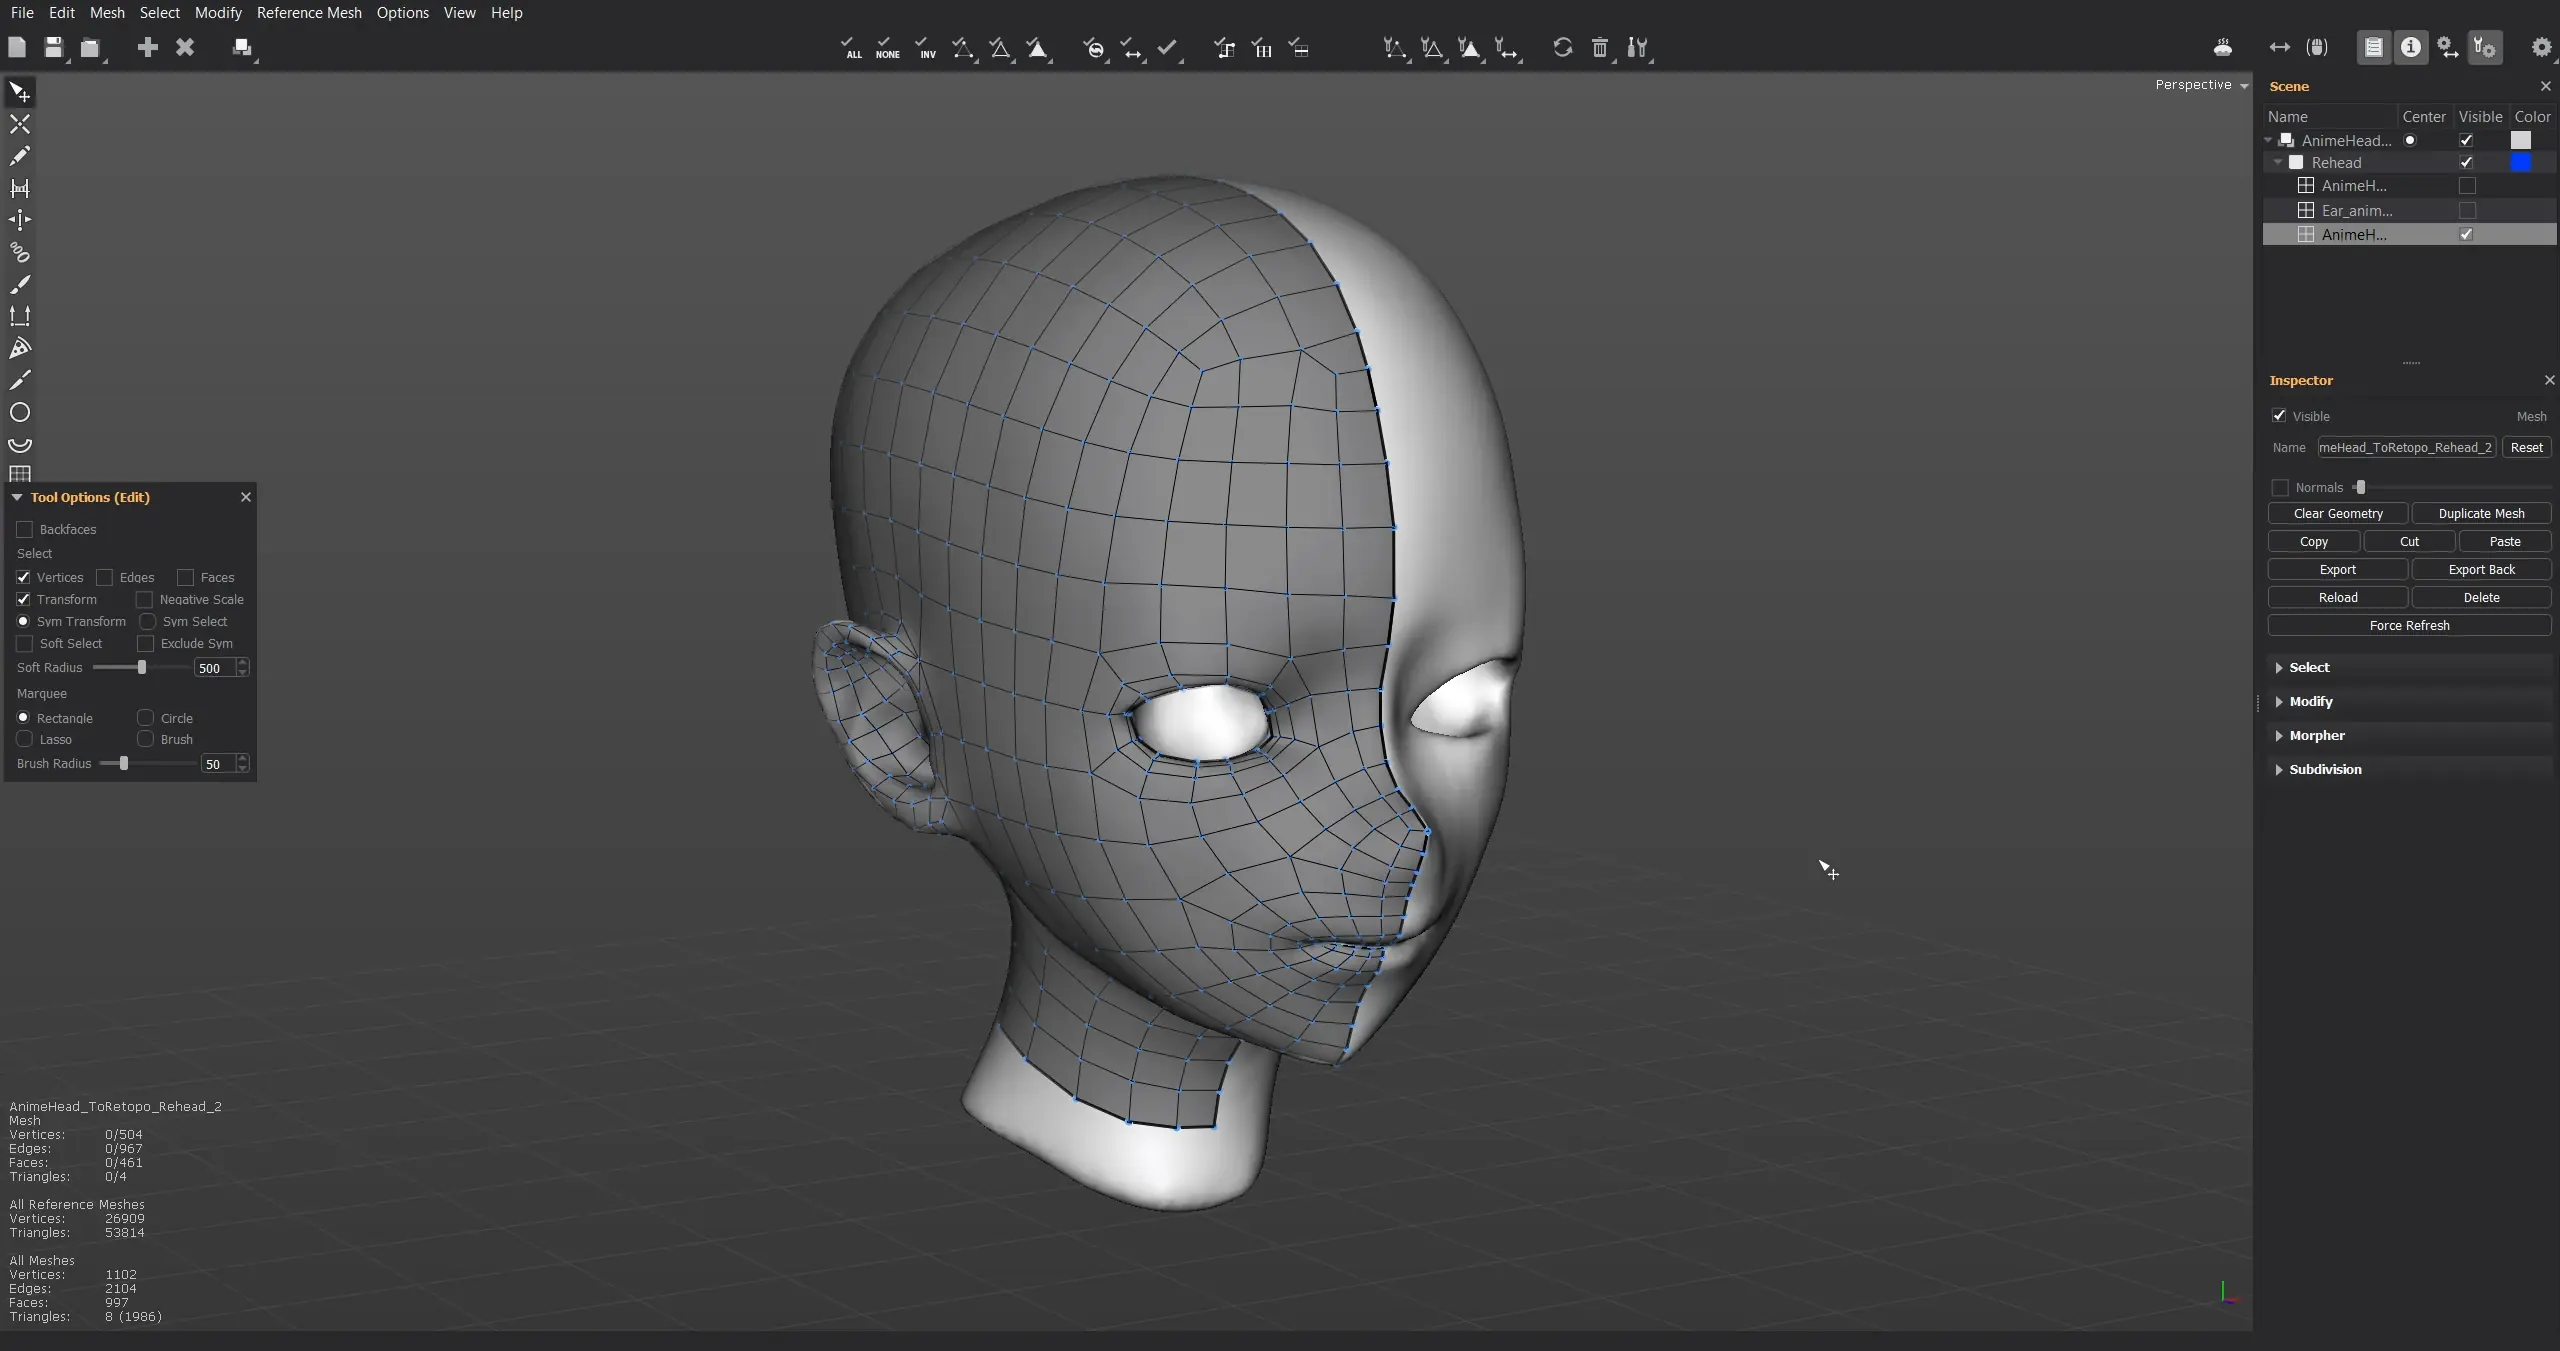
head redone
clothing.
Once the model was posed, I imported it into Marvelous Designer to get some clothing done.
Just as a reminder, I resized the mesh to 1x from 100x in Blender, before importing it into MD.
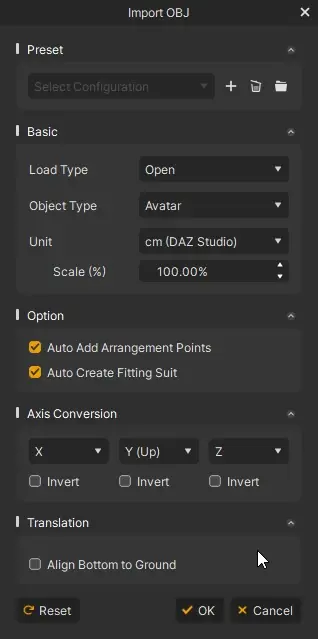
I used these import settings
I gathered clothing references previously, but I waited to find some tutorials here so it was fresh in my memory.
I found tutorials to get me started for the jacket, shorts, and tights, then honestly went by gut feeling to fill in the gaps afterwards.
In general, my process for creating a piece of clothing was:
- Create Polygon half.
- Copy and Paste Symmetry for other half.
- Copy and Paste both halves normally for back region.
- Edit as needed
- Offset Internal Line/Pattern Outline to create outer bands where needed.
- Enable Seam Taping or Elastic where needed.
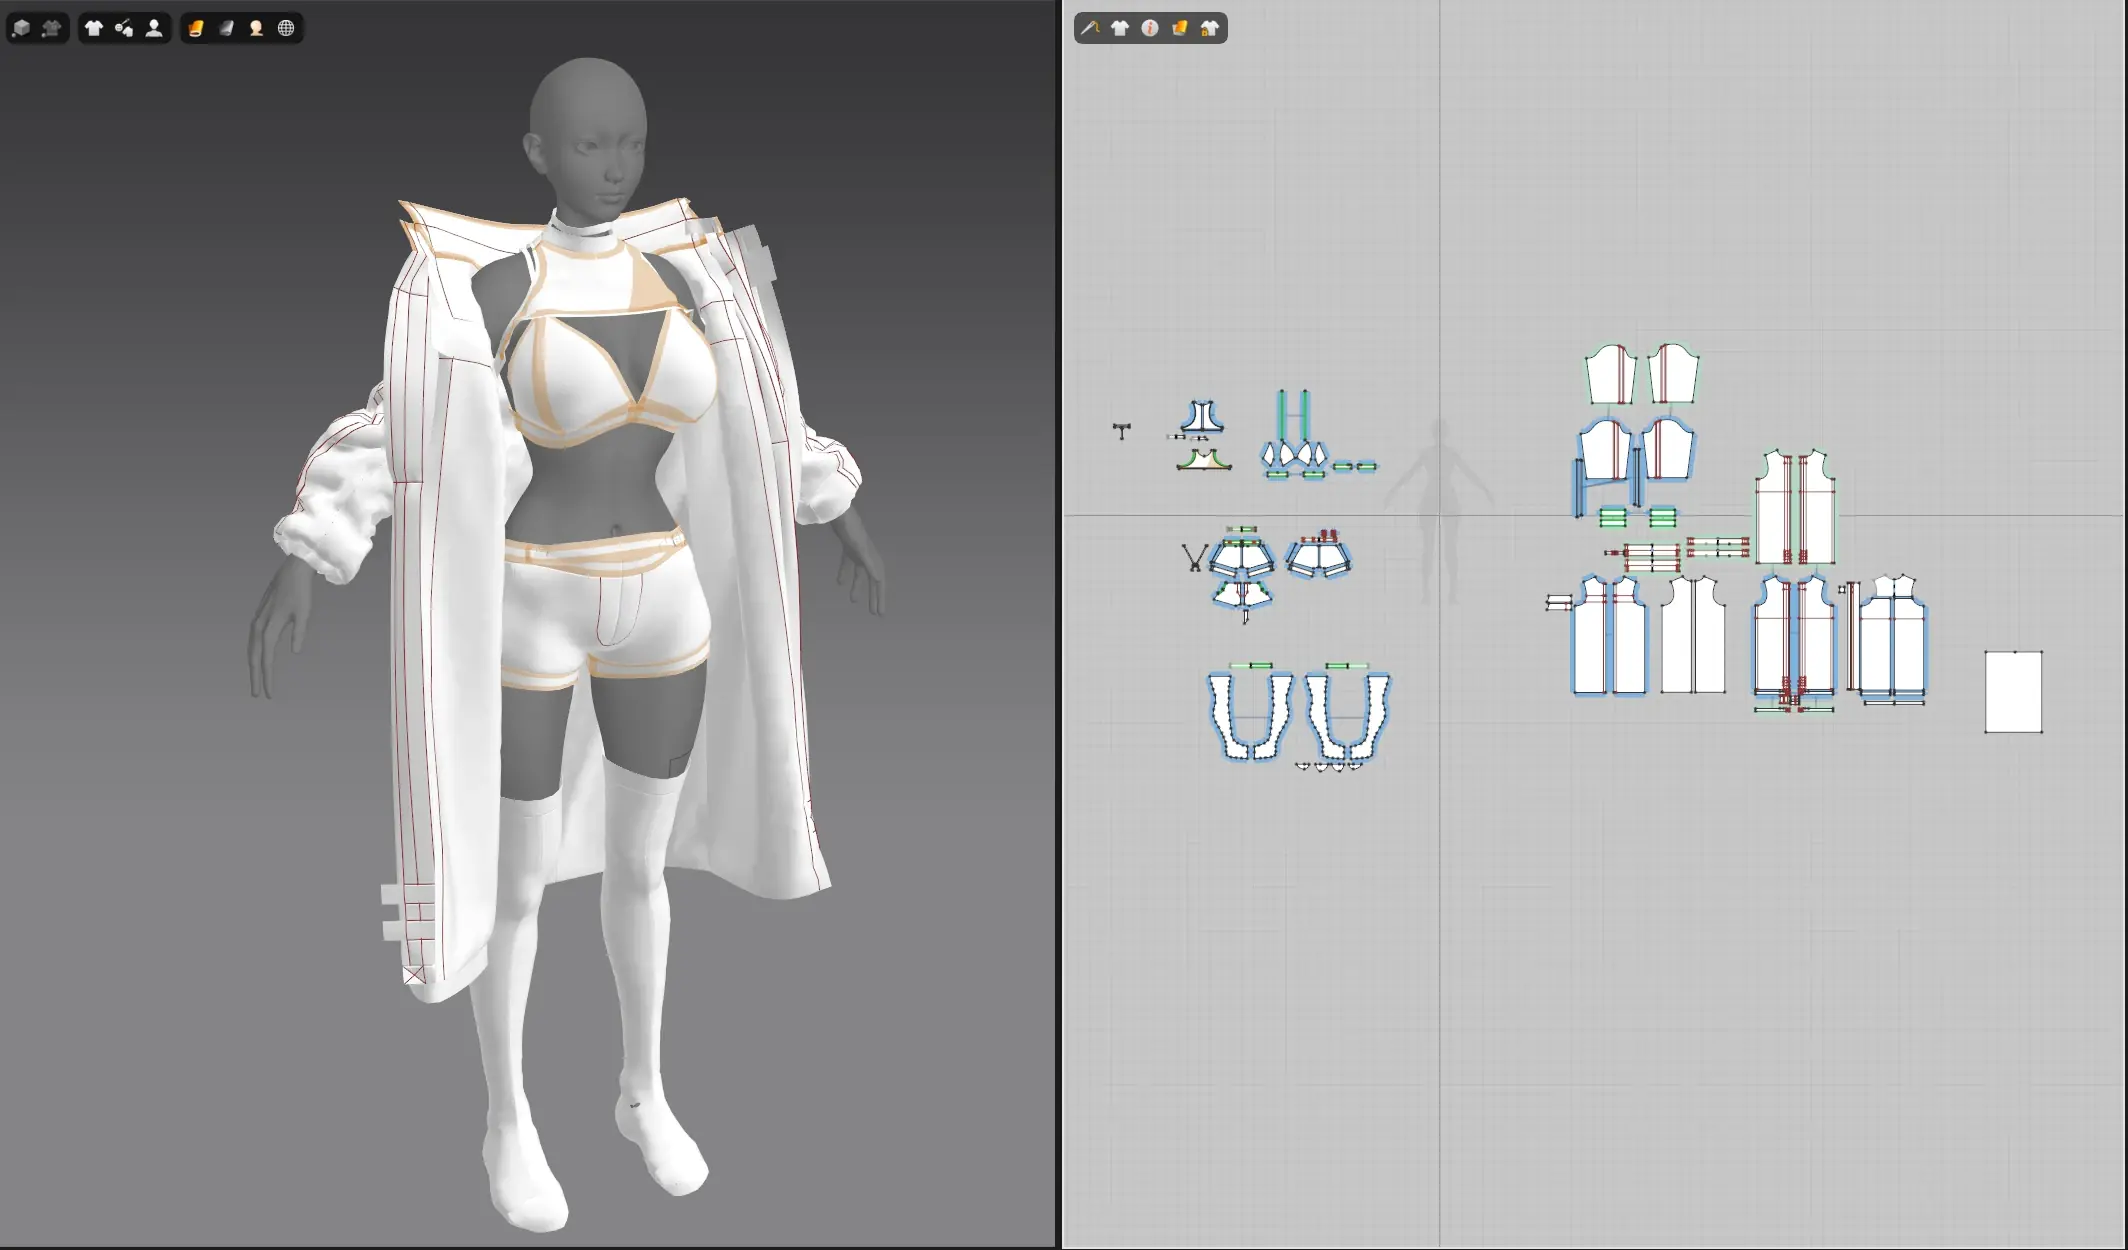
clothing (unposed)
Once the patterns were complete, I imported the posed character mesh to retarget (or fit) the clothing onto it.
Afterwards, I went for another fitting pass on the clothing and finished them with layer clones.
I waited until this point to create the harness since it was asymmetrical and deliberately posed.
For the harness, I imported a torus as a Trim object and pinned a bunch of strips to it. Wrapping the strips around the character and torus without tangling it up was hard, but I couldn't find a more efficient way to do this.
Finally, to pose the clothing, I used pins (Hold W and LMB-drag on clothing) to hold parts of the clothing in place, and set the particle distance to 5mm before disabling the piece of clothing to lock-in the posing.
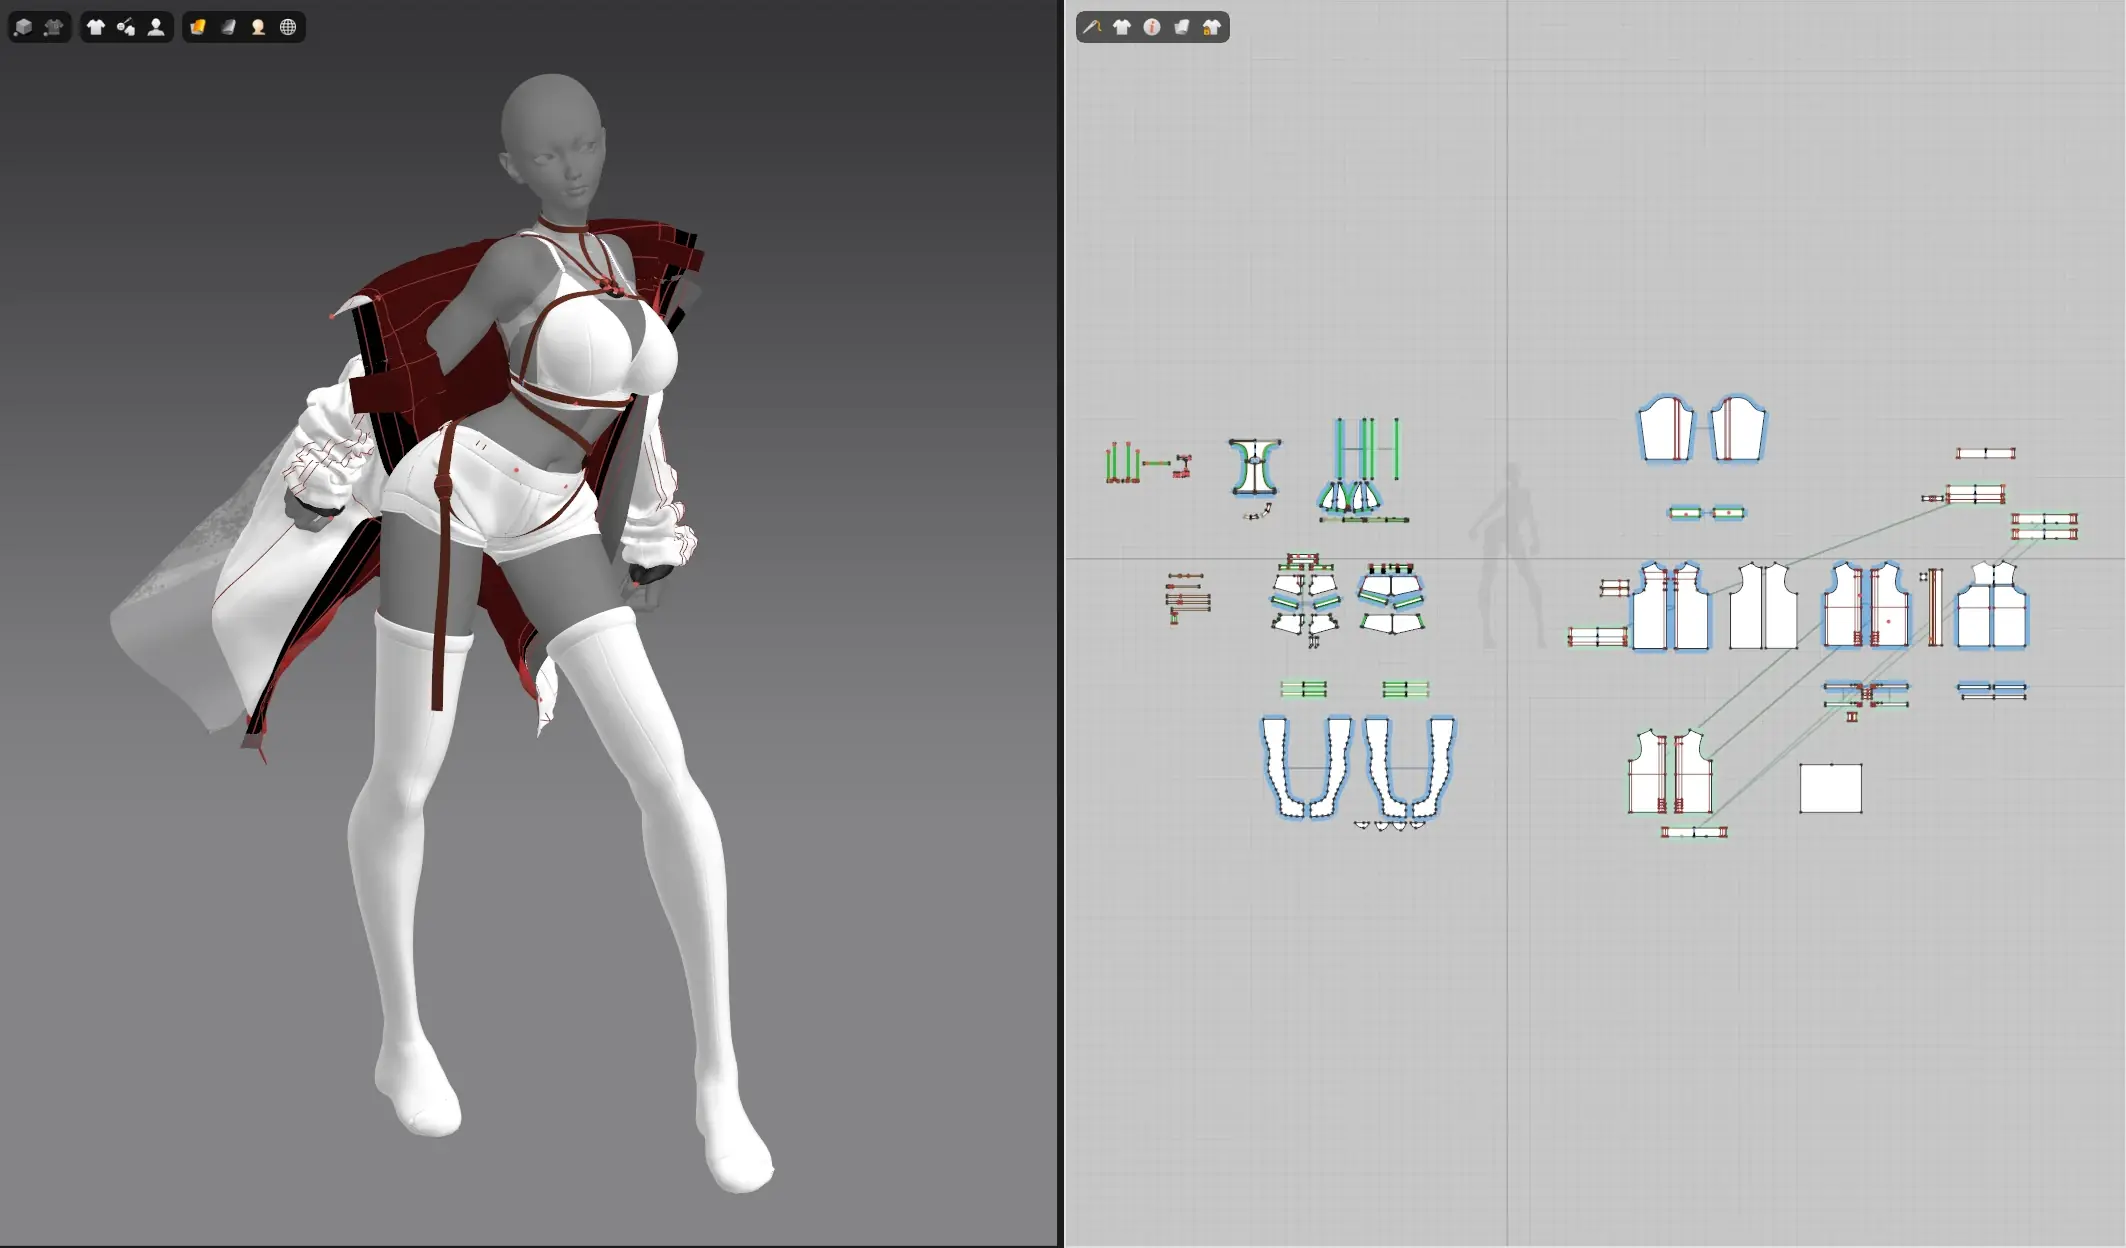
clothing finished
While Marvelous Designer has a Remesh to Quads feature, I found the resulting topology lacking and decided to use Maya's Retopologize function to clean it up.
I used a script to retopologize the clothing in a batch for my previous character project and revised it slightly for this time.
- I removed the import function since it overcomplicated the process, in favor of the next bullet point instead
- I added a button to initialize the meshes, namely updating the dictionary for which clothing meshes to affect based on which was visible. This was a faster and more efficient solution than a modular scroll list function.
- I thought of automatically deleting the previous retopo mesh when repeating the process, but I decided not to, as I might want to compare each result without needing to retopologize a fresh mesh each time.

clothing prep script demo
The script now works as such:
- Import the .objs with _Flat and _Sim as suffixes
- Initialize meshes - rename and add the meshes to a dict
- Retopologize
- Check the results and repeat to finetune
Afterwards, I merged any unwanted seams in the mesh and deleted any unneeded layer clones, before manually moving any vertices to minimize pinching in undesirable areas.
Now back in ZBrush, the clothing goes through a final retouching phase, where I extrude thickness for the mesh and manually resculpt it again.
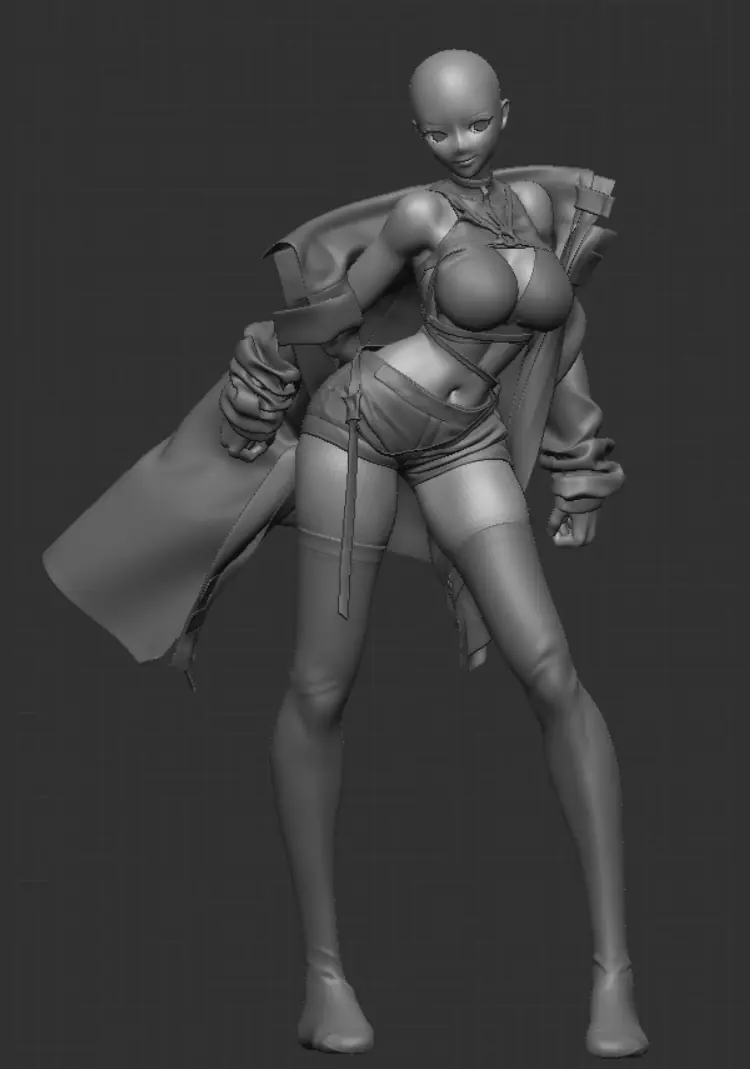
clothing retouched
hair.
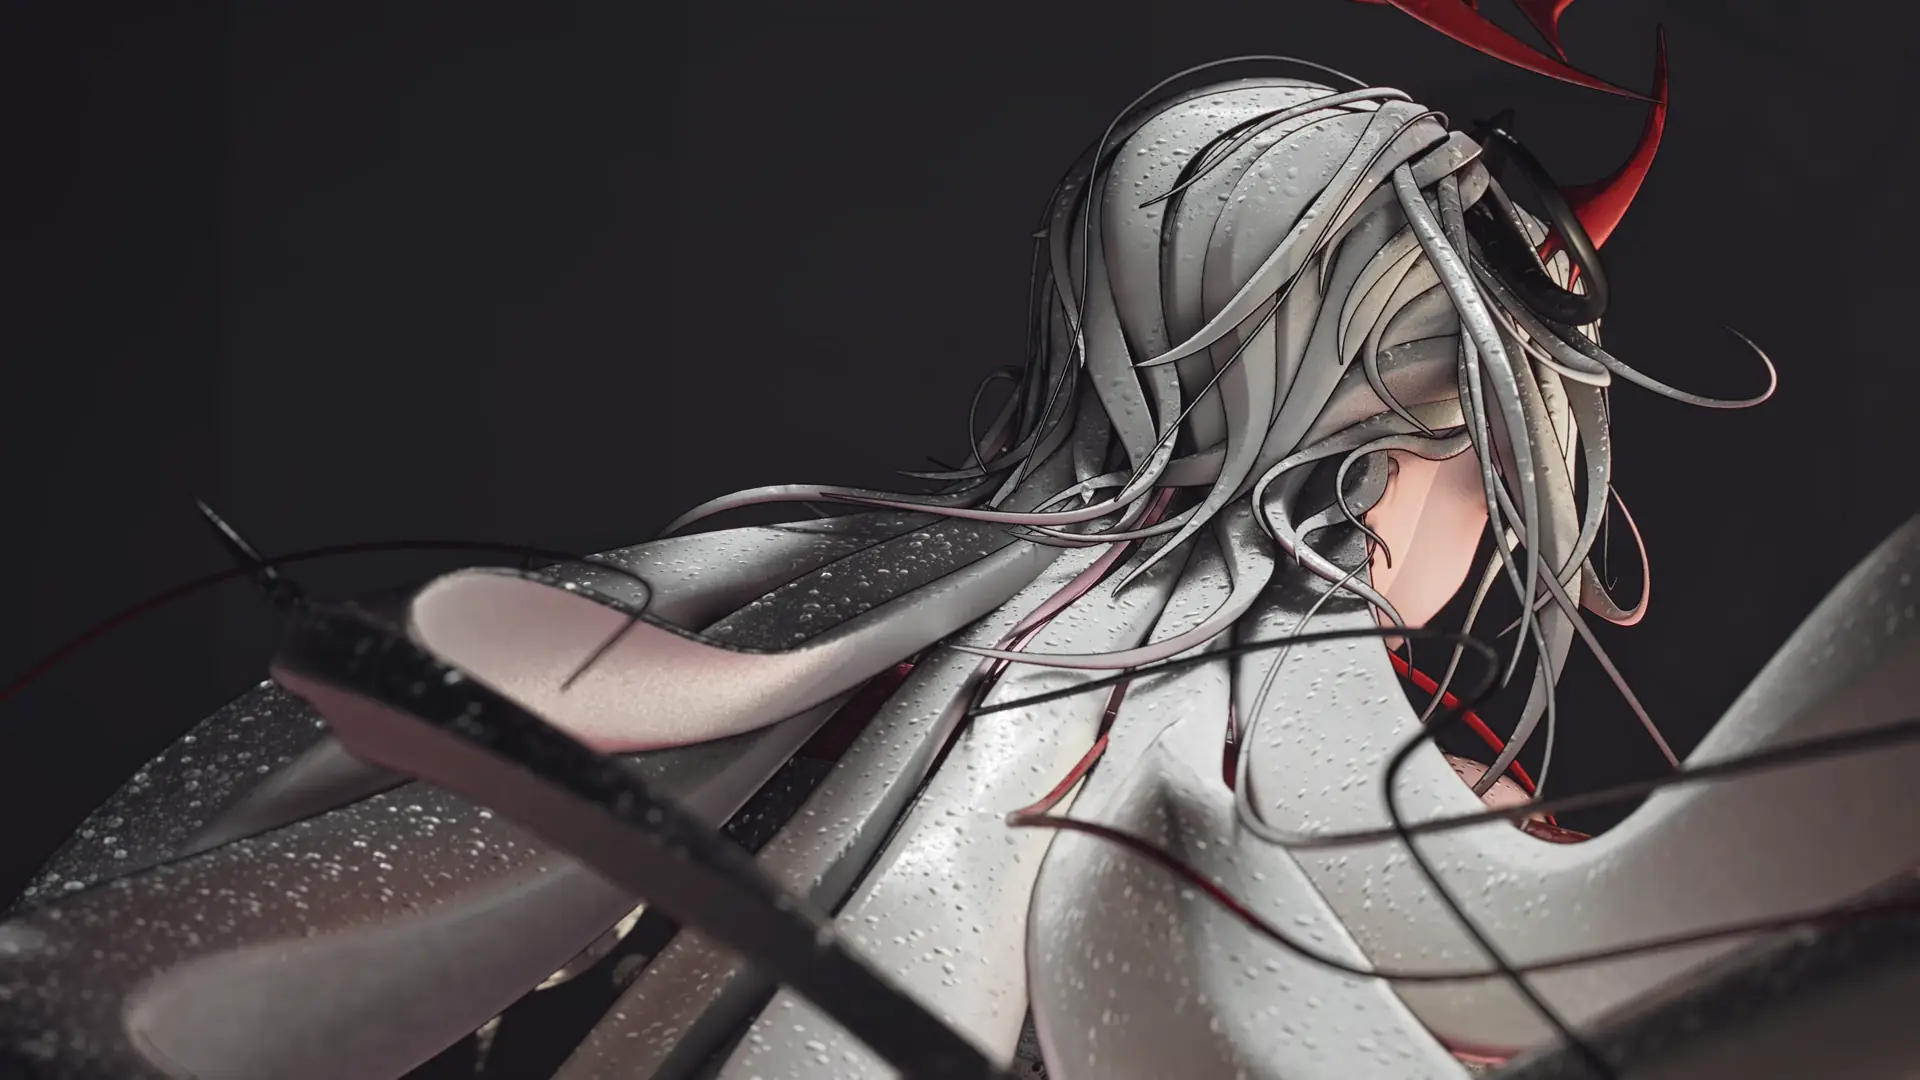
After the clothing was complete, I went to create the accessories and hair in ZBrush. The accessories were straightforward 3D modelling and didn't need explanation, but the sculpted hair was a surprisingly extensive process, as someone who usually does hair fibers instead.
I started with a scalp mesh to cover up any tiny gaps in my hair in the future, and to serve as an initial base.
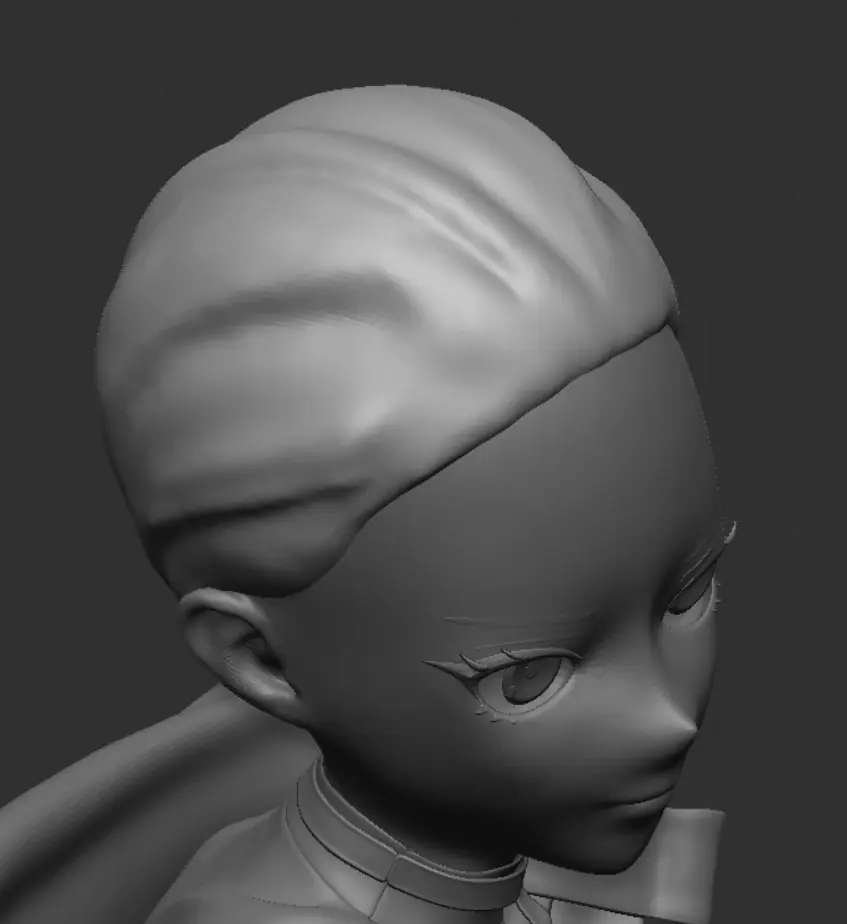
scalp base
At first, I tried a more traditional sculpting method, adding blobs of clay and using the Snake Hook brush to block out some shapes to sculpt on. However, I found this method time-consuming and created annoying topology to work with, so I changed my approach to use an IMM brush instead.
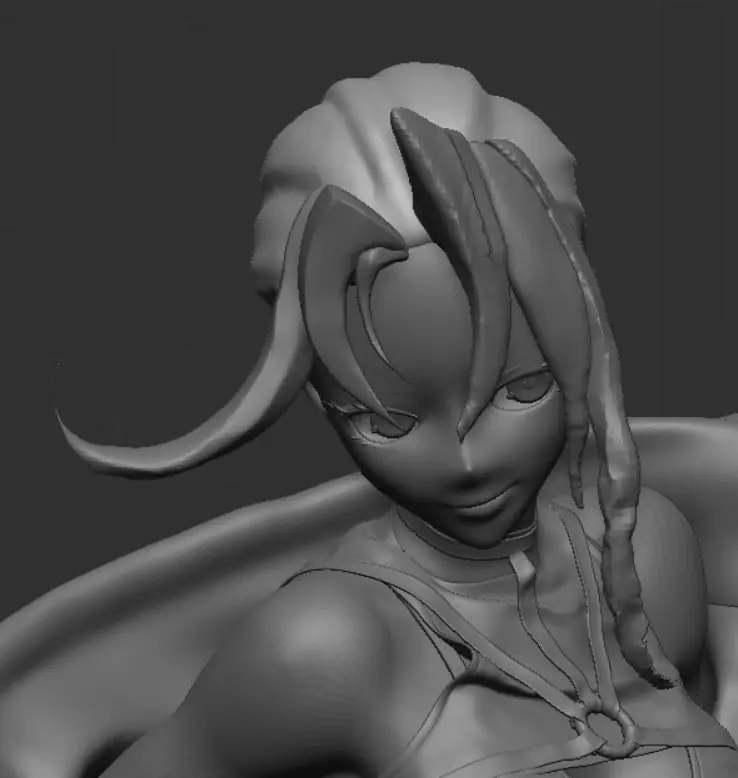
horror
After testing a few brushes, I settled on an IMM brush from MrNunez to block-in the hair strands, making sure to get the overall shape right before exiting from the curve mode for each strand.
My workflow consisted of using a tiny QCube as a dummy inside the head, which I make active when adding a new IMM curve. This makes the hair strand easy to isolate and separate into its own object.

Example usage of QCube method
In the process, I found the Picker Depth menu very useful to prevent unwanted behavior while positioning the curves. Since I used it very often during this stage, I attached these buttons to the bottom of my ZBrush UI.
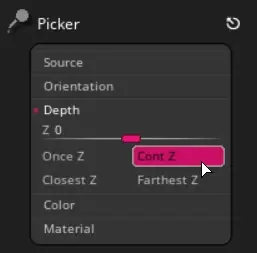
picker depth menu
For instance, I set it to Once Z when trying to position a hair end inside another mesh such that it only samples the Z Depth once; when the cursor is first clicked and dragged to move the curve.

Once Z Demo
Using the default of Cont Z would continuously sample the Z Depth while dragging the curve. Thus, something like this can happen for someone with a lot of objects in the scene:

Cont Z Demo
At this point, I actually started the unwrap process and found that there was an insane amount of non-manifold geometry.
I realised that the hair ends tended to cause this if they were scaled down too much, causing the end to fold into itself.
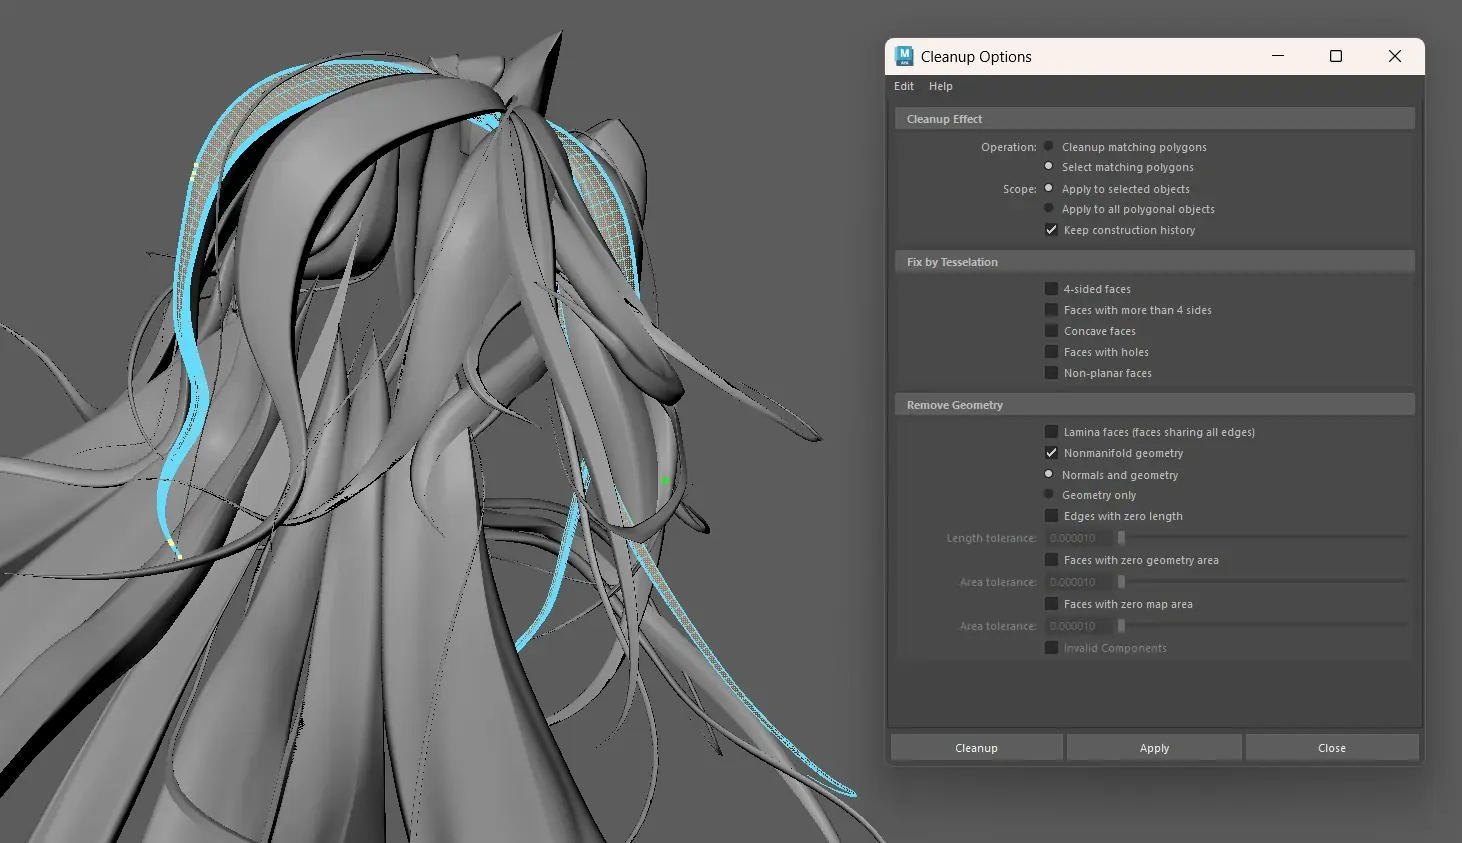
non-manifold hair
To remedy this, I went back and deleted the ends, then scaled the end vertices together so closely that they appeared closed without truly merging them.
This also let me unwrap them into clean and straight UV shells later.

Scaled down hair ends
unwrap.
Once all meshes were complete, I started UV unwrapping them for texturing.
As an initial precautionary measure against bad geometry in ZBrush, I used Check Mesh Integrity and Fix Mesh. Then, I hid anything I didn't want to include in the unwrap process. Once that was done, I used Transpose Master > TPoseMesh to combine the meshes into one, which I then export as .ma.

Meshes combined using TPoseMesh
This then gets imported into Maya, where I check the mesh again with Cleanup. At this point, I found the non-manifold geometry in my hair mesh that I mentioned earlier. After sorting that out, I export it as .obj into RizomUV to unwrap and pack into one UDIM (for now).
Previously, I actually separated the mesh based on the material slots which I planned to have, unwrapped each mesh as their own .obj, then imported them into ZBrush.
However, I found that there was no elegant solution to make this work, as the separate/combine process would change the point order in the mesh and render it unrecognizable in ZBrush, preventing it from properly overwriting the old mesh and causing weird artifacts in the UV shells.

Importing error if I separated/combined previously
I tried copying the point order from the original mesh over too. While it does prevent the error window from appearing, it still causes artifacts within the UVs.
Thus, my revised process delays the separate/combine until I actually finish everything I want to do in ZBrush.
turntable.
I had a first version of the character where I skipped this due to time constraints, but I decided to include a turntable in the final version.
To create a base, I started with a Cube in Blender, and applied a Cell Fracture modifier from an addon of the same name. I apply it another time to some fragments to vary their sizes more.
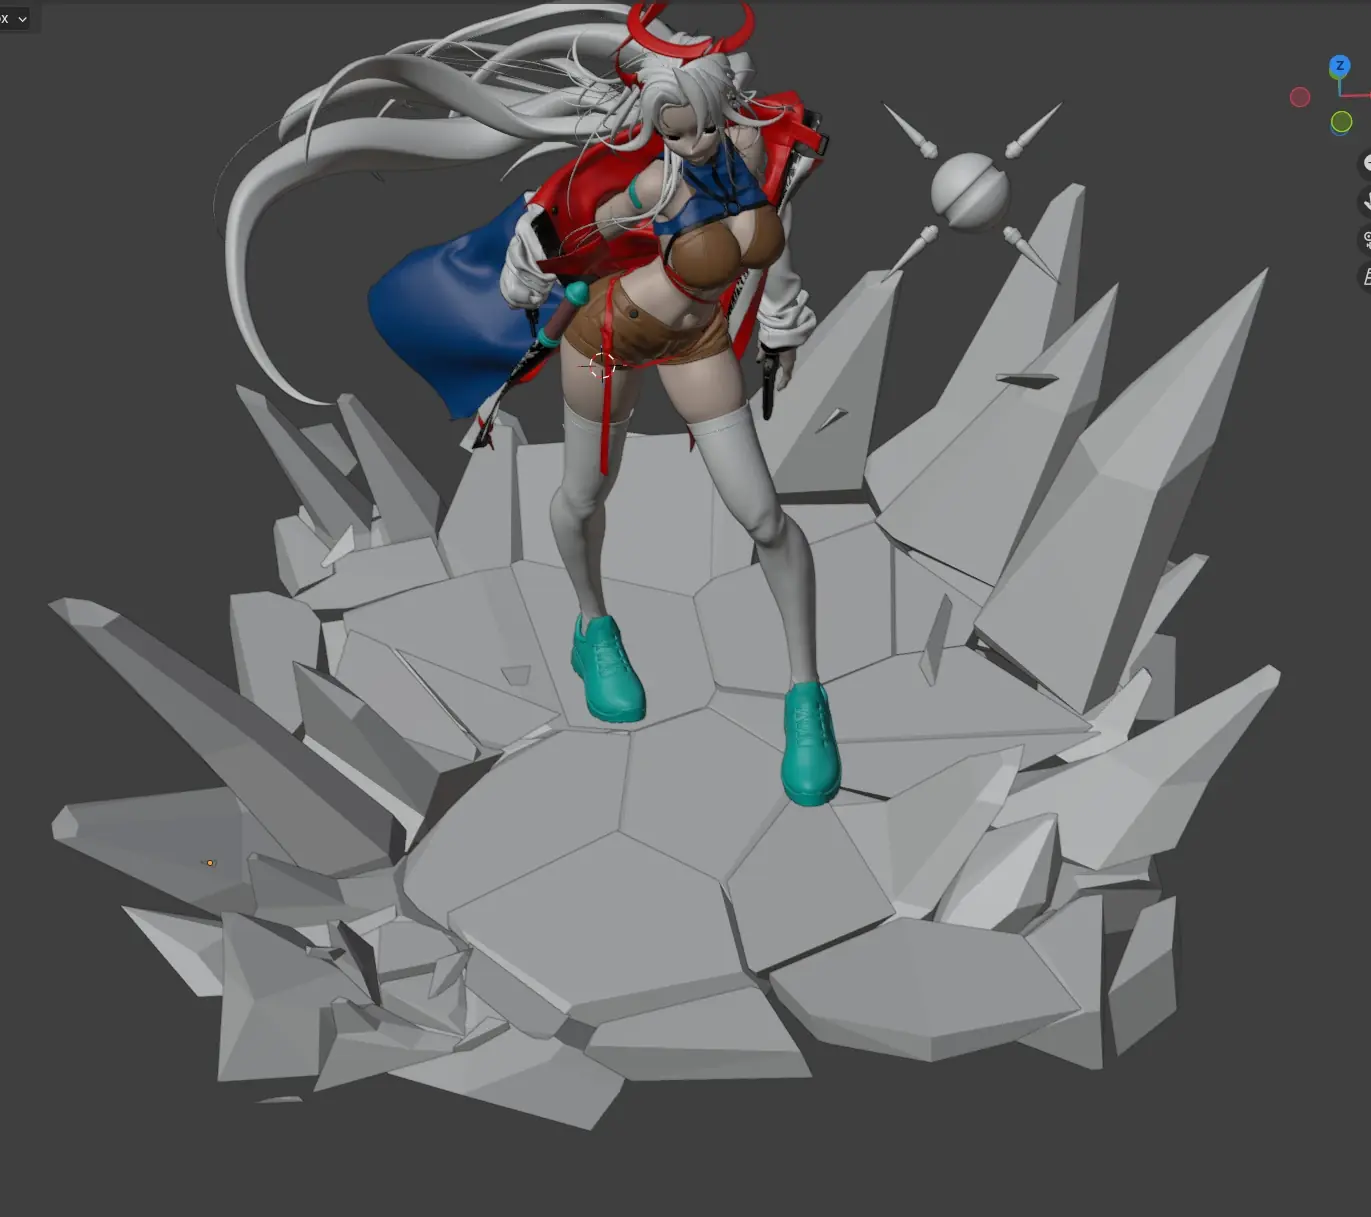
turntable base created using cell fracture
Afterwards, I brought it to ZBrush to sculpt it proper.
I first used the ClayBuildup brush (surprise!) for the initial volume, then moved on to the TrimSmoothBorder brush with Alpha 28 for mid/tertiary detail.
After some sculpting, I ended up with this turntable mesh.
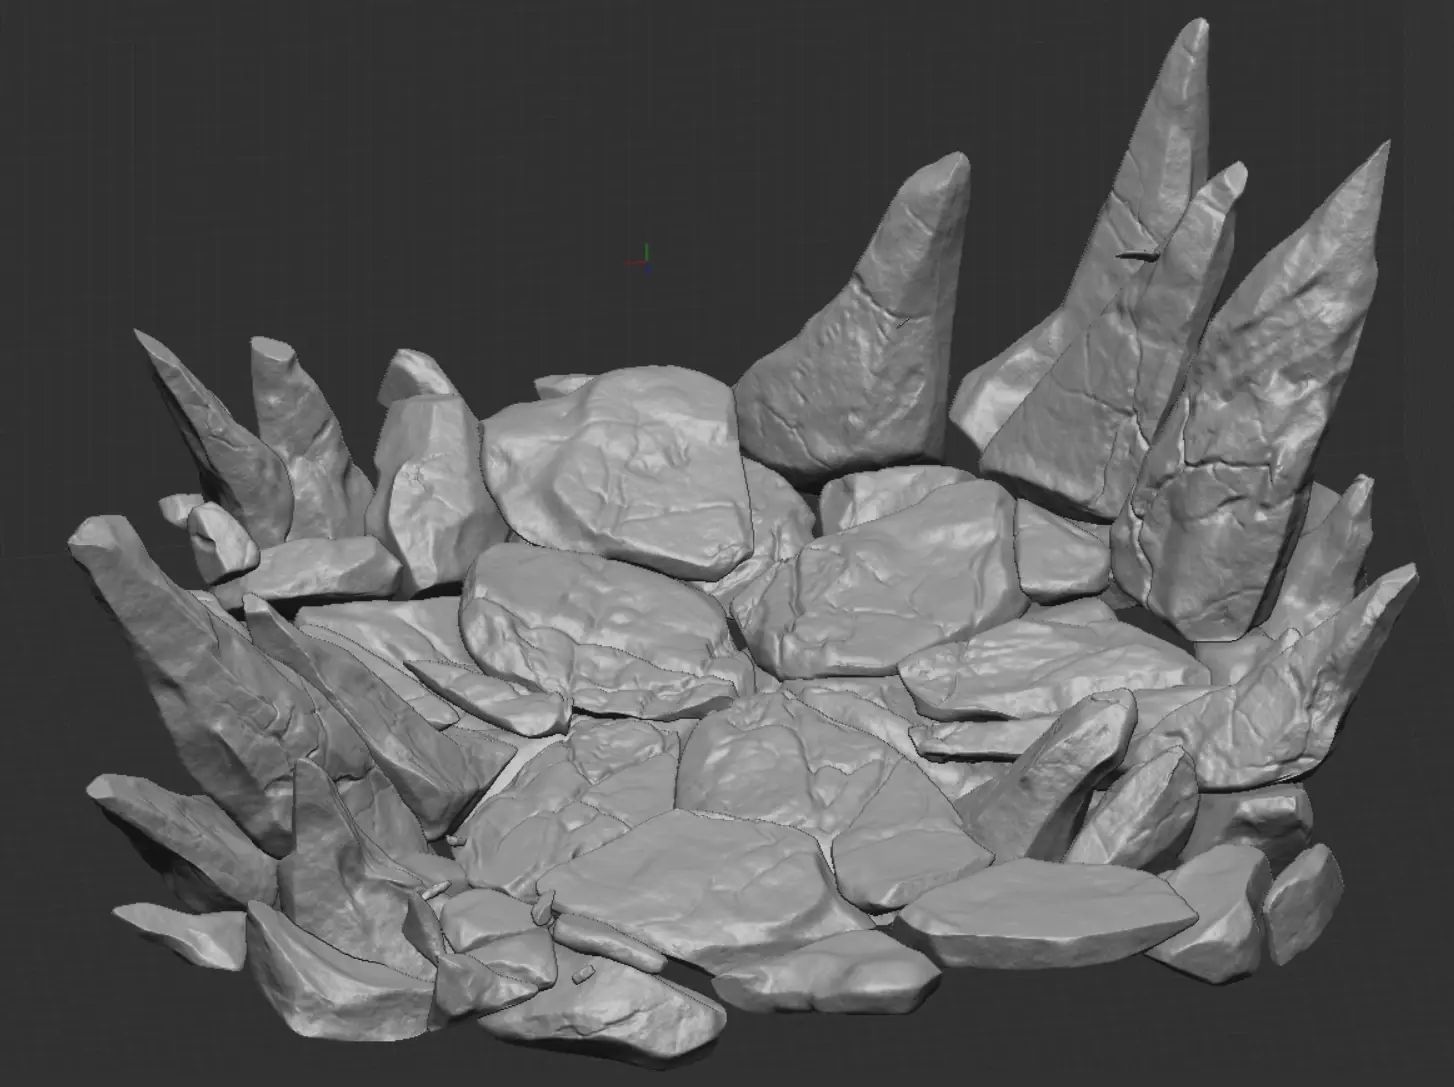
the turntable mesh I ended up with after some sculpting
texturing.
Now that the meshes are all finished, we're moving on to texturing in Substance Painter.
I like to texture in a ground-up, structured manner starting from base colour and subtle roughness/height variation, then moving on to tackle more characteristic elements of the material, and finishing with dirt/edge wear if appropriate.
I'll start with the jacket's red metallic material. As advertised, I start with a base colour and subtle Clouds 2 roughness variation.
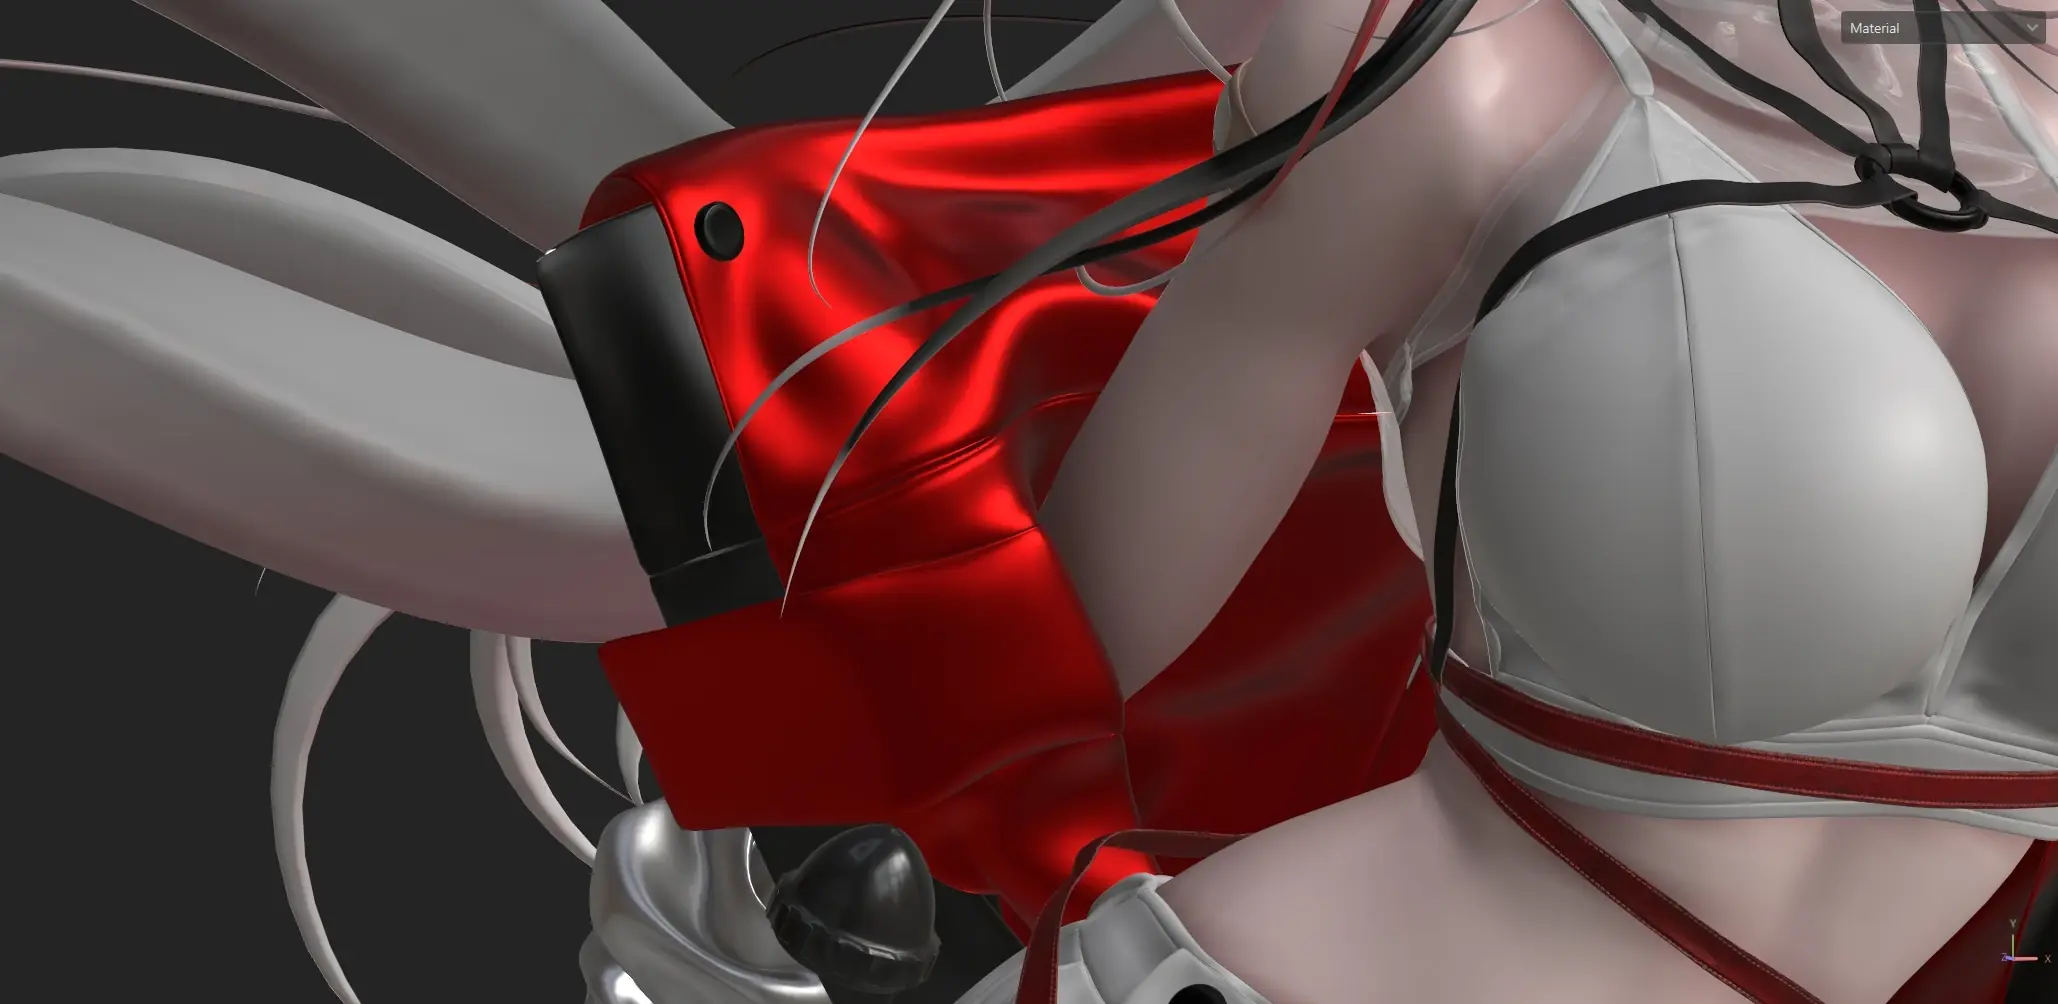
base colour pass
Then, I added a crease pass using a Creased map driven by a Curvature generator mask to isolate the effect away from the seams and edges. I'd like to credit Artin Azarnejad for this really simple yet effective method for creasing fabrics.
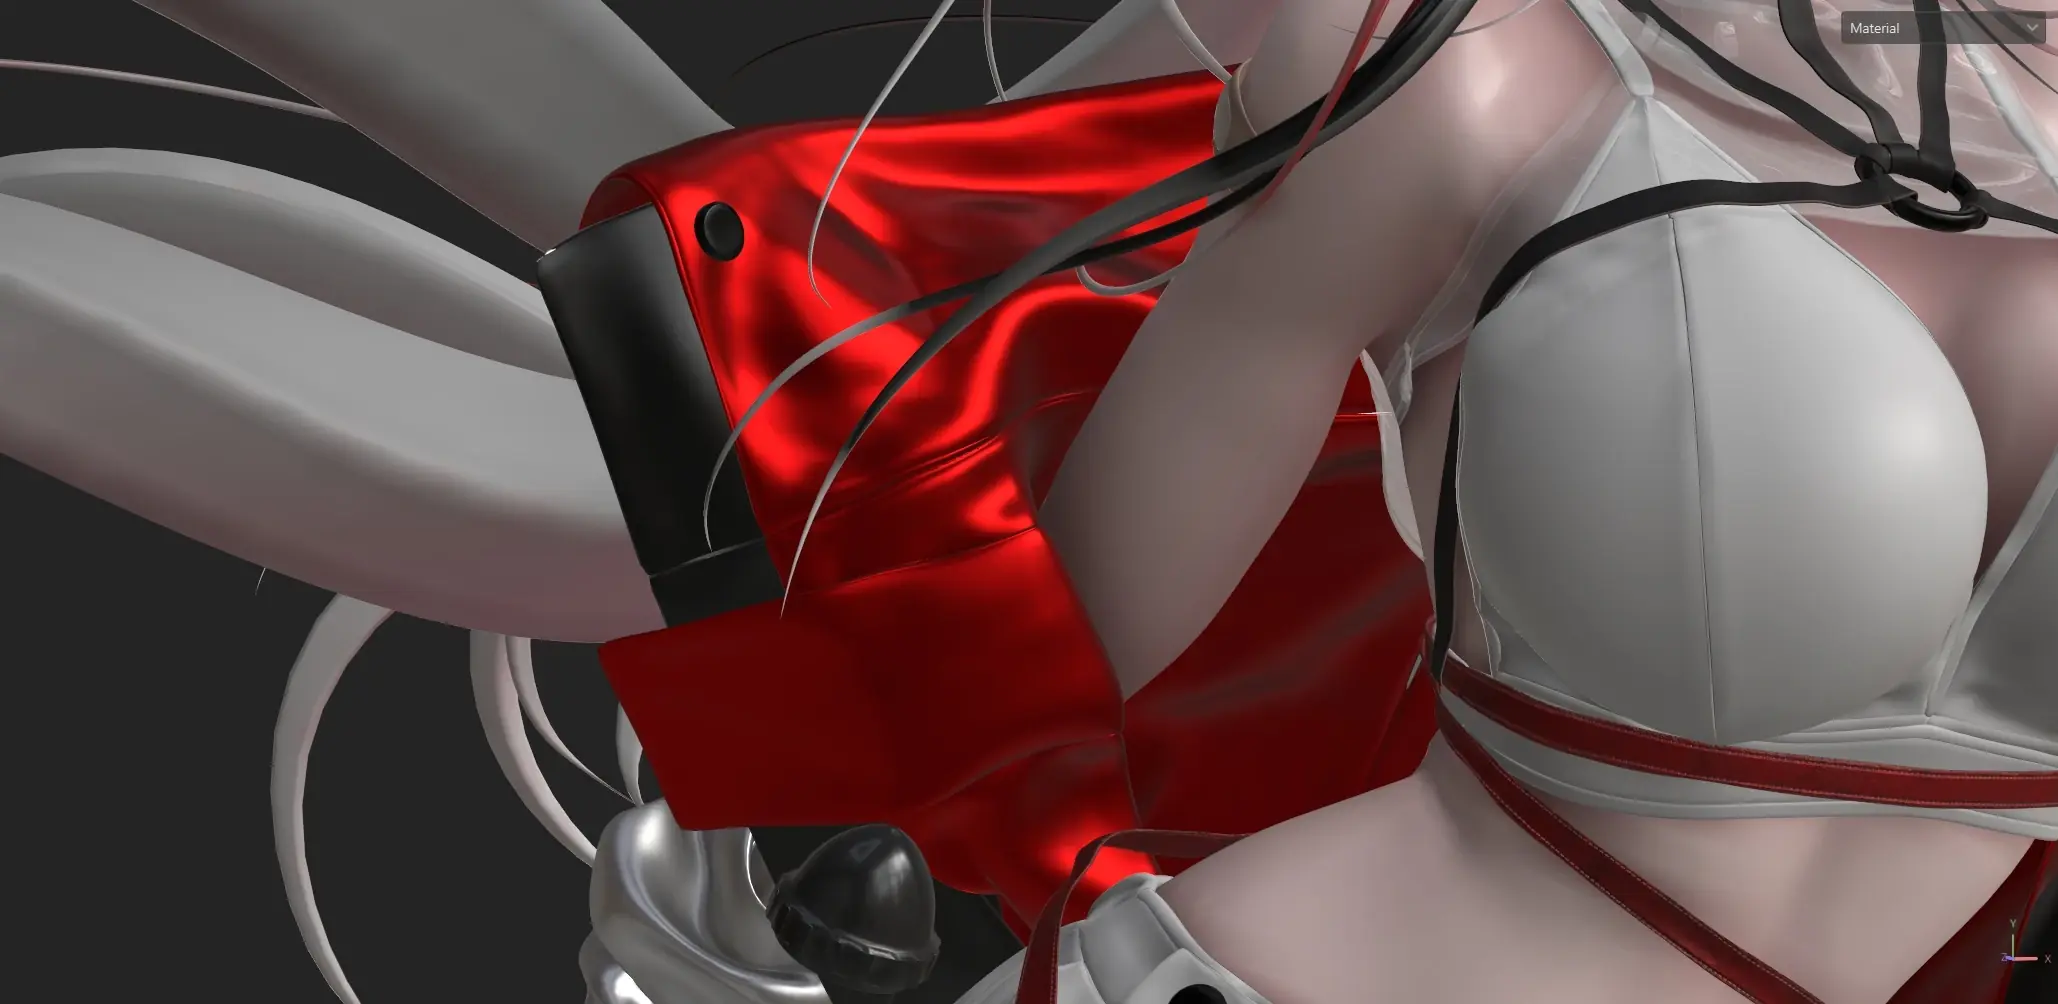
before
after
creased pass
Afterwards, I added fabric patterning to move into tertiary detail using Fabric Diagonal, then Fabric Circular.
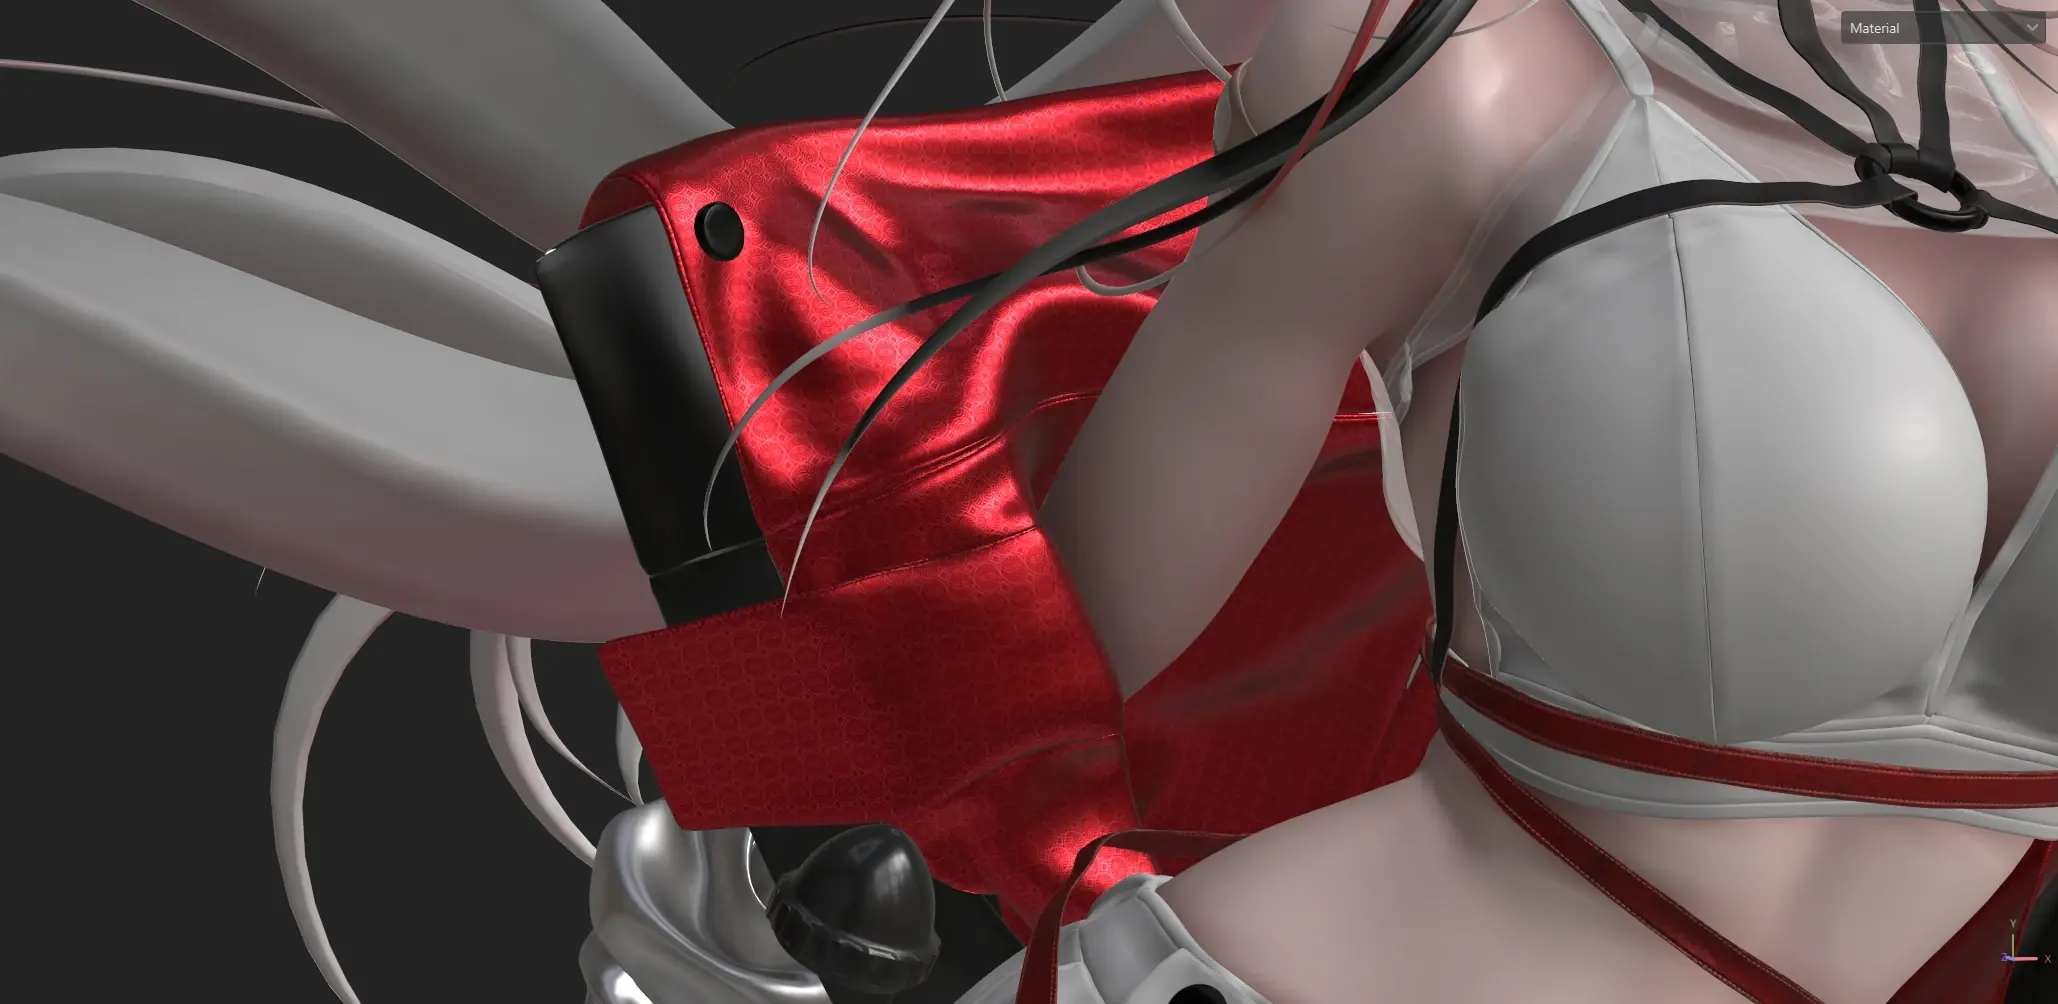
fabric pattern
I also decided to add more height around the seams again using UV Border Distance.
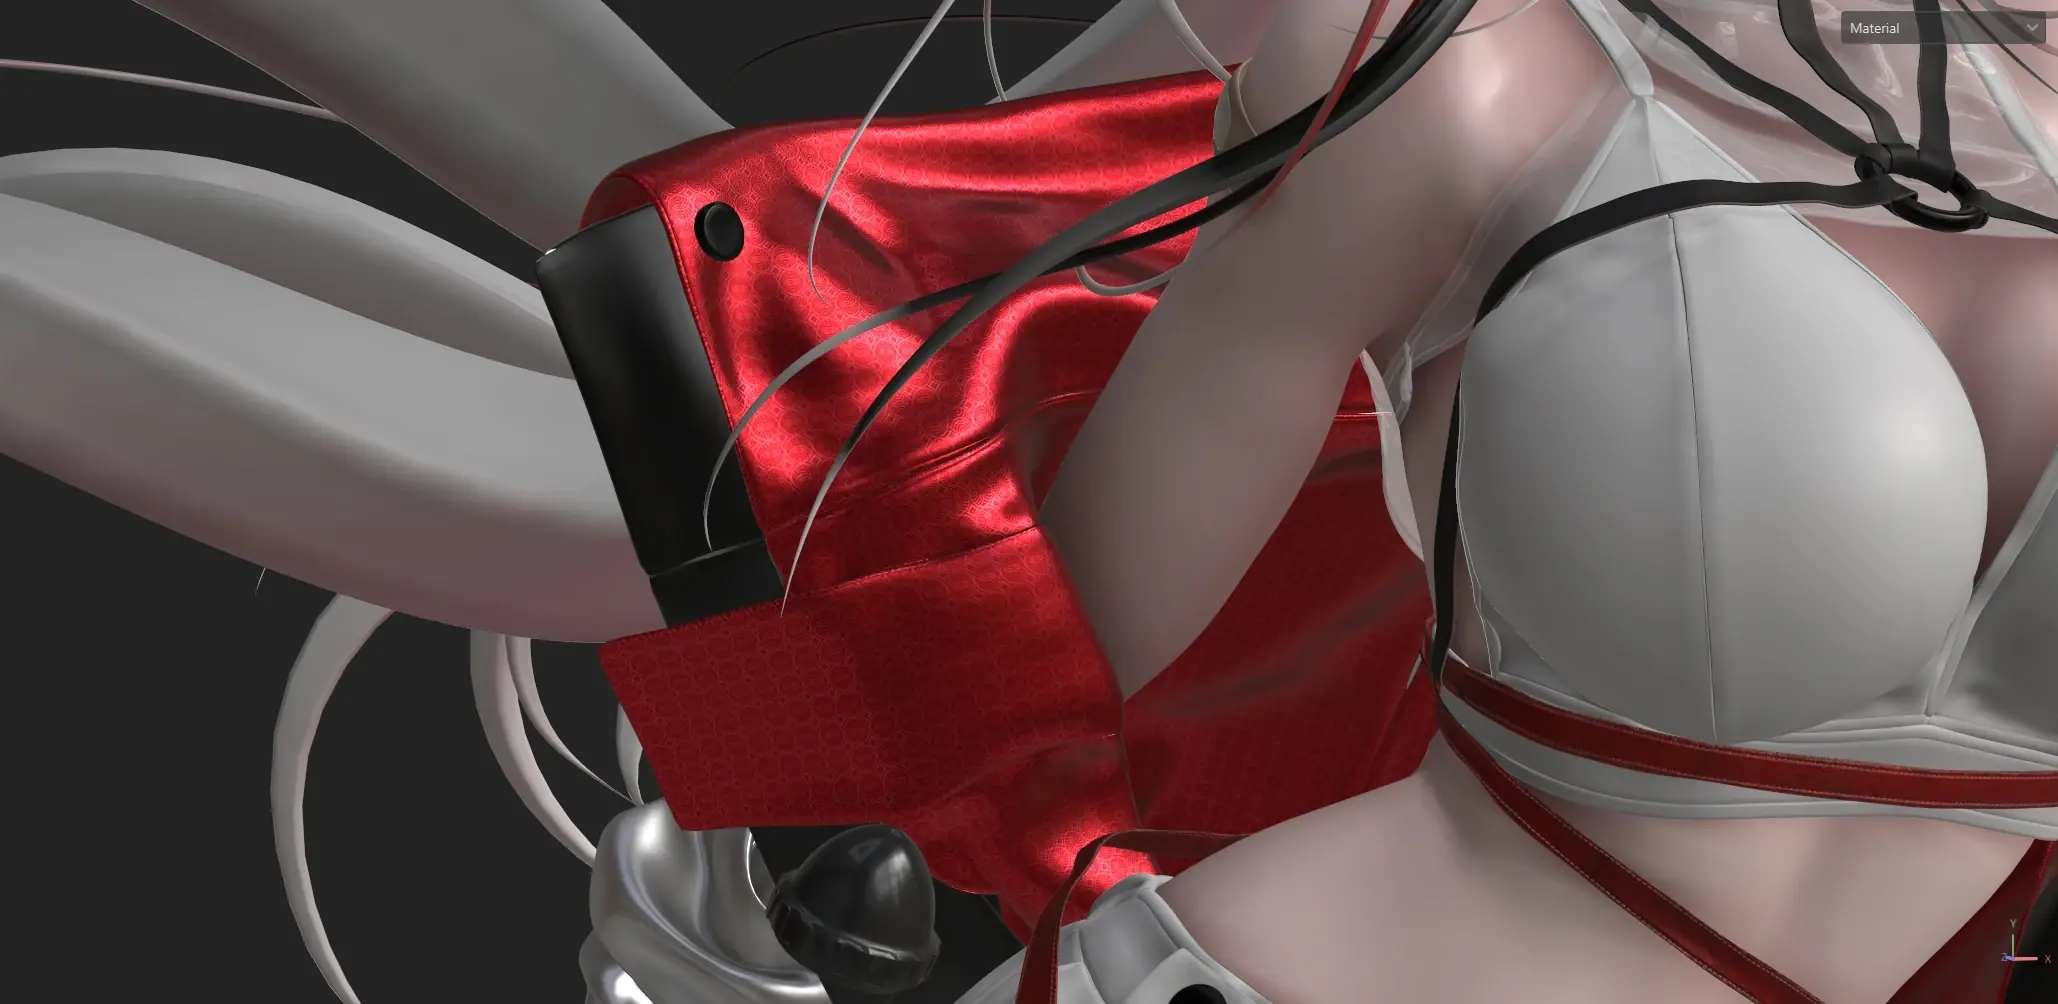
before
after
thickening near the seams
With most of the material settled, I added the extra decorative elements.
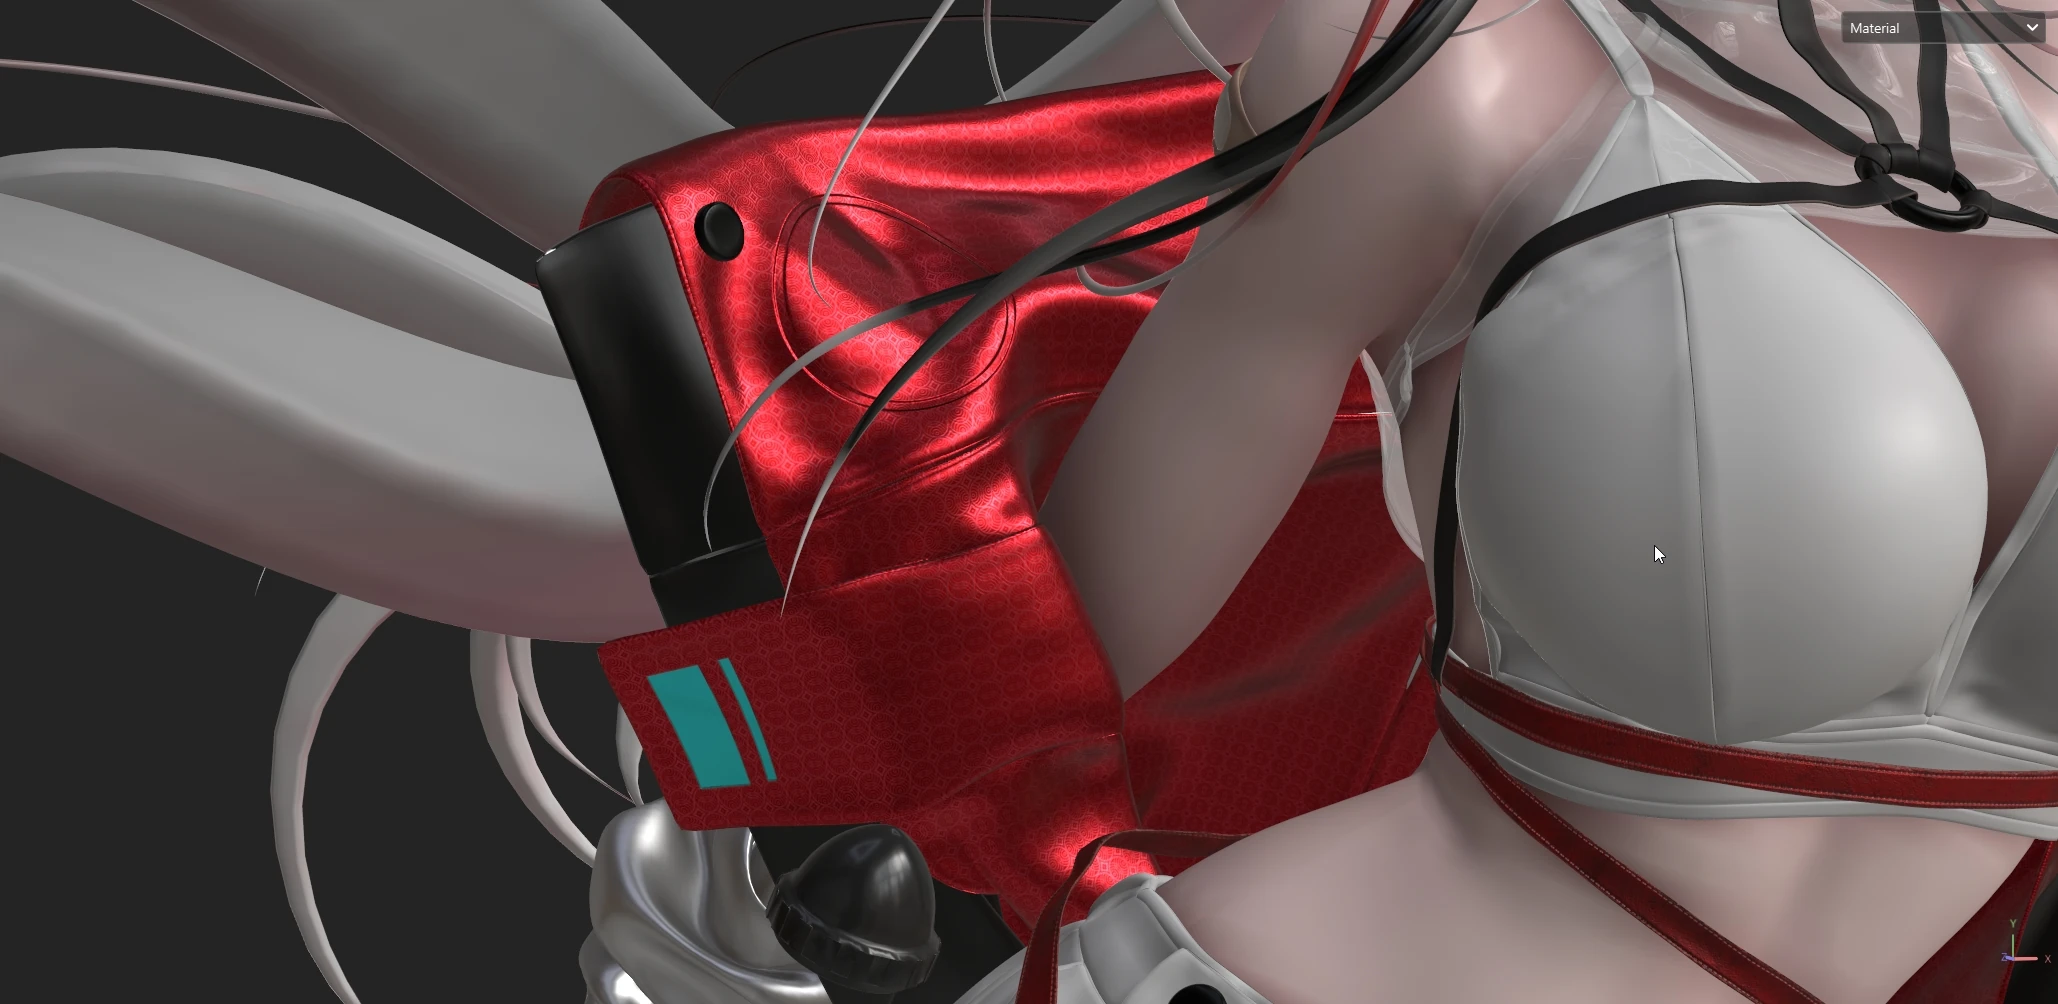
extras
Finally, I added topstitching. For this, I drew paths onto the mesh, then applied a topstitches material onto it. The fact that the paths are made of bezier curves let me approach and edit each path individually, and in a non-destructive manner.
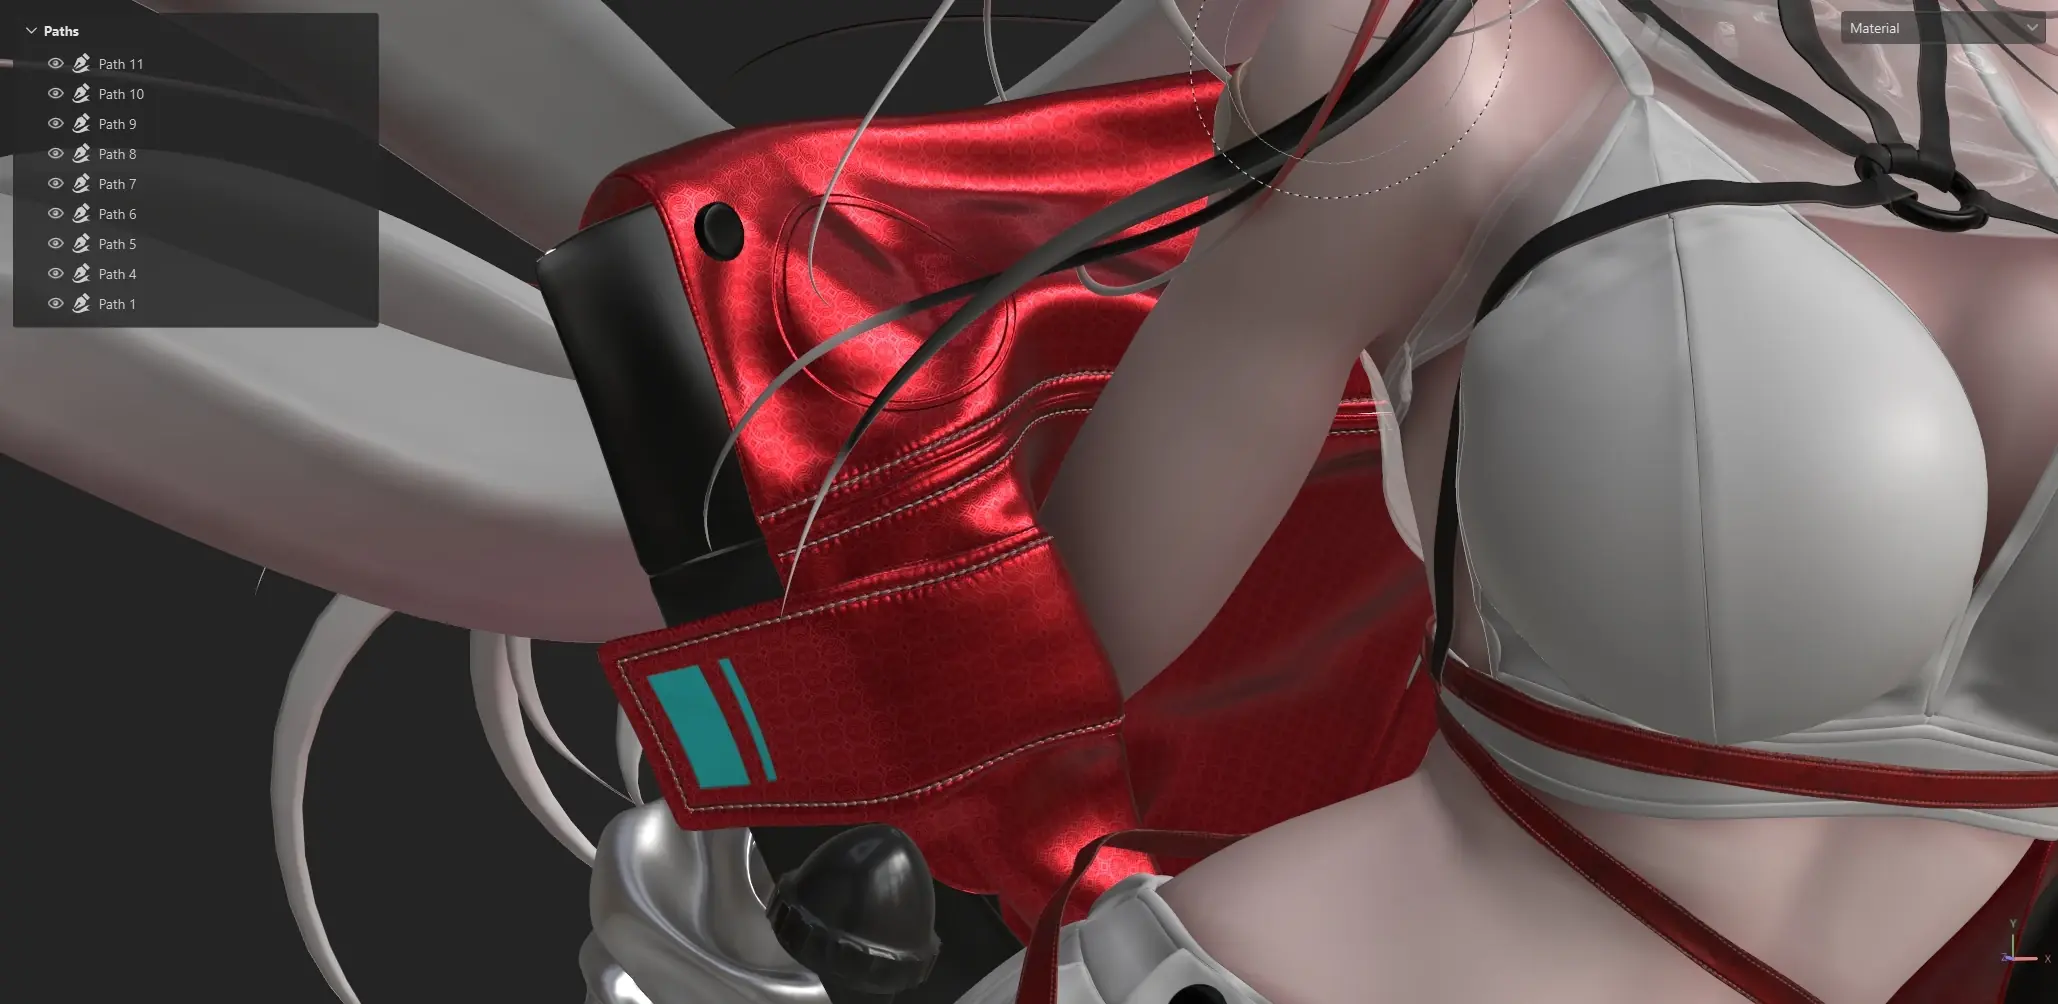
topstitching
I did the turntable in a separate project file since I did it later, and my existing project file with the character was already quite heavy.
My process here was not too special. As usual, I start with a base colour with a bit of roughness variation using Clouds 2.
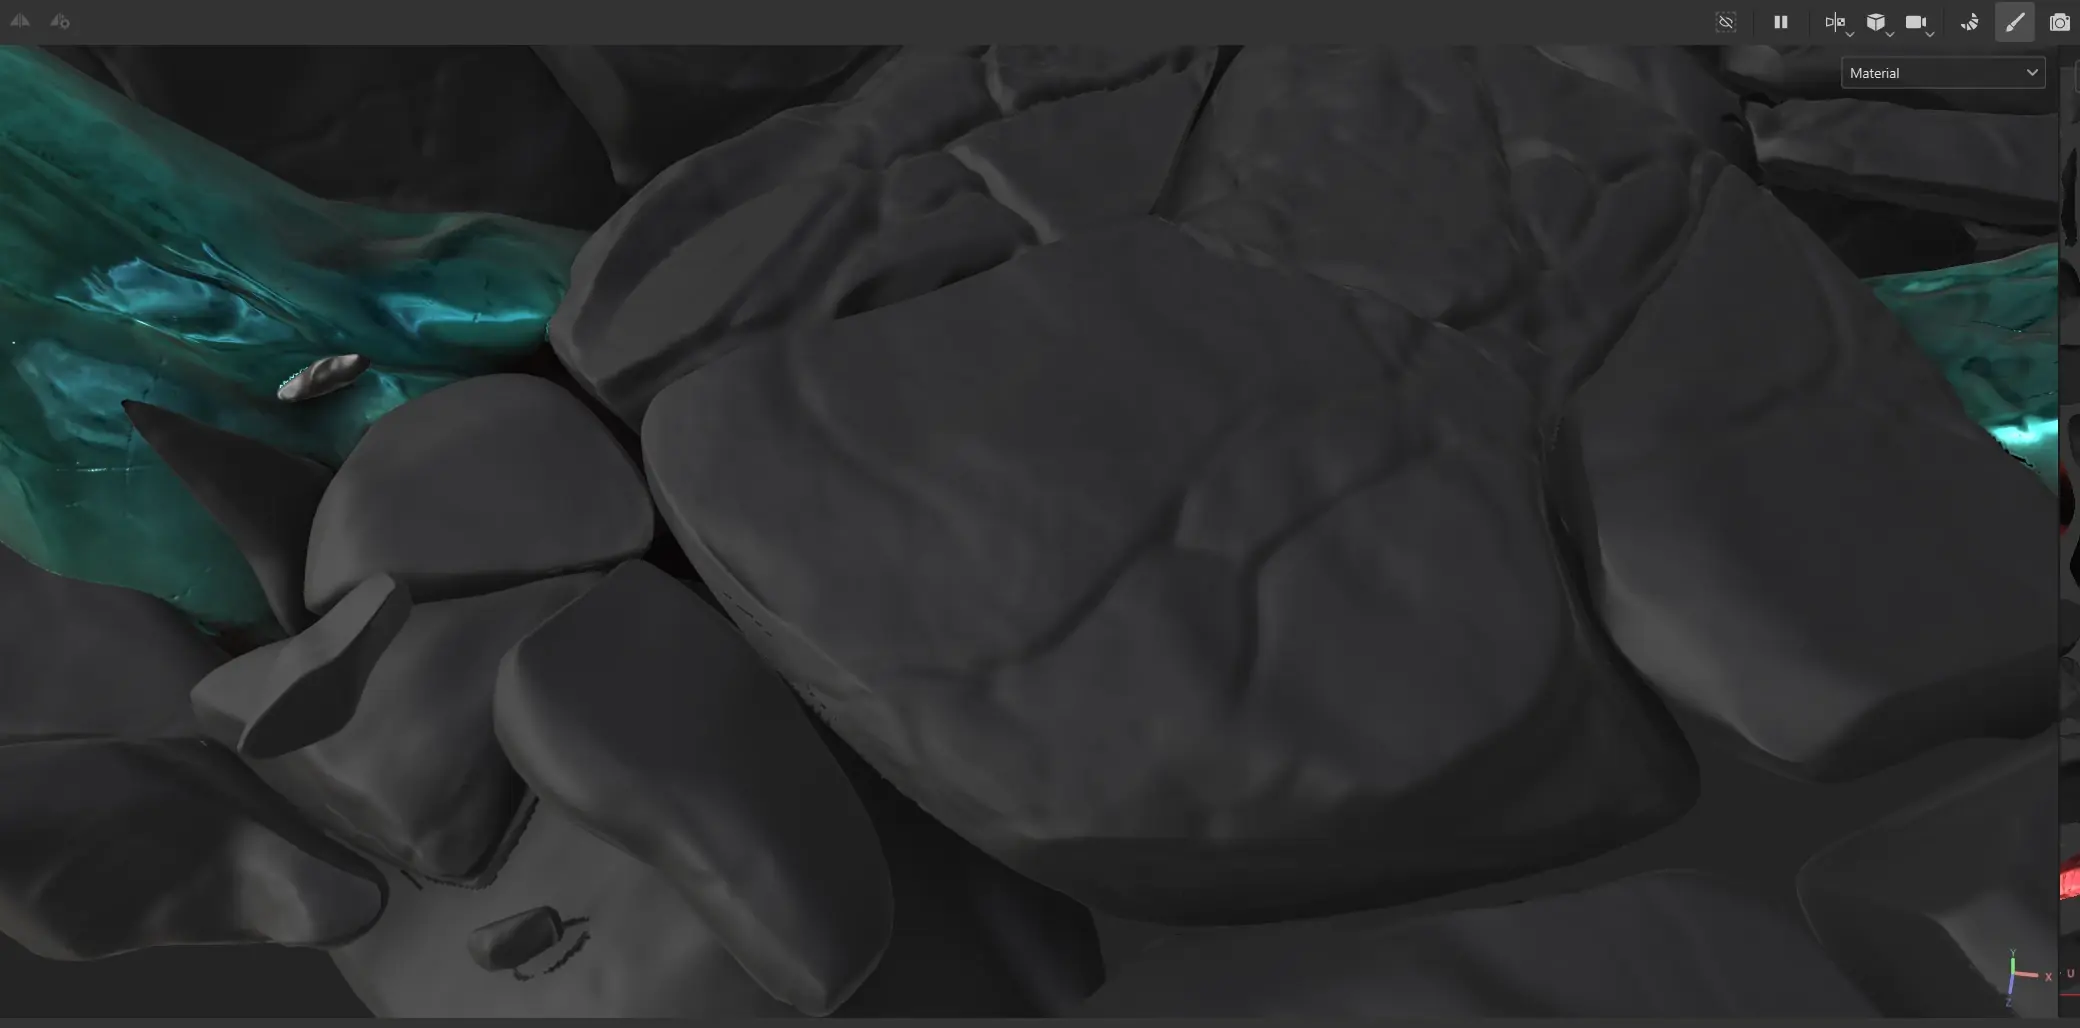
base colour pass
Then, a few layers for the height just using the grunges available in Substance Painter. I used Fractal Sum, Grunge Stone Details and Clouds 2 for some grunge maps, then intensified it with a Blur Slope filter.
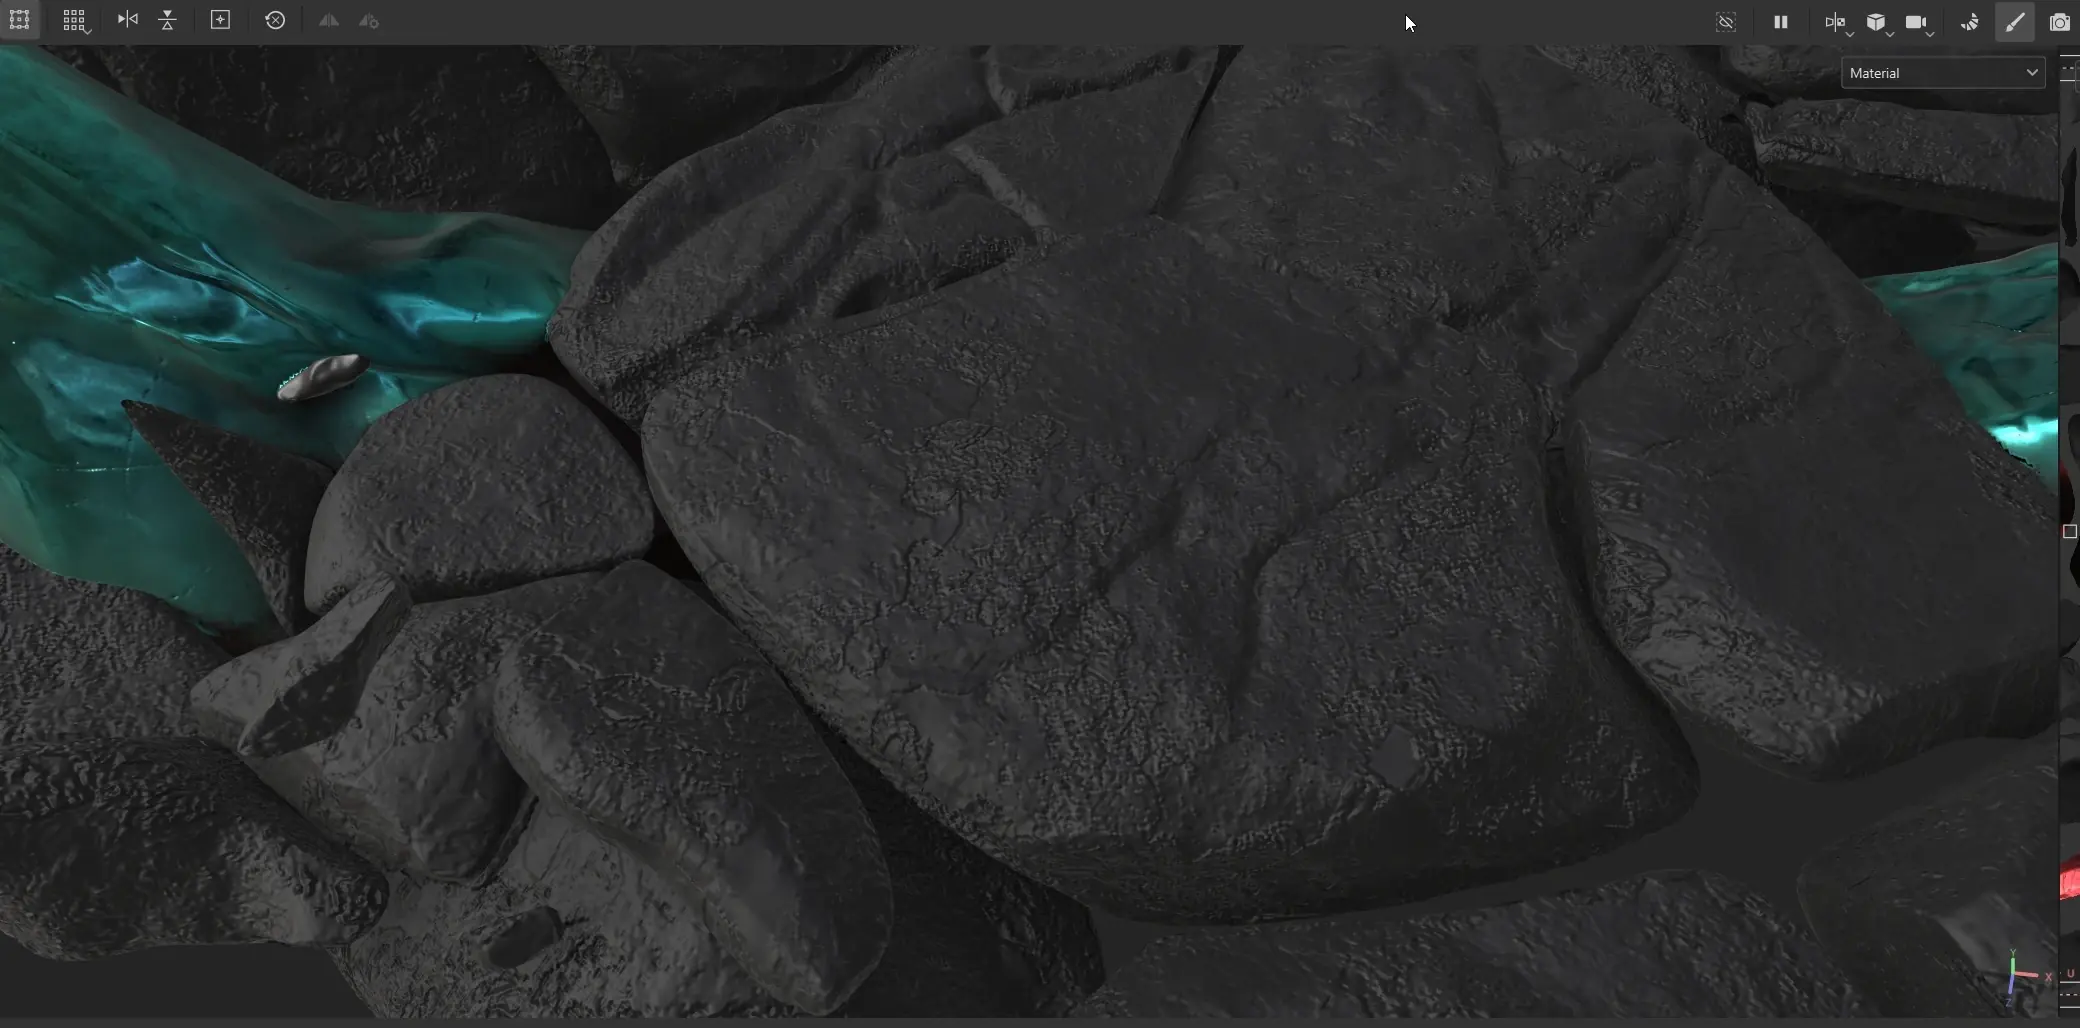
height pass
I first realised Blur Slope is really strong for creating detail for stone surfaces in a previous project in Substance Designer, and I'm happy that it remains true here.
Finally, I added a dirt generator to add colour variation and roughness in deeper crevices.
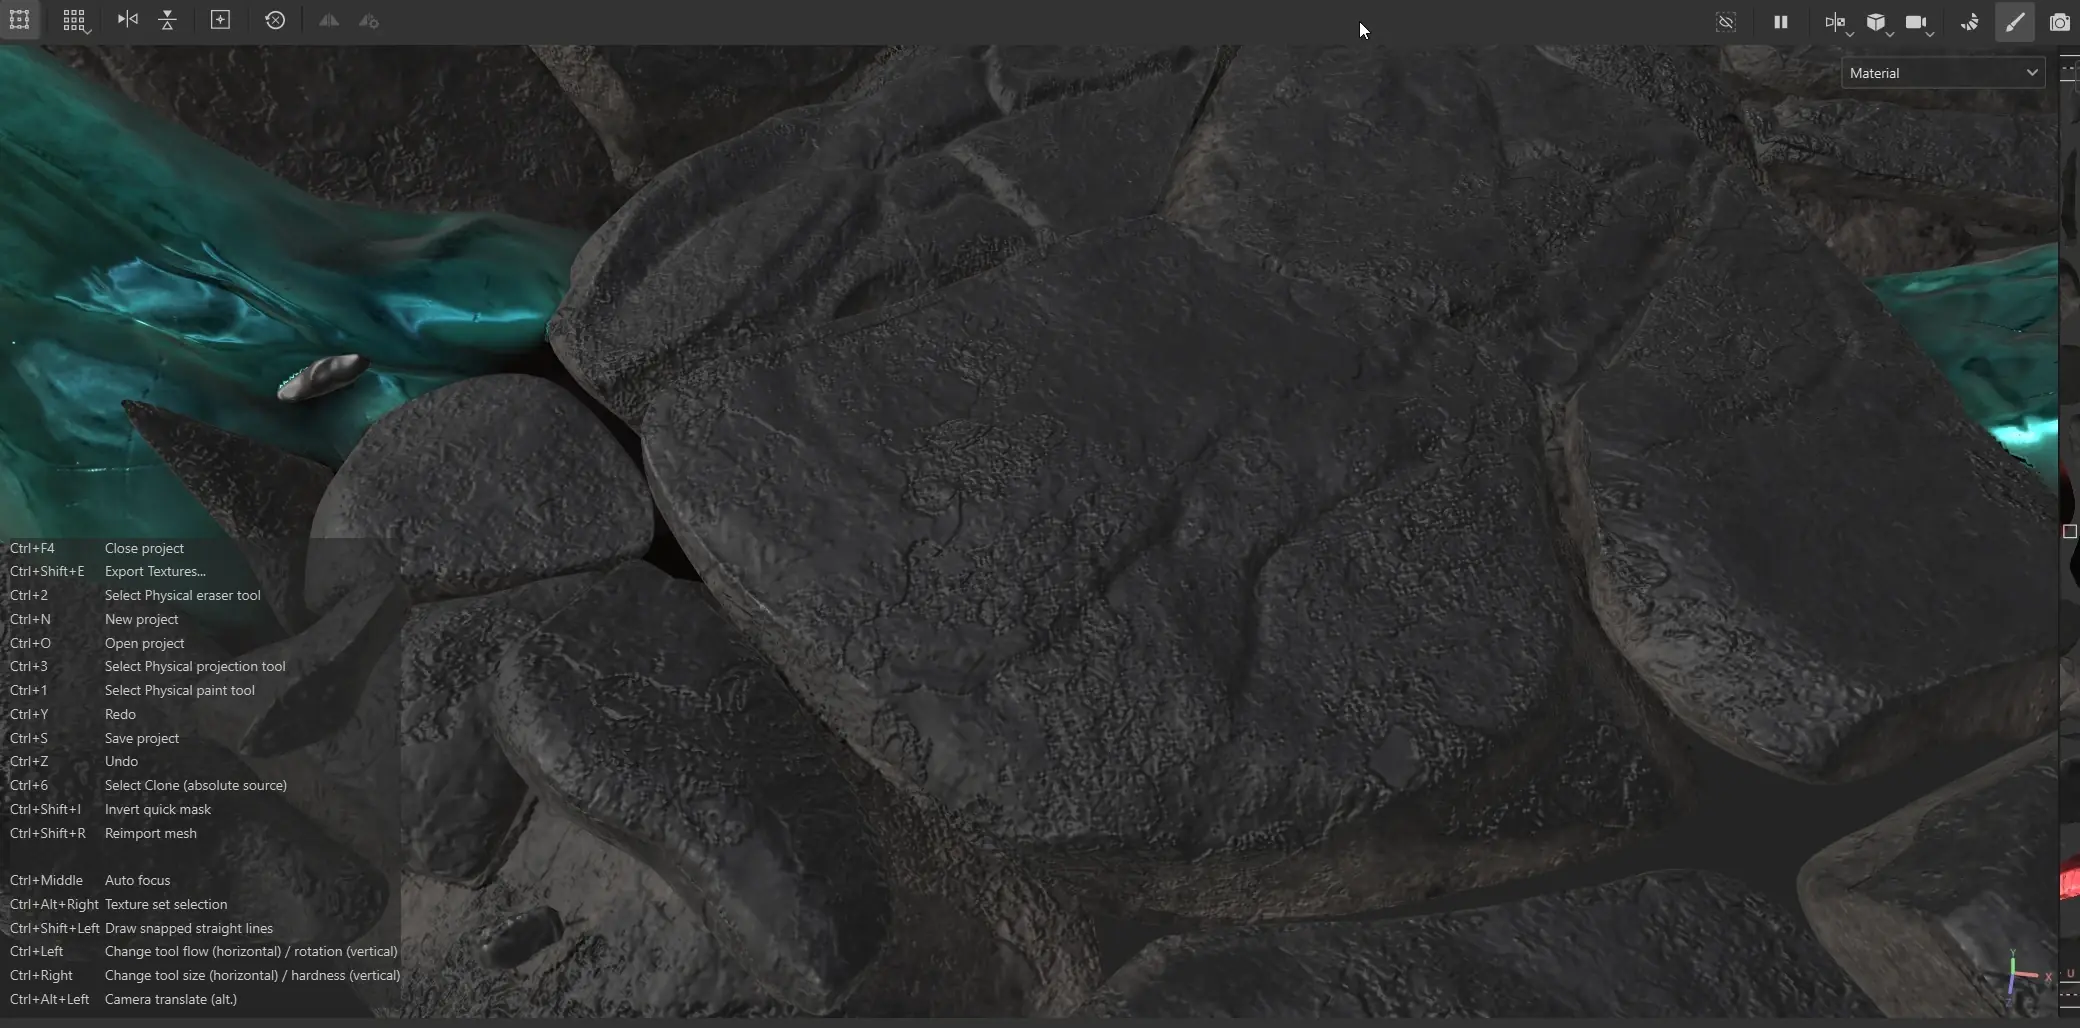
dirt pass
Most of the other materials either use very similar processes or were kept very simple as they were part of the body, where the Unreal Engine shaders would play a larger role.
anisotropic hair.
I wanted to create an anisotropic effect on the specular highlights that I see on some other artists' work, similar to what is in the video below.
However, I didn't follow much of the instructions in this specific video. Why?
There were two main reasons.
- I didn't want to install and use Krita to create the flow map if I could help it.
- I wanted to use Unreal Engine, so the Marmoset section didn't apply to me.
Instead, I found this video, which showed a method to create a custom brush for Substance Painter in Gimp, which would be used to paint the flow map. The method was program-agnostic, and just involved a 16x16 canvas filled with (128, 255, 128), so I did it in Photoshop.
Afterwards, I created a brush layer in Substance Painter, and set these brush settings:
- Follow Path - On
- Projection > Alignment - UV
- Only NRM channel enabled
- Insert the custom flow brush into the Normal input at the very bottom
I also made sure that the hair's UV shells pointed in the same direction, rather than drawing arrows like in the video.
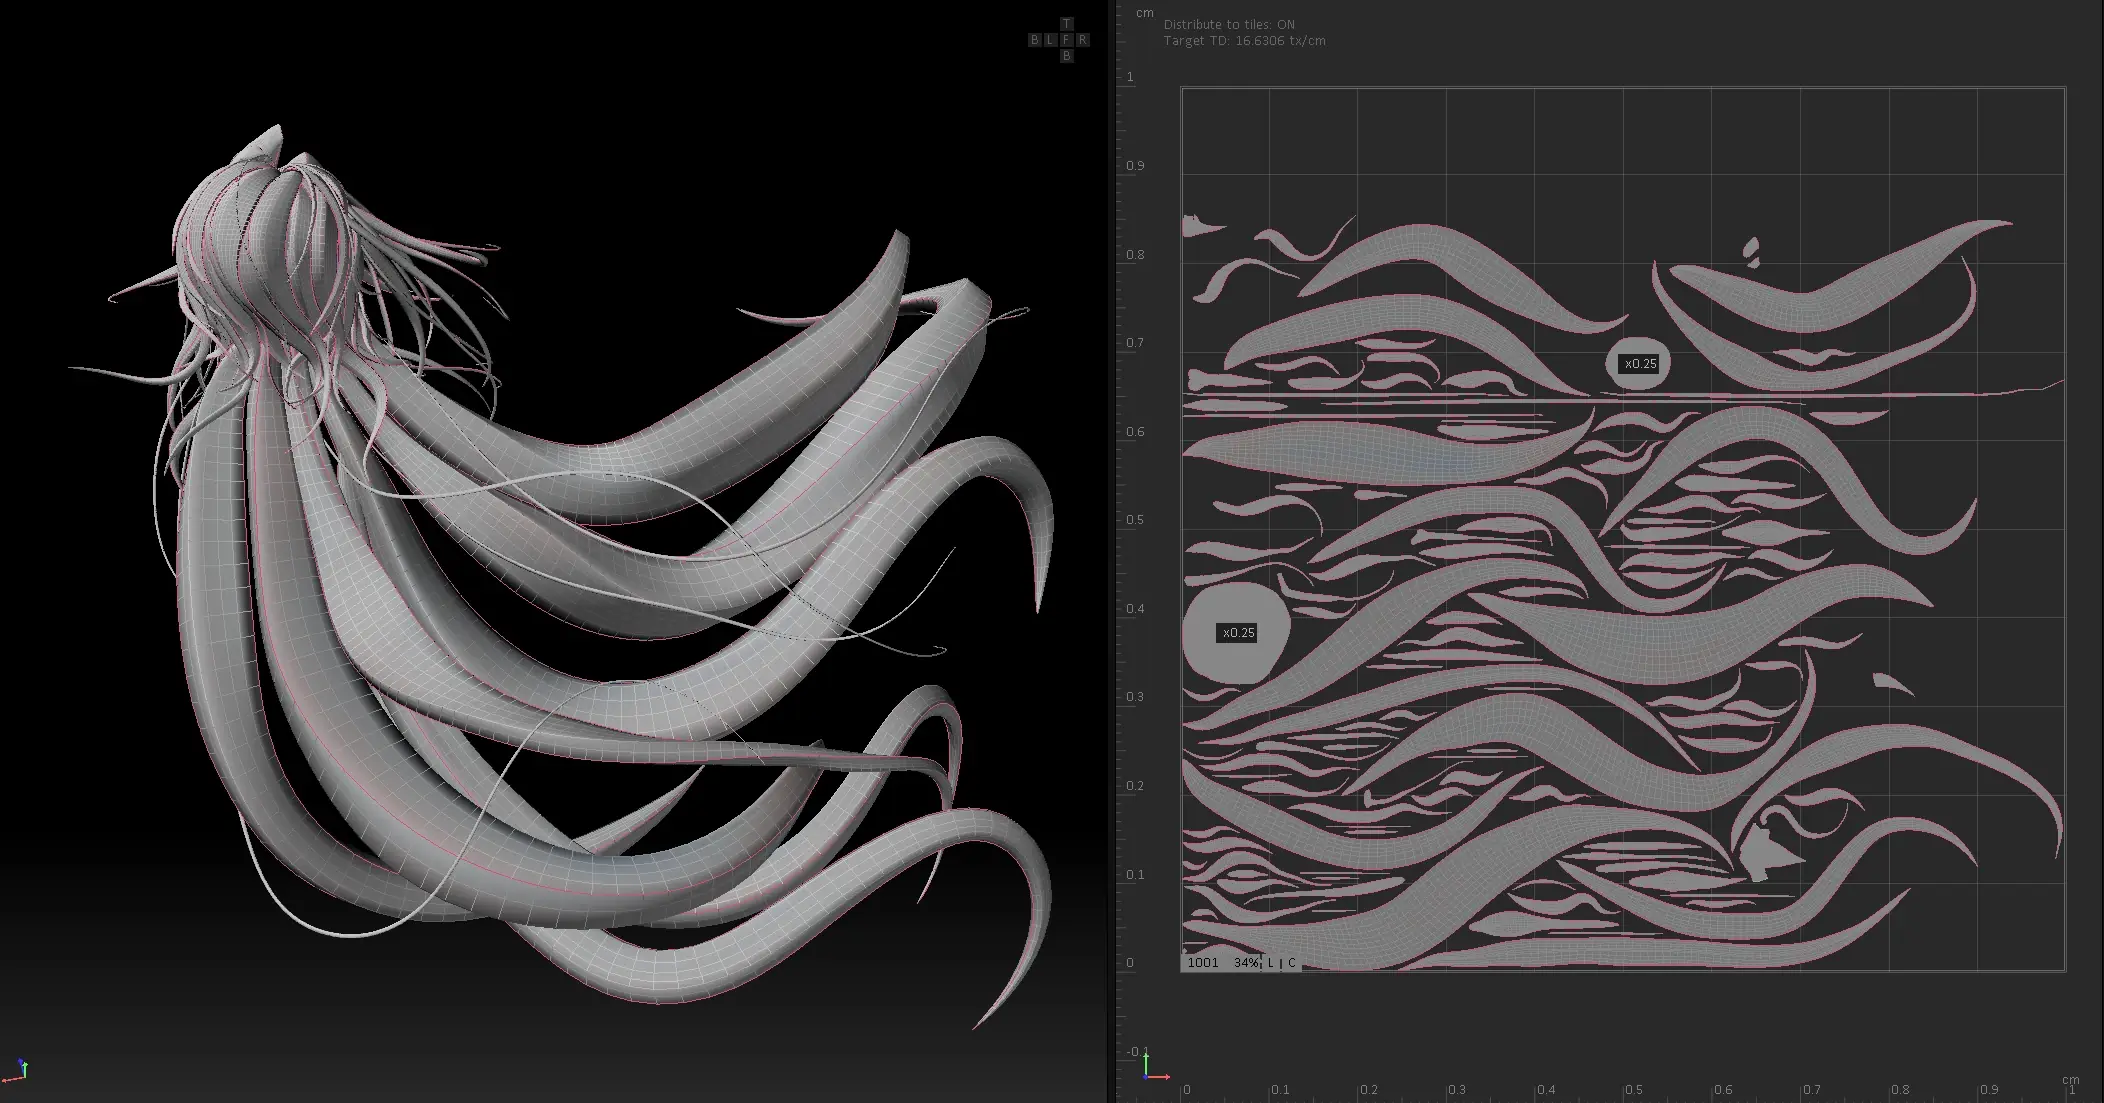
hair UVs
Back to Substance Painter. On a new layer, I drew the flow map through the 2D View, following the same direction.
To do this, I painted in long, continuous strokes as small deviations would change the flow in awkward ways. This layer would be set to Normal, such that it replaces the normals of the hair for now.

Snippet of the painting process
Finally, I exported the hair's normal map to obtain the flow map.
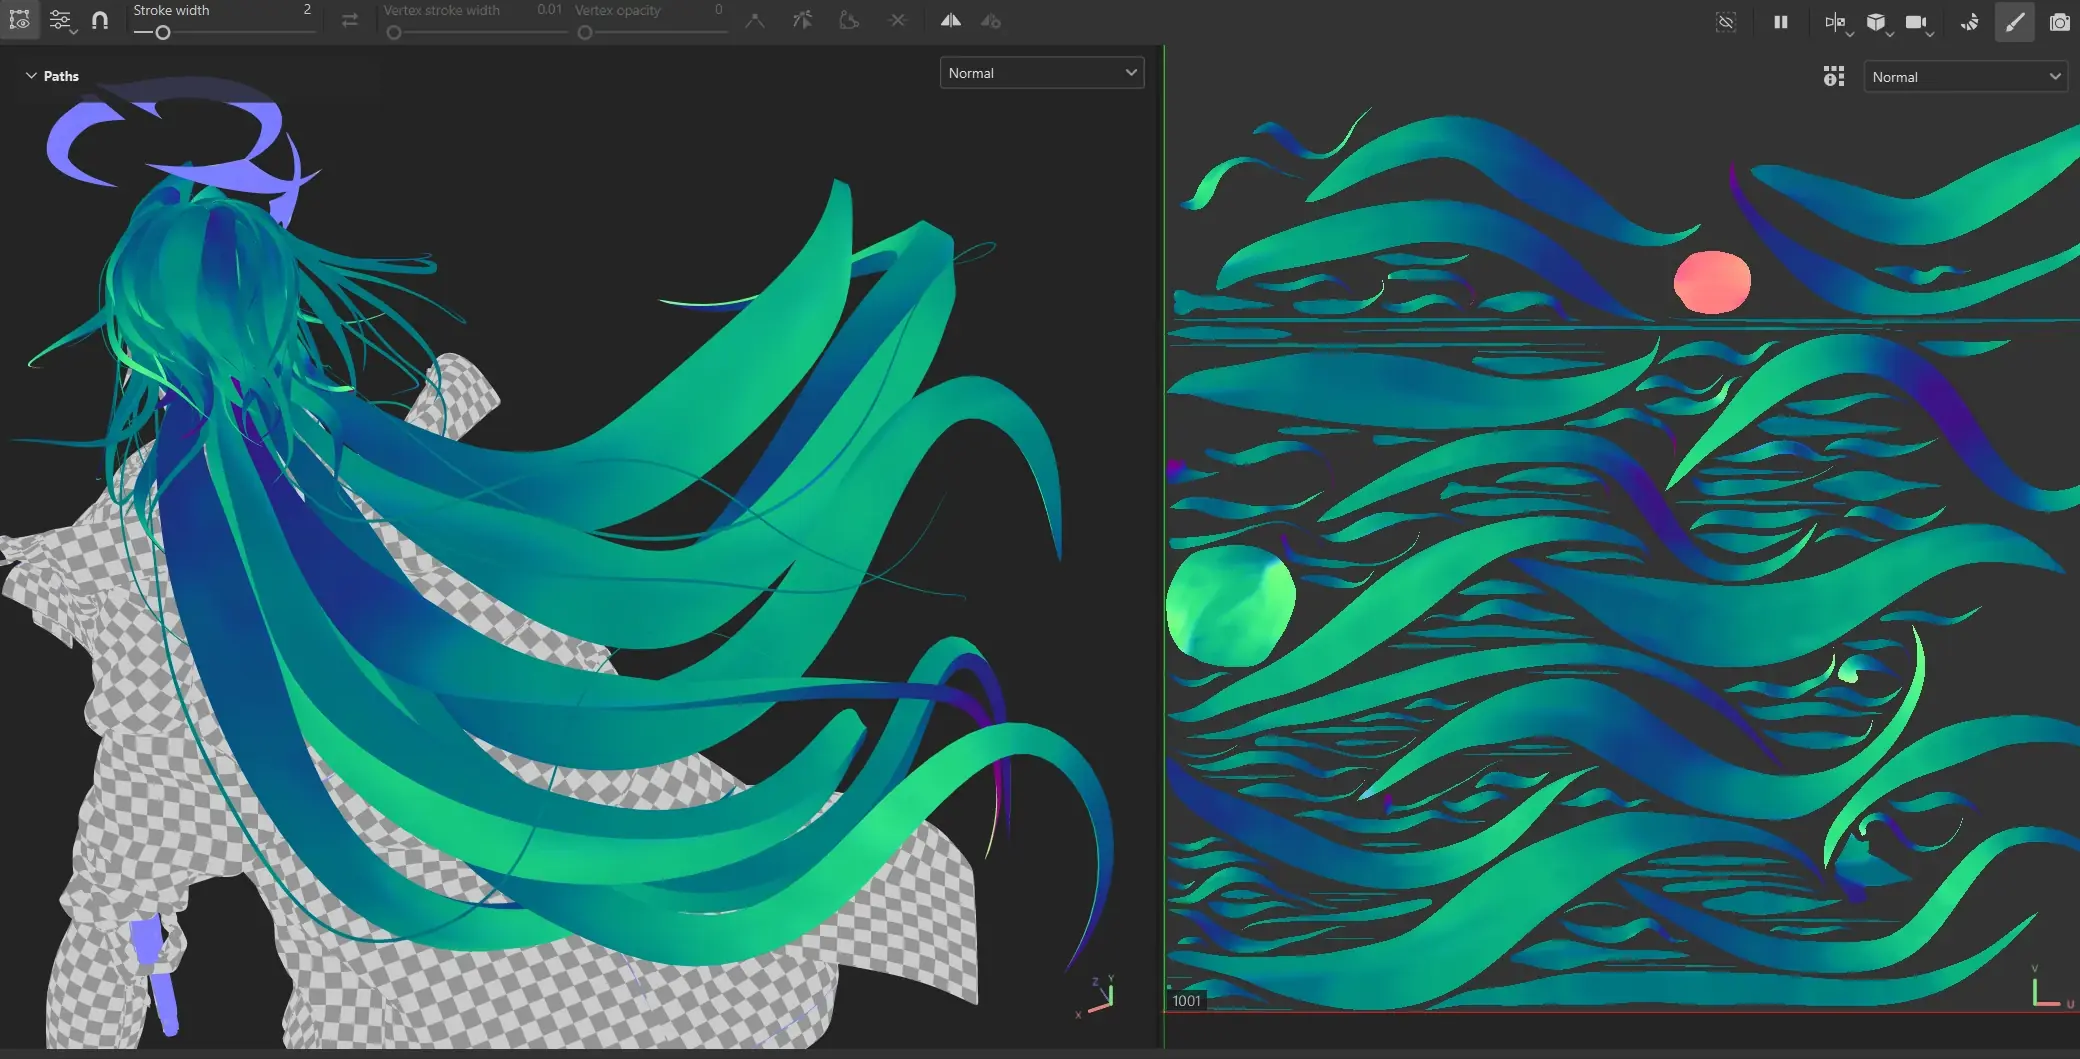
the flow map
Later in Unreal Engine, I used a StaticSwitchParameter to switch between the flow map and a generic normal vector, which goes into Tangent input of the material.
I also added a scalar parameter to control the Anisotropy Intensity, which goes straight to the Anisotropy input. This value basically controls the sharpness of the highlight.
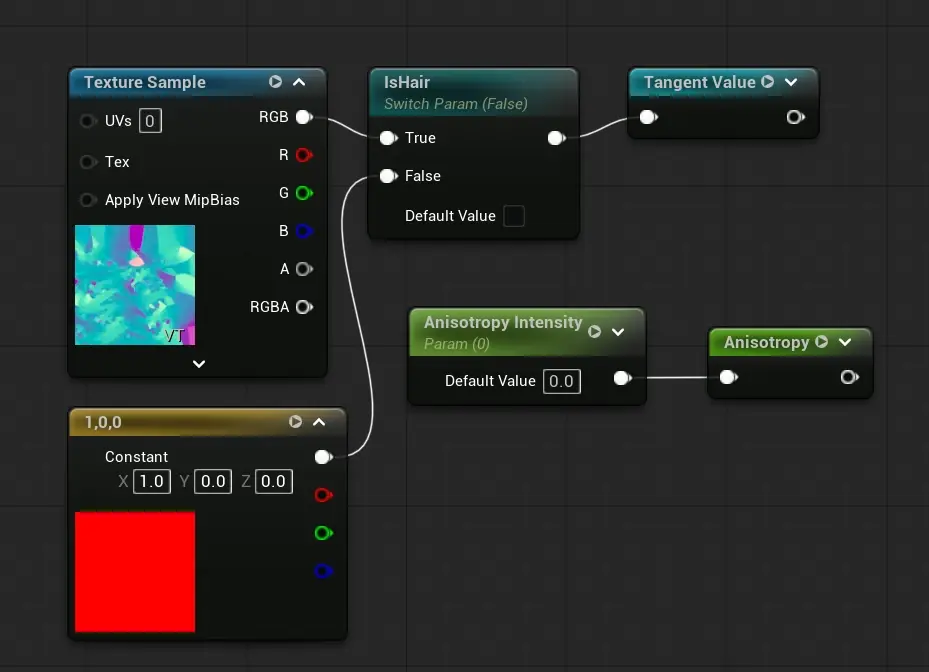
the UE setup for anisotropic hair
It was a surprisingly simple implementation after the relatively hefty setup.

anisotropy intensity scalar
face sdf.
I wanted to set up SDF-driven shadows on the character's face since regular raytraced shadows would give very awkward-looking results, especially for an anime-styled face.
To start, I mostly followed this video by 2AM to create the SDF map. I started by rearranging the UVs for the head so I had a clearer base to lay the SDF map onto.
While I was still in RizomUV, I also increased the texel density of the face and reduced the size of UV islands which were hidden.
Later on, I shifted the face onto its own material separate from the rest of the body instead, since it complicated the vector alignment and shadow flipping process greatly.
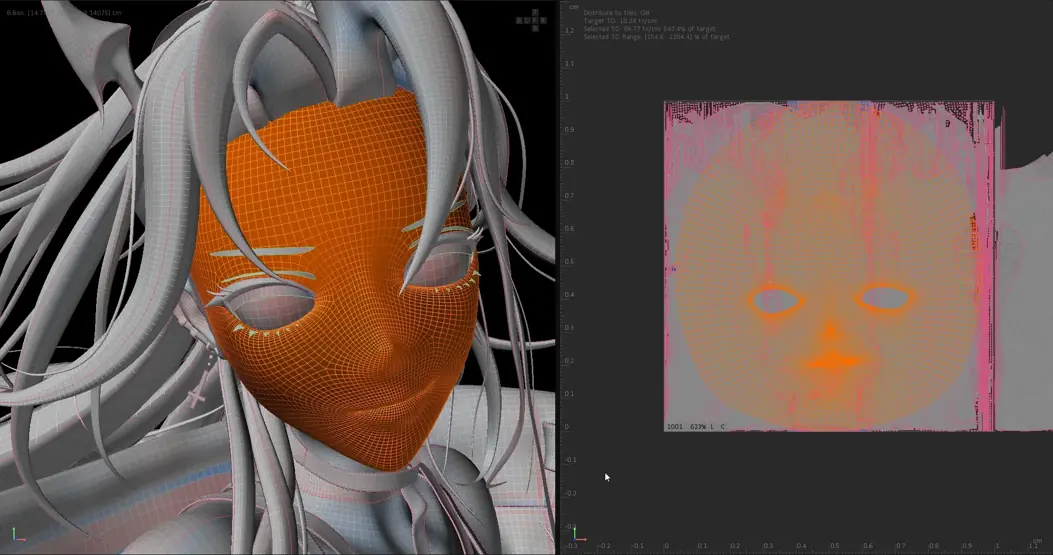
face UVs now
This process admittedly took much longer than I wanted, as I ran into what I think was an NVIDIA graphics driver issue (on version 595.97), which caused freezing when I tried to bake mesh maps in Substance Painter for the new UVs on the body.
My guess was that there was a bug involving Vulkan, as I was also having stuttering issues playing a certain other game using Vulkan.
I found a workaround after some time to disable GPU Raytracing in Substance Painter so that I could avoid using the GPU for baking. It took much longer than usual using the CPU, but at least I got the bake working.
Moving on to the actual work here, I drew a bunch of guidelines in Blender, then exported that as an image, as well as the UV layout for reference later on.
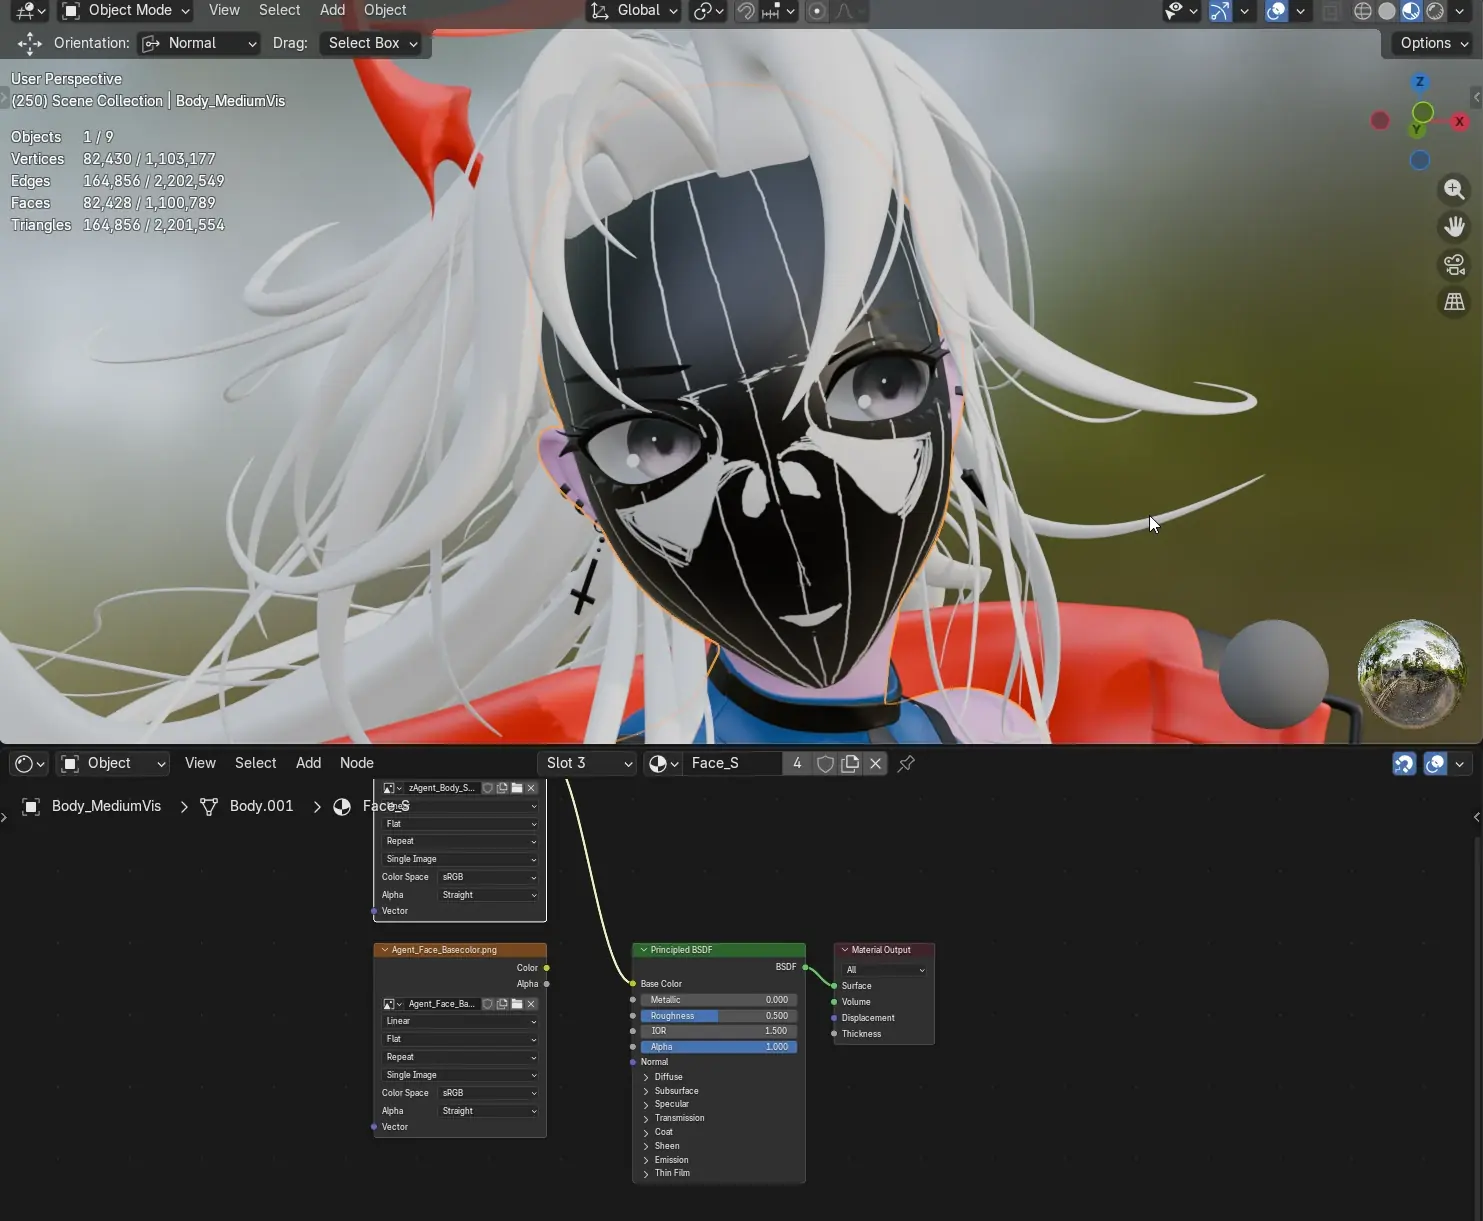
very temporary guidelines for drawing the SDF maps
I noticed that some artists drew the SDFs directly in Substance Painter, but I really don’t like the brushes available, and I couldn’t get rid of the jittery spacing on the hard brush. Thus, the plan was to draw the SDF component maps in Clip Studio Paint, where I was most familiar.
When the component maps were done, I found a useful tool by Jon Game Dev Hub for generating the final SDF map. This tool was based in Substance Designer, which I was thankfully comfortable with.
Later on, I implemented the SDF shadows in Unreal Engine with the help of the UE5 Toon Shader Breakdown by Songji. I won't fully go through this process in the next section since it's explained well in the video.

Face SDF Shadows
skin shader.
Just as a short preface for shader time, I noticed that many toon shader tutorials used different methods in Unreal Engine to achieve a stylized look, so I looked for and found this artist’s stylized shader theory series which helped me understand the underlying logic.
The series is by Ikwoo Lee (이득우). I recommend it heavily for getting an initial grasp on NPR. Before I could get started, I needed to make a few finicky adjustments to the UE mesh in preparation.
First, I created an eye shadow mesh by duplicating the top half of the eye socket boundary's edges, then extruded downwards and adjusted manually with proportional editing.
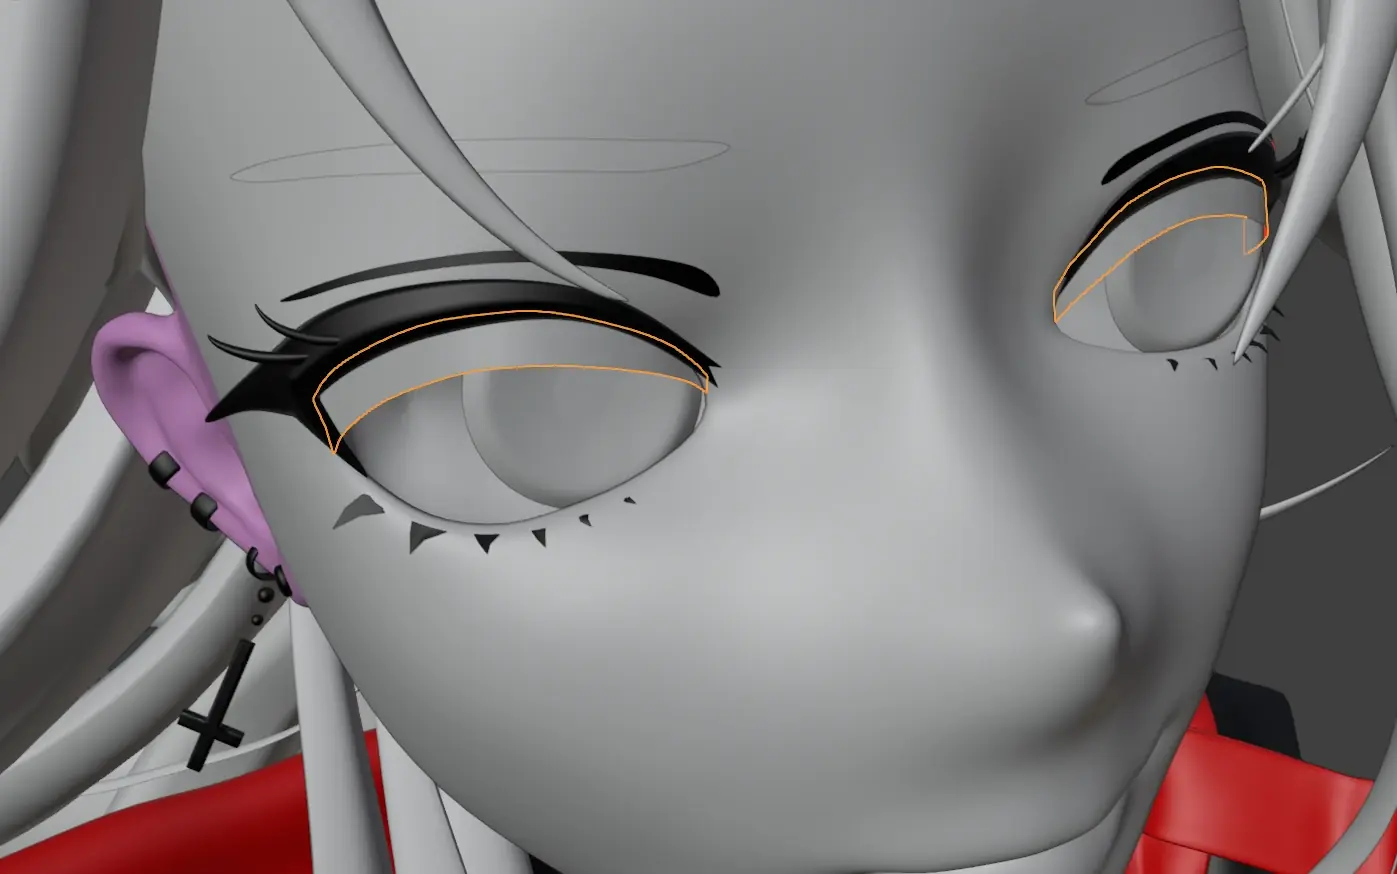
eye shadow mesh
Then, I created an eye fresnel mesh by creating a UV sphere in Blender, applied a subdivide modifier with 3 levels, then scaled down to squash it closer to a square to lay on top of the eye, since this eye has more of a flatter profile than a realistic eye.
This mesh is to act as a container for the eye specular I create later on.
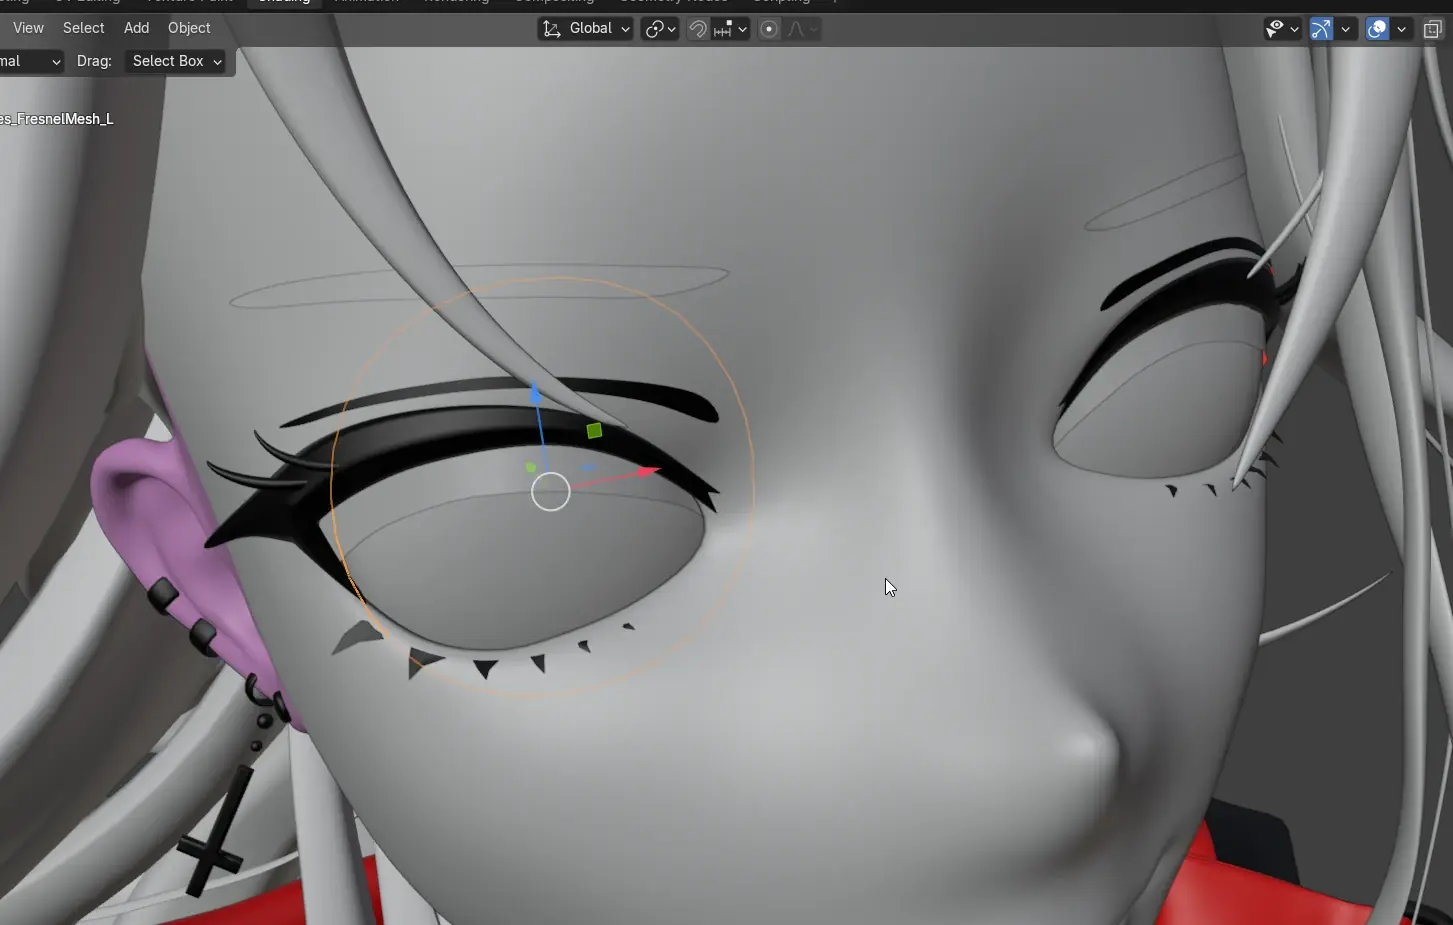
eye fresnel mesh
Finally, I assigned the face to its own material/UDIM and centered it, so that flipping the SDF wouldn't need manual adjustments after. Aligning the vector to the face orientation without using bones is also easier, since I don't have a rig in Unreal Engine.
Afterwards, I found this tutorial by Songji which compiles several components needed for the character’s look, oftentimes scattered into what I felt were potentially conflicting solutions. The video explanation is thorough, so to save some time, I'll skip to the gotchas and extra things I did.
While setting up the DirectionalLight which is used to set a single direction for the shader's light and shadow to be based on, I realised that the light was not returning a rotation value.
It turned out that I had set the Light Intensity to 0 to prevent it from directly affecting the scene, but it also caused this issue.
To get around this, I disabled the lighting channels for the actor instead.
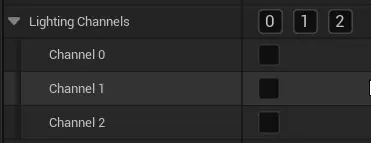
disabled lighting channels
Onto the next hitch, the head joint was used as a reference for the head's forward vector, but I had no rig present.
As such, I created an empty actor and manually positioned it to the character's head.
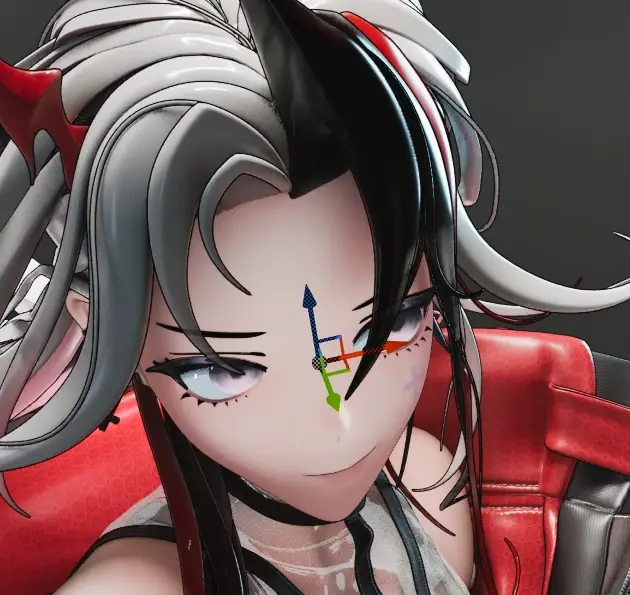
HeadForward Vector
Before I set up the face SDF map that I created previously, I also needed to flatten the normals on the face.
I found that the export settings in the video didn't work for me, so I experimented until finding that Smoothing (Face) and enabling Tangent Space worked.
In Unreal Engine, I reimported the mesh, then disabled Recompute Normals and Recompute Tangents such that UE5 would not overwrite my custom normals. I also made sure to Apply Changes at the bottom.
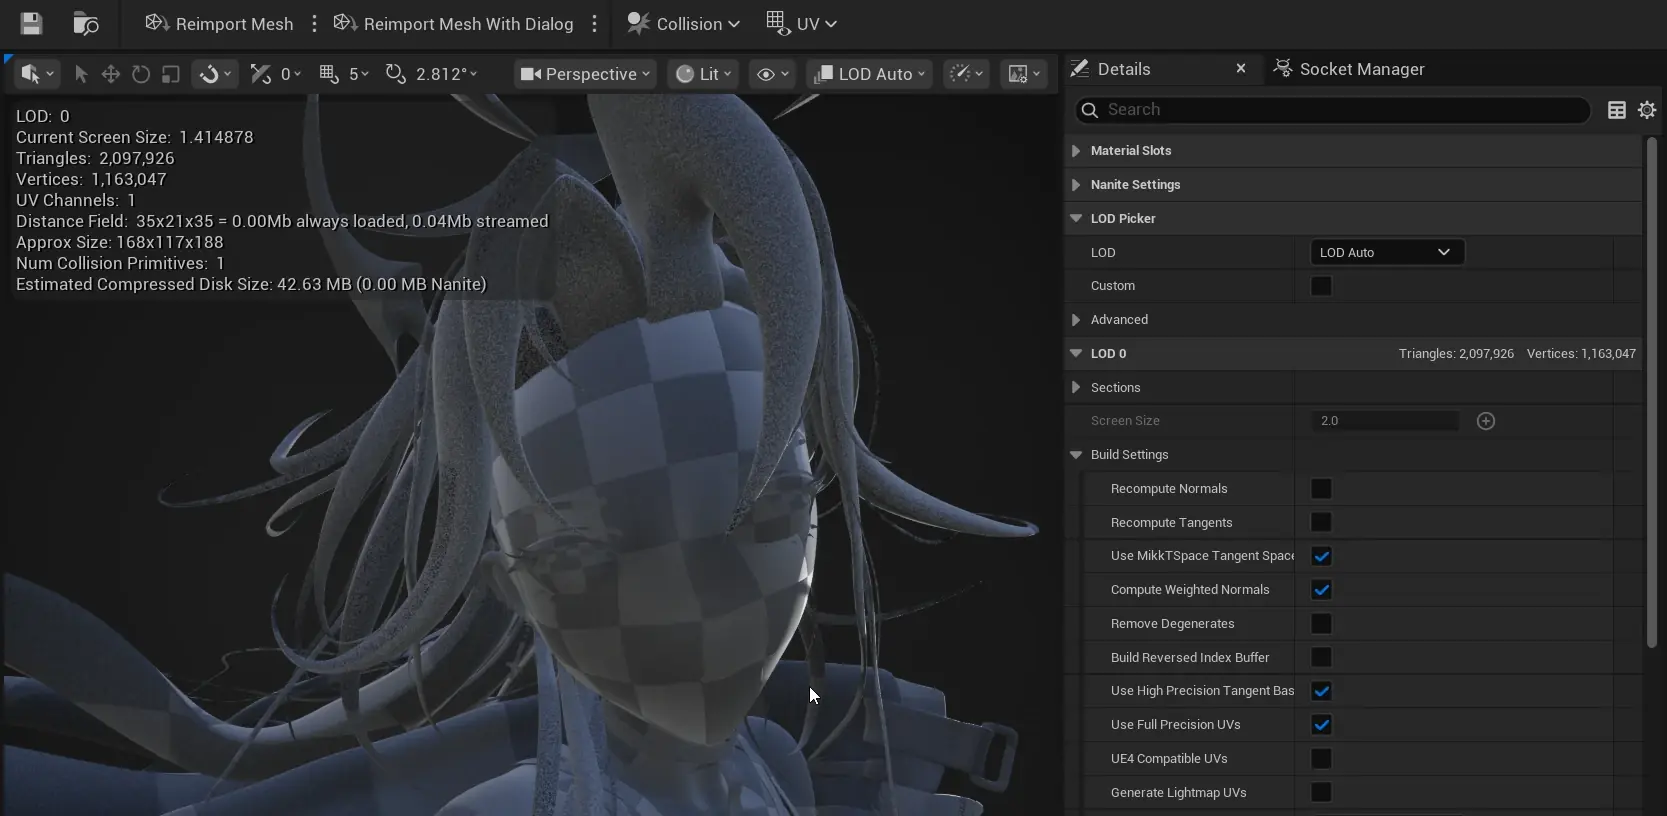
UE mesh settings
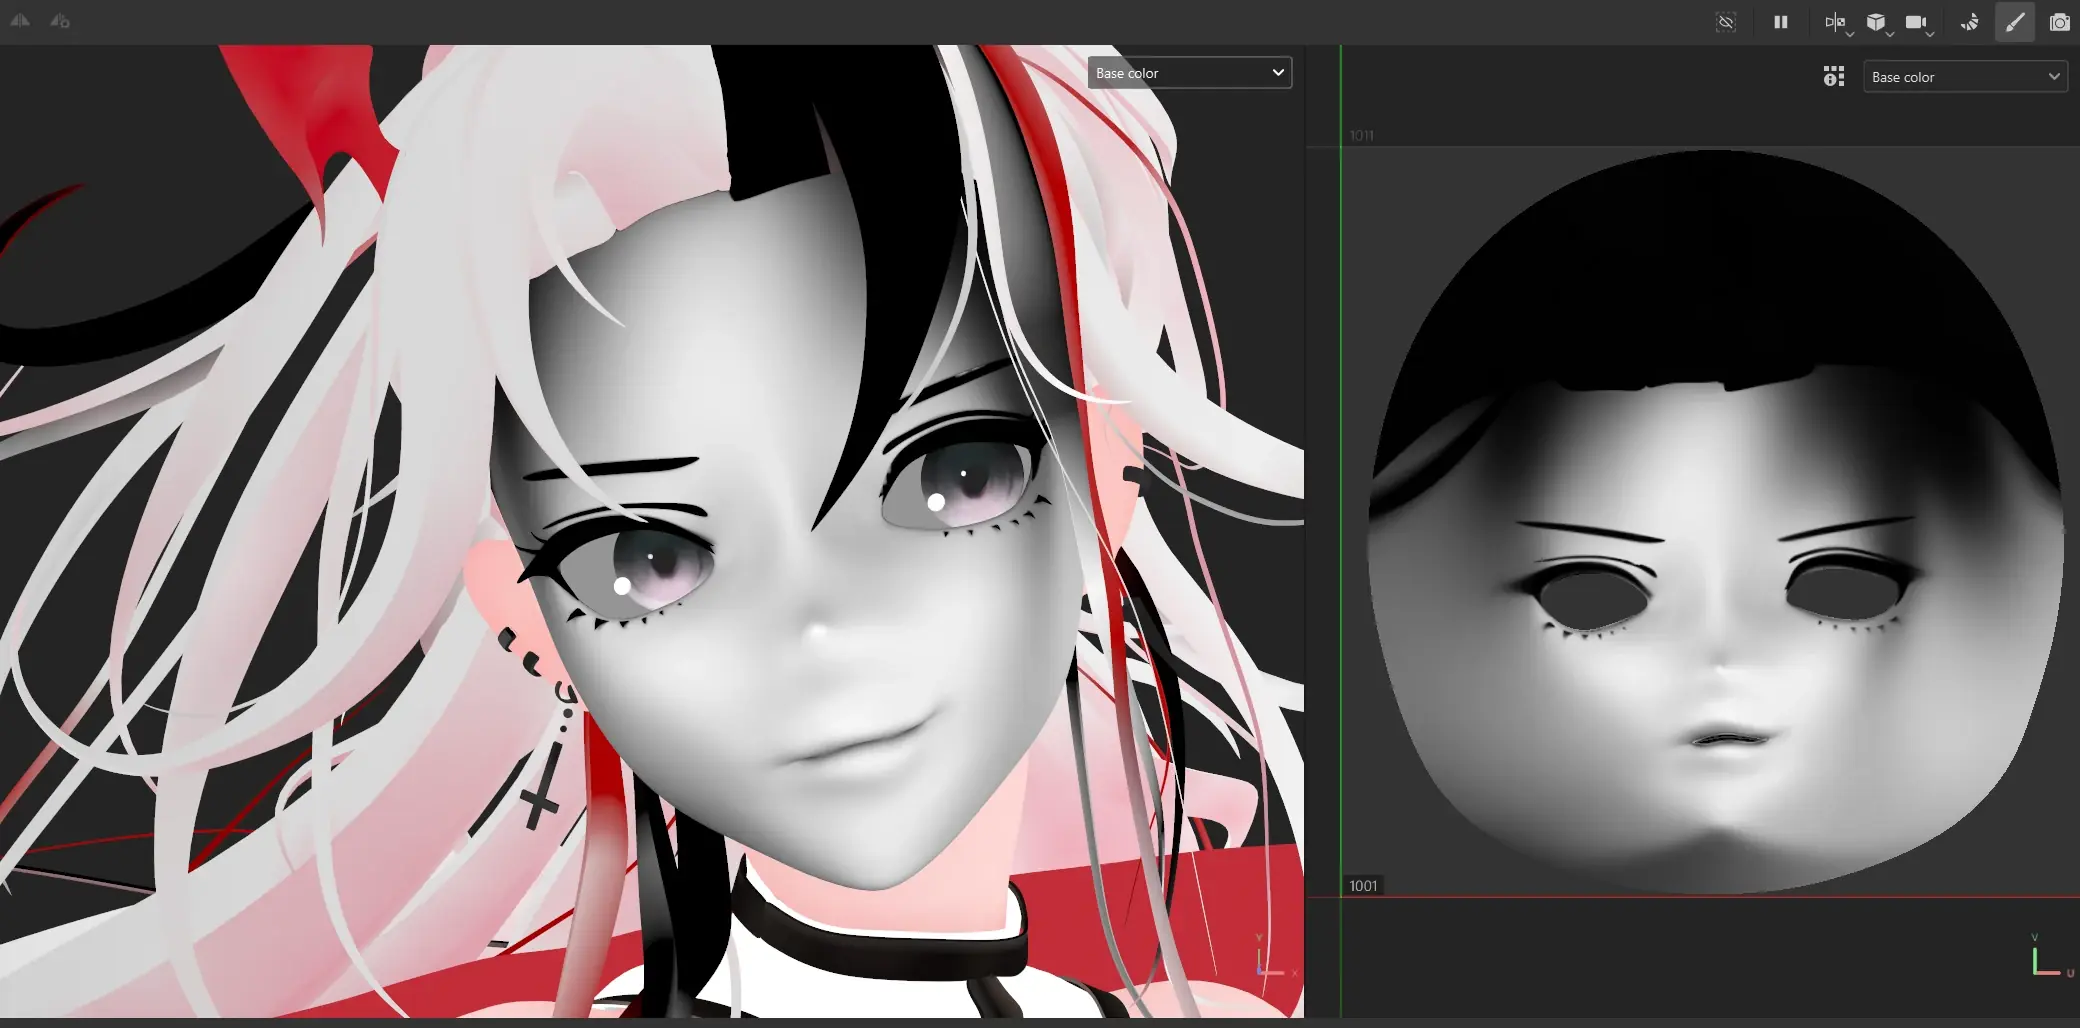
With that settled, I wanted to use the Ambient Occlusion I baked from Substance Painter for the face, but it was another contributor (aside from the original normals) which exposed the real contouring around the nose.
As such, I went back to Painter to manually paint away the AO around the nose area. To accomplish this, I added the original AO bake in a new layer, then a paintover layer over it in the Basecolor channel. Implementing the SDF map was straightforward from there.
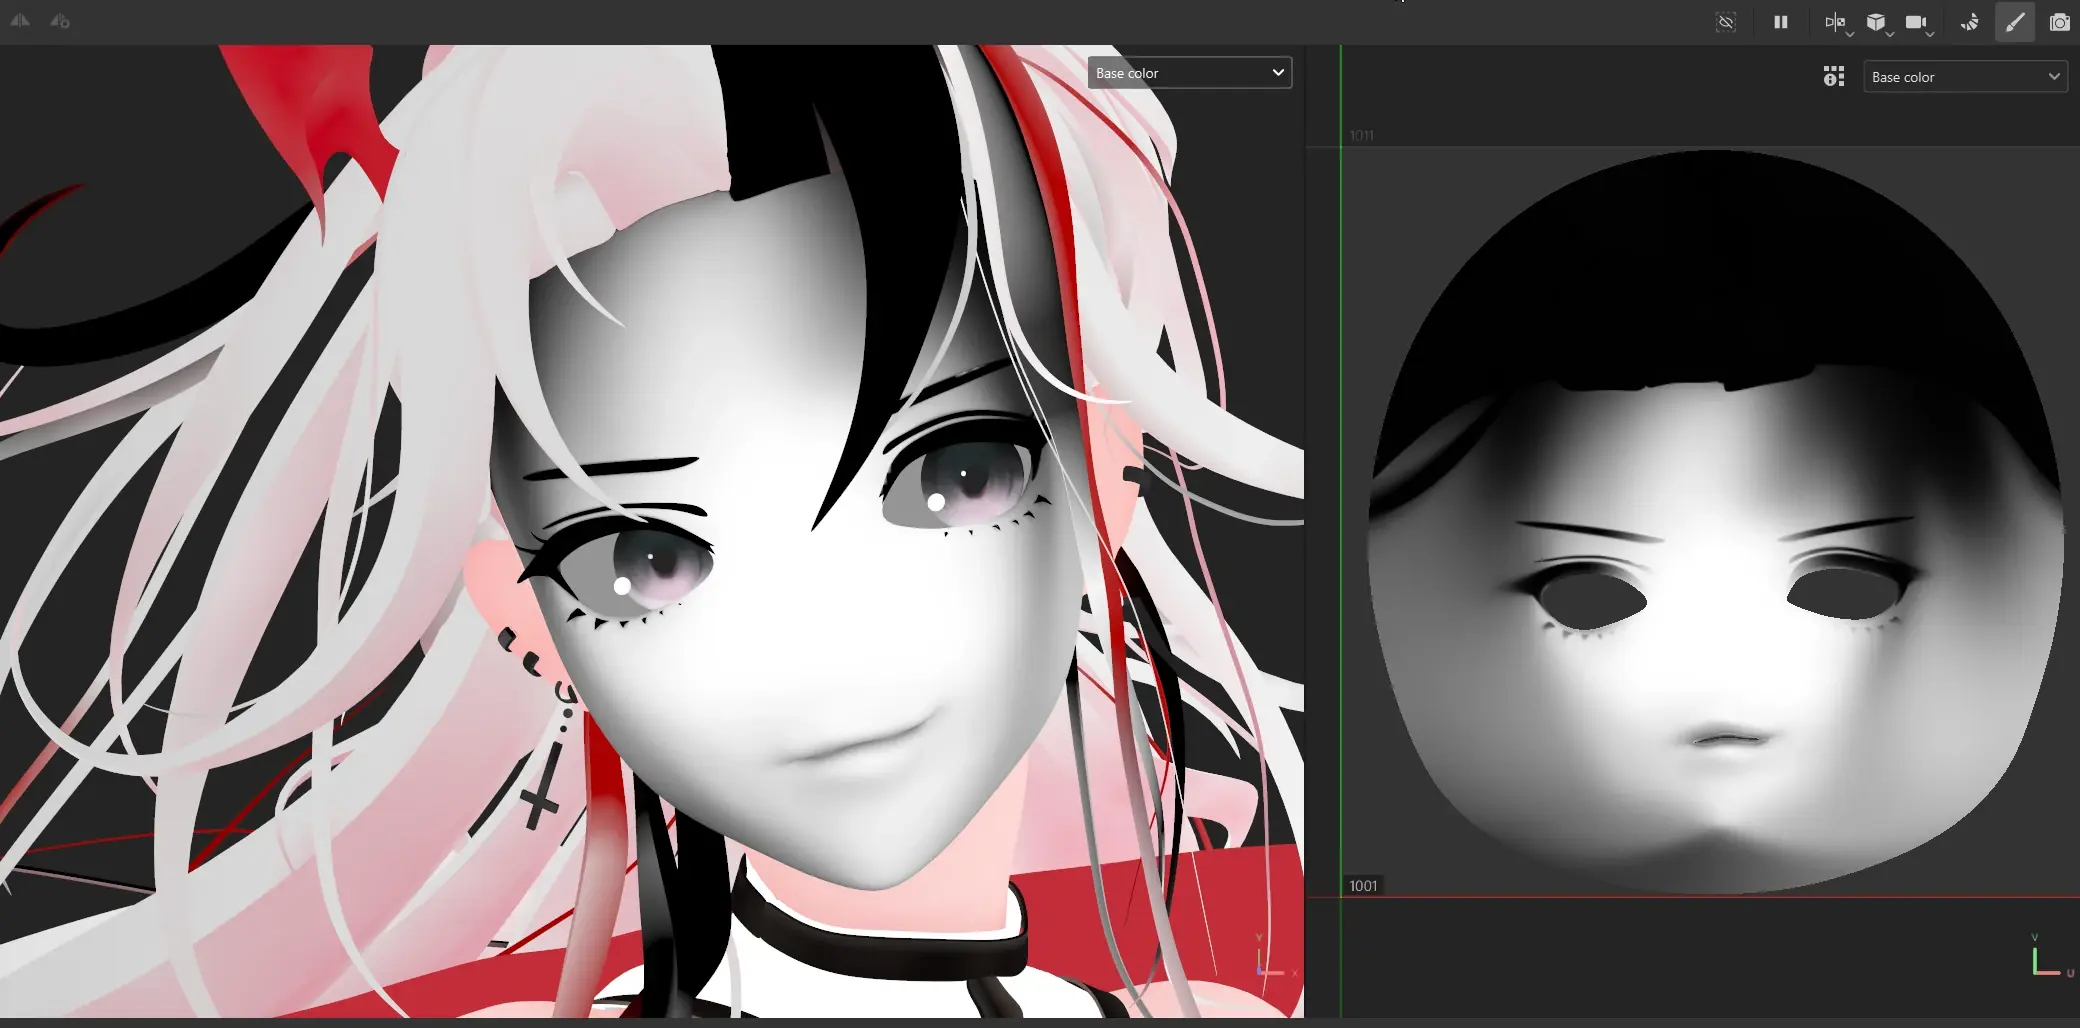
before
after
face ao paintover
From here, I did most of the things mentioned in the Toon Shader Breakdown, then moved on to set up other things I had in mind, like this Eye Specular effect using Inverted Fresnel I saw from Cherylynn Lima. This is what the eye fresnel mesh was for.
As the effect was made in Blender, I had to translate it into Unreal Engine, which was surprisingly straightforward. I just used a Fresnel node, guesstimated the Exponent and BaseFraction scalar values, and assigned a white Emissive colour.

Eye specular, first version
The troublesome part was figuring out how to add more specular highlights. Using an Add node didn't work, and I needed to research how fresnel was calculated to realise that I needed a Max node instead.
I added X and Z offset scalars to a VectorNormalWS, which then gets plugged into the normal input of each fresnel node.

Eye specular, multiple highlights
After getting the base setup going, I added more scalar parameters for X and Z offsets to control the specular positions individually, as well as one more set of offsets in the Material Parameter Collection (MPC) to adjust them as a whole.

Eye specular offset
I wanted this overall offset value since the speculars don't adapt well to vertical camera angle changes.
After this was done, I also wanted to try implementing a light falloff effect for the toon shader. The artsy basics of this effect are best explained in a video by Marco Bucci.
To make my intent clear, my goal for this effect is to isolate and have colour control over just the area where light meets shadow, since I already have control over the latter two.
After some brainstorming, my plan looked like this:
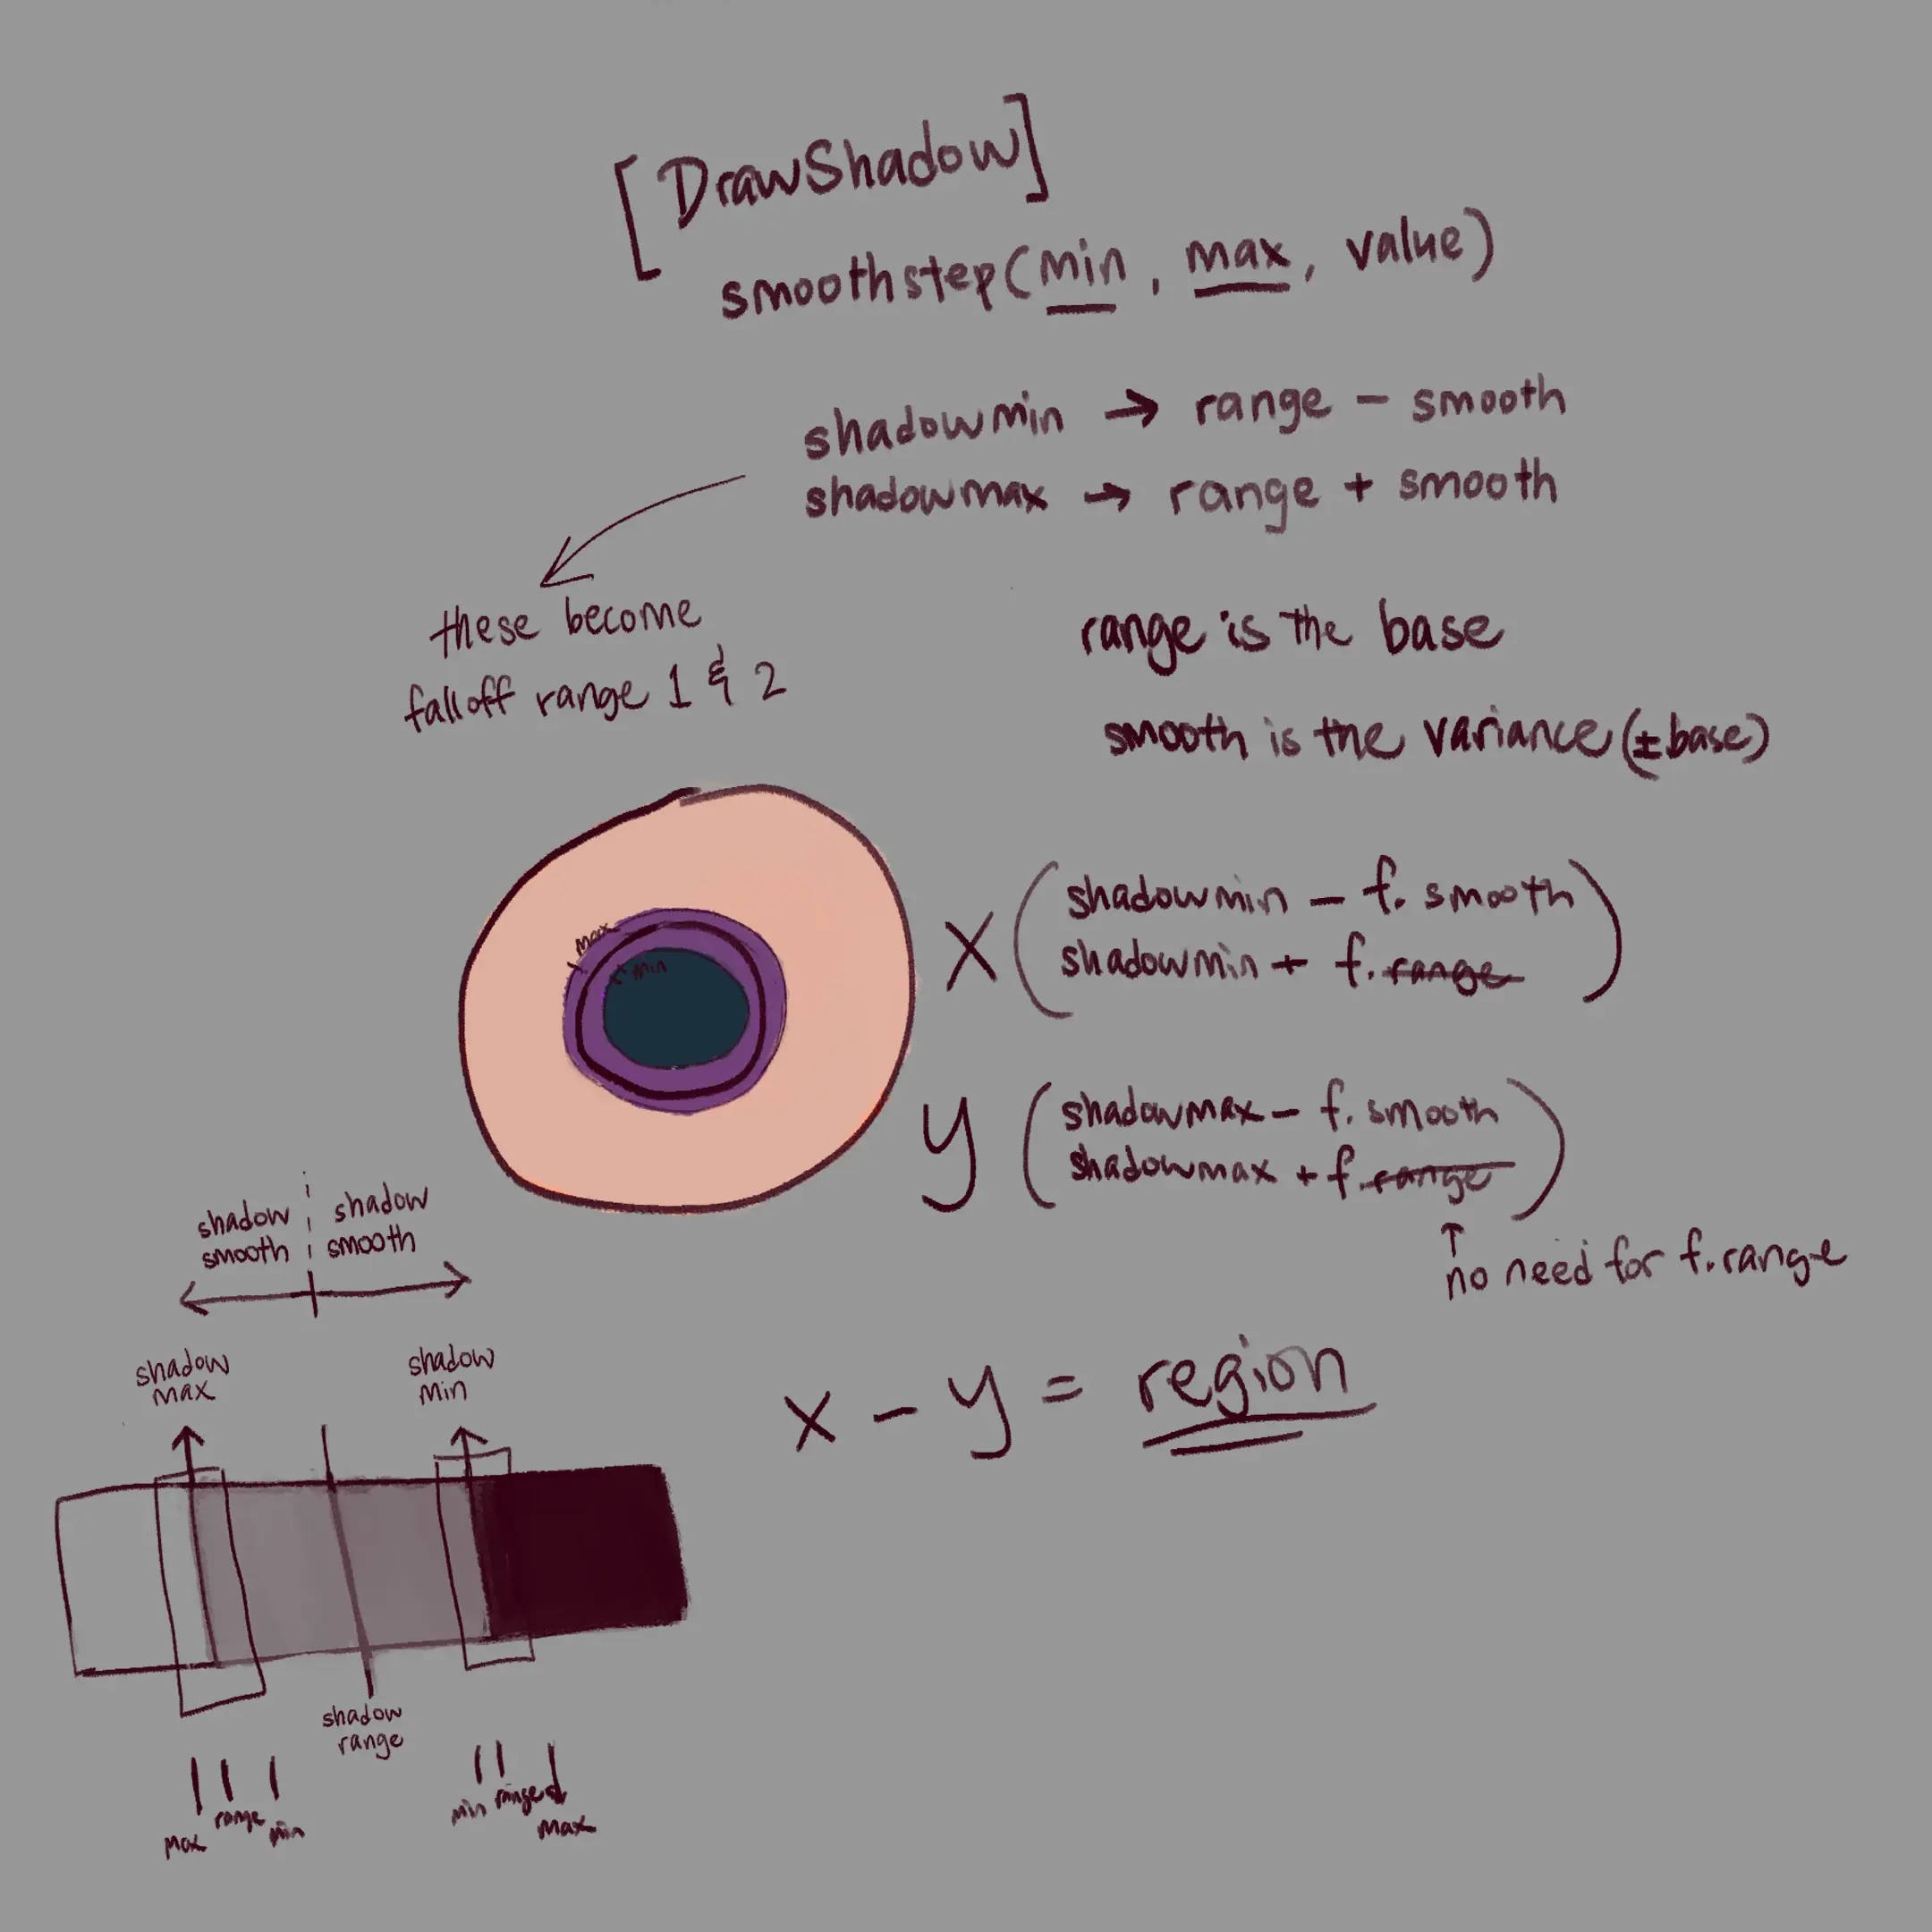
caveman writing
My plan was to get individual masks of the left and right areas of the boundary, then subtract the masks from each other to get the boundary area itself.
As part of the Toon Shader video, I obtained a shadow mask through a smoothstep function. This involved calculating a min and max range for the smoothstep, with the directional light’s dot product to the character as the input.
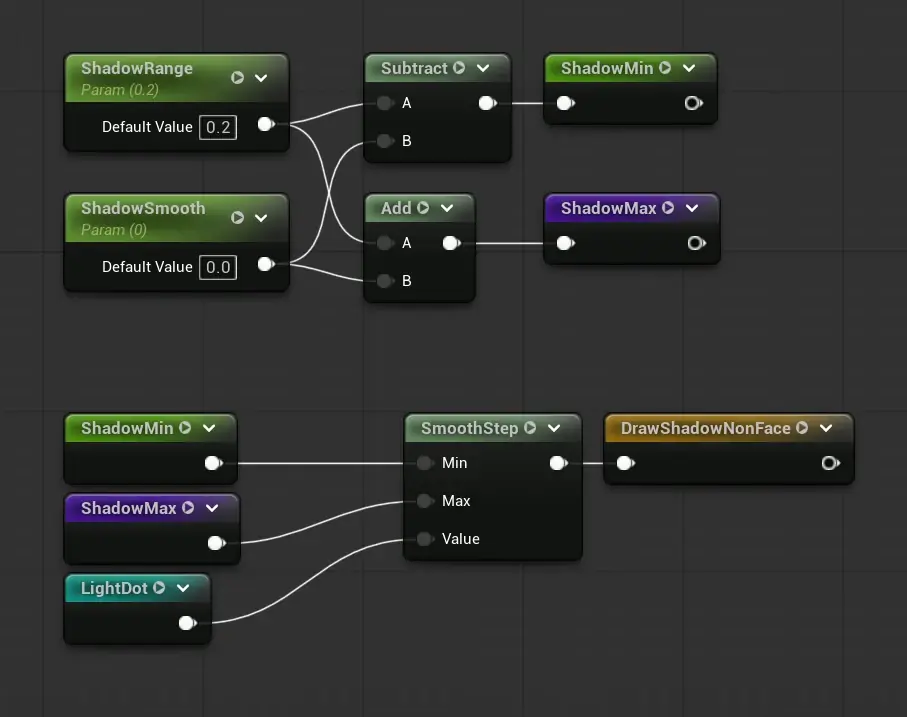
shadow mask
To start, I treated the shadow mask’s min and max range as the boundary of two new masks. Let’s call these the ShadowMax and ShadowMin masks for simplicity’s sake.
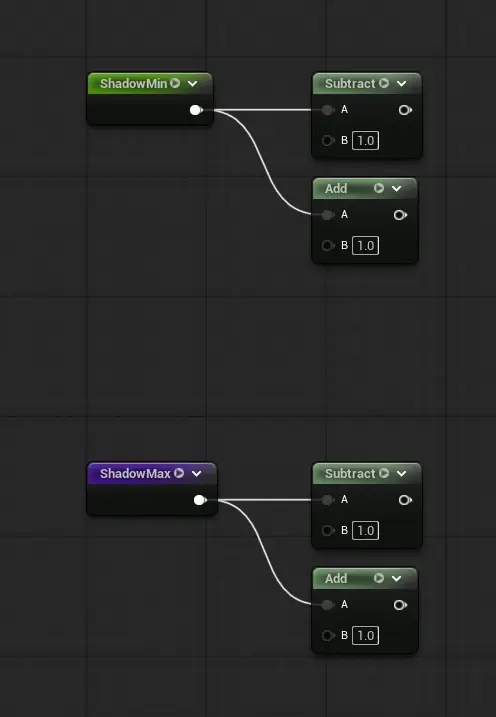
boundary
I added another scalar to control the deviation of the light falloff mask. This is used for calculation of the min and max range for the ShadowMax and ShadowMin masks, giving us the two masks.
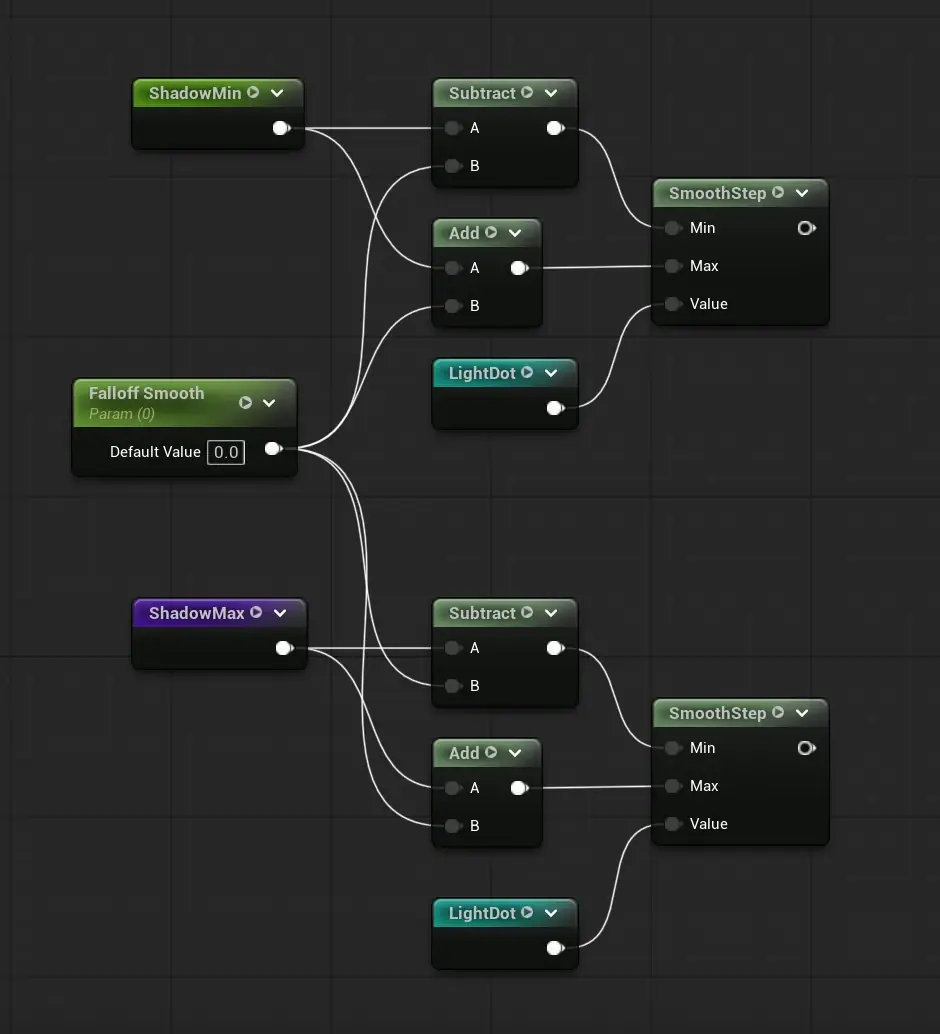
ShadowMax and ShadowMin masks, with Light Falloff Smooth scalar
Finally, we subtract the ShadowMax mask from the ShadowMin mask to obtain the light falloff mask. I also multiplied in a scalar at the end to control the opacity of the light falloff mask.
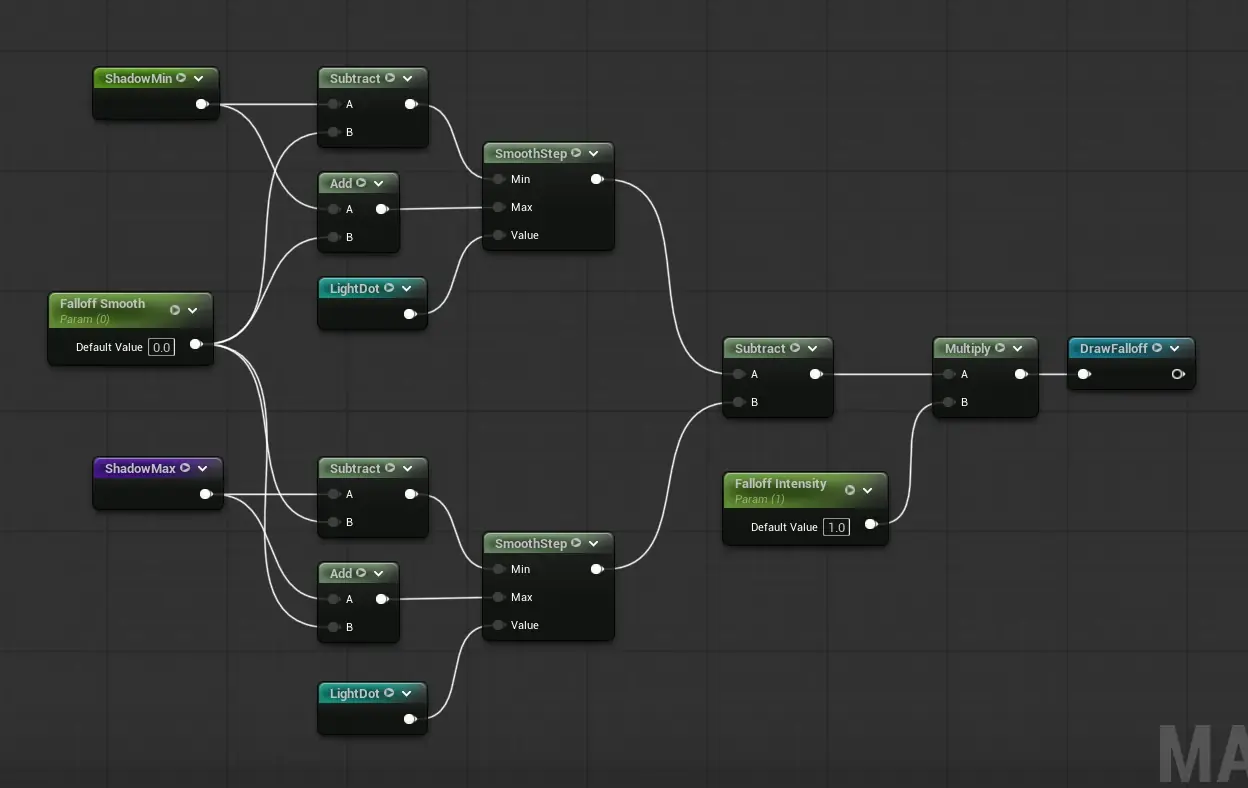
Light Falloff mask
I'm quite happy with the final result. It can be used to accentuate more dramatic lighting, but I'm going to keep it subtle this time.
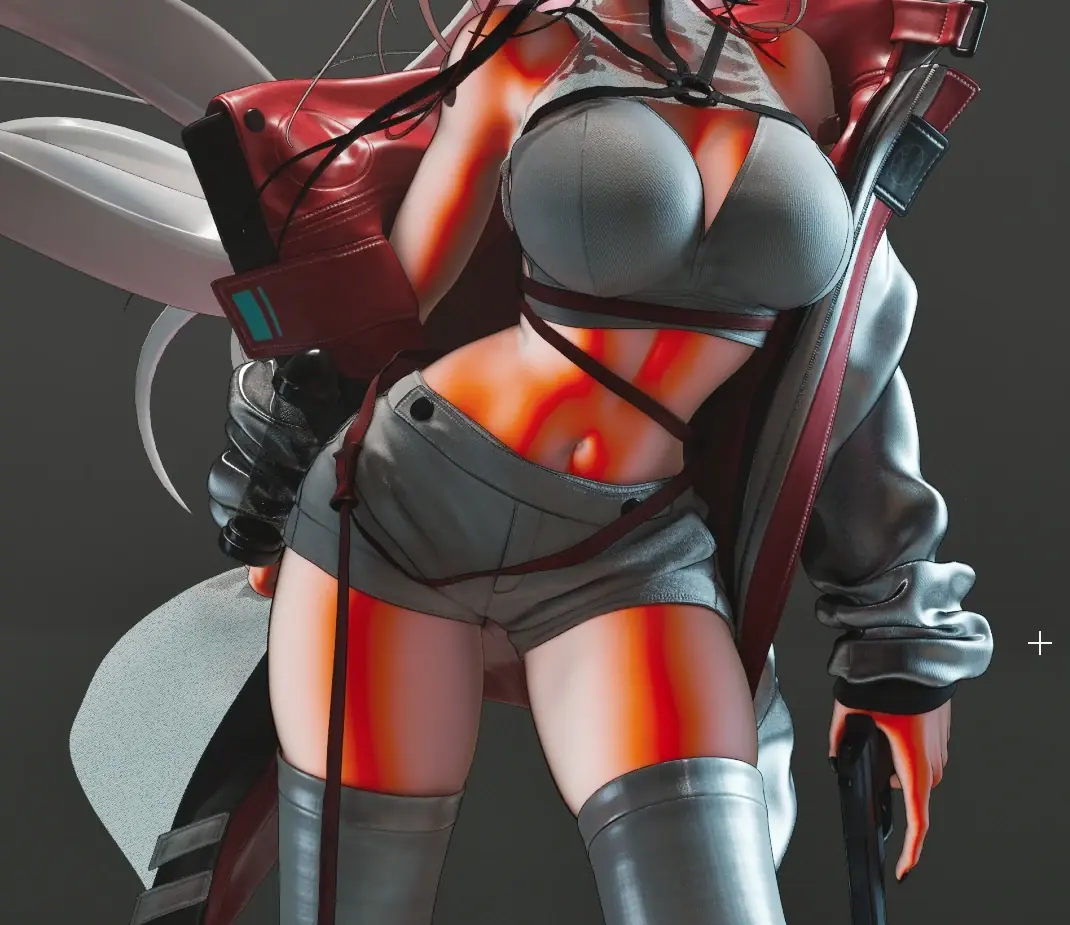
Light Falloff mask in red

Light falloff demo
After the light falloff effect was complete, I multiplied an extra layer of ambient occlusion and fresnel-driven shadow onto the final emissive colour to get a bit closer to the Endfield look.

Fresnel outer shadow demo
rain shader.
Since I was already taking heavy inspiration from Endfield, I wanted to go a bit further and try to setup a rain effect for my character, like in the game.
For the shader, I relied heavily on Ben Cloward's extensive rain shader tutorial series, which I highly recommend.
While the textures used were provided in the video descriptions, I created the rain drop and drip textures from scratch in Substance Designer instead to have more control over the drops' density and shape.
The main obstacle I ran into during this process was that the Tile Sample circles would overlap one another, and there wasn't an easy solution to this.
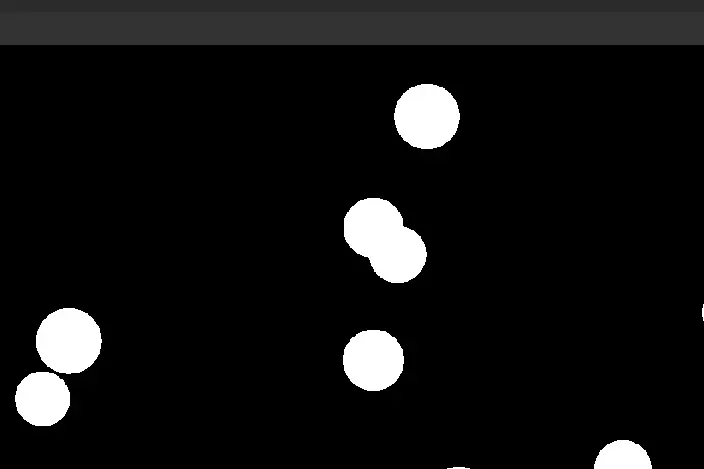
the circles overlapping if I generated too many in one node
To prevent myself from over-engineering one, I settled on a simple solution, which involves generating the circles in small batches using this chain setup which expanded the previous batch slightly and used it as a mask where the next batch would not be generated.
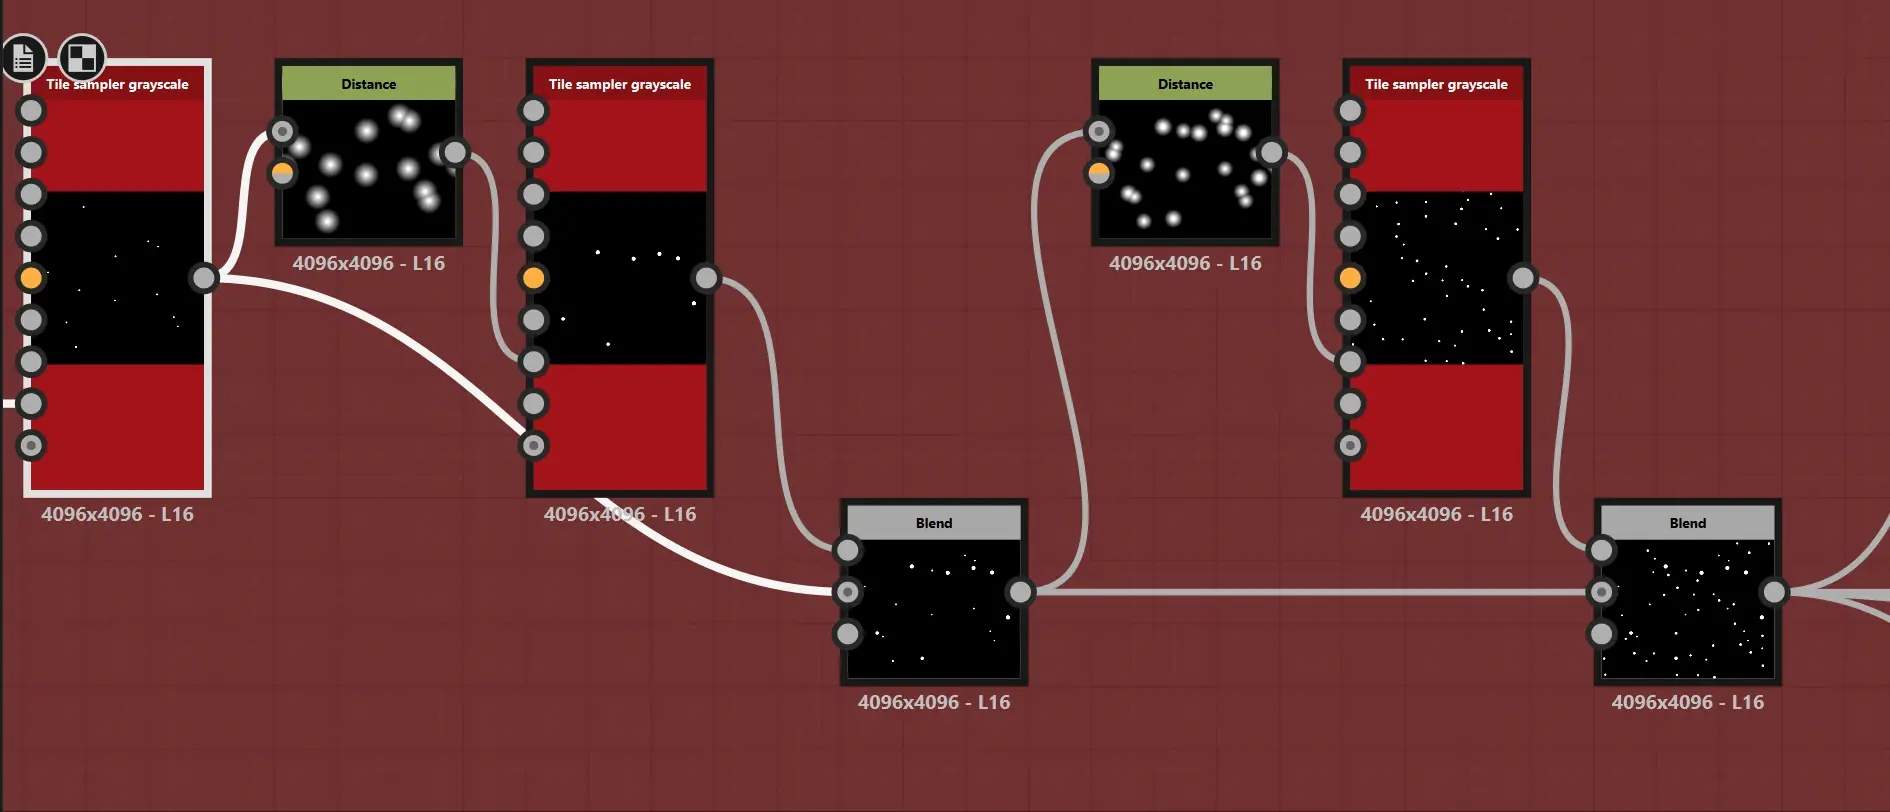
generating the circles in small batches
For each type of drop, I would also warp it with a perlin noise to better resemble a raindrop.
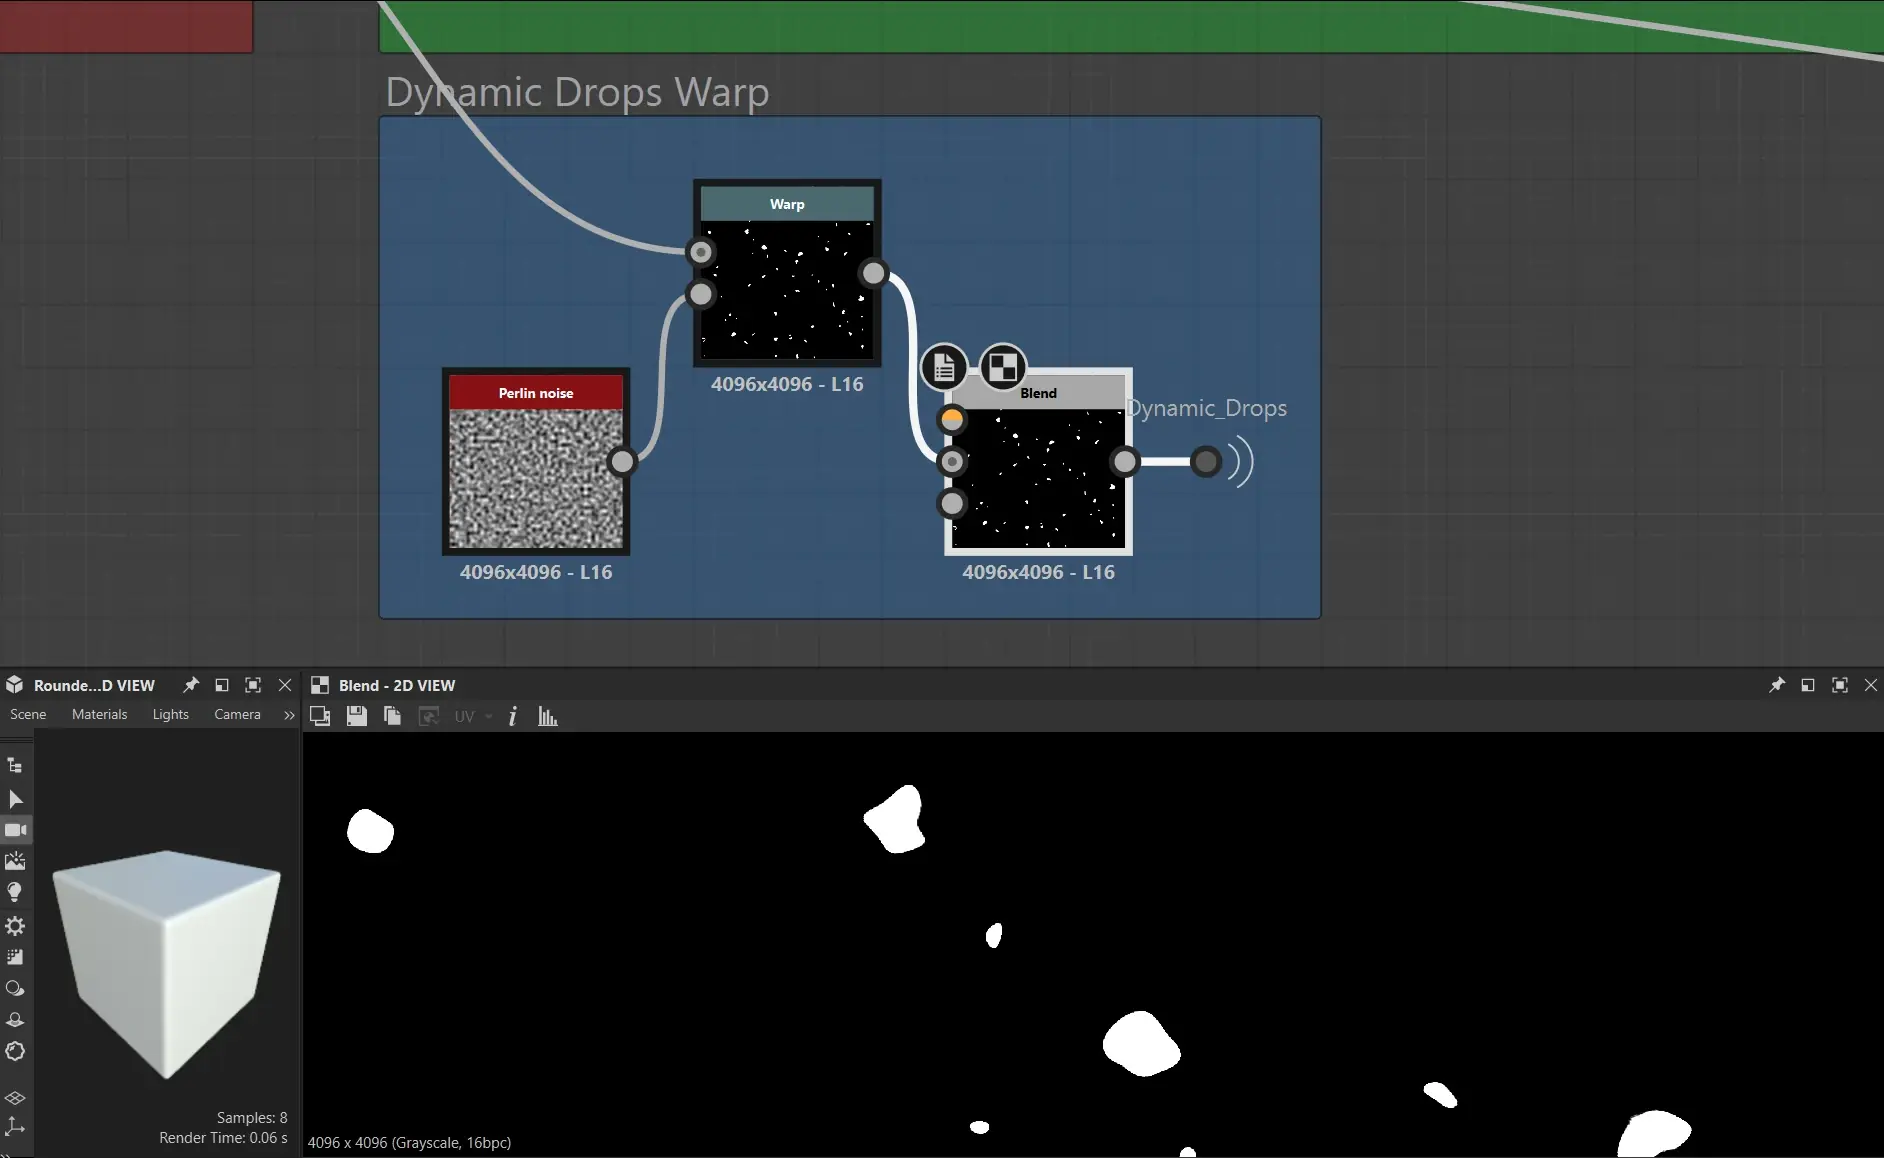
warp + perlin noise
Once the mask was created, I rounded out the edges for a normal map, then packed it all into the final rain drop map.
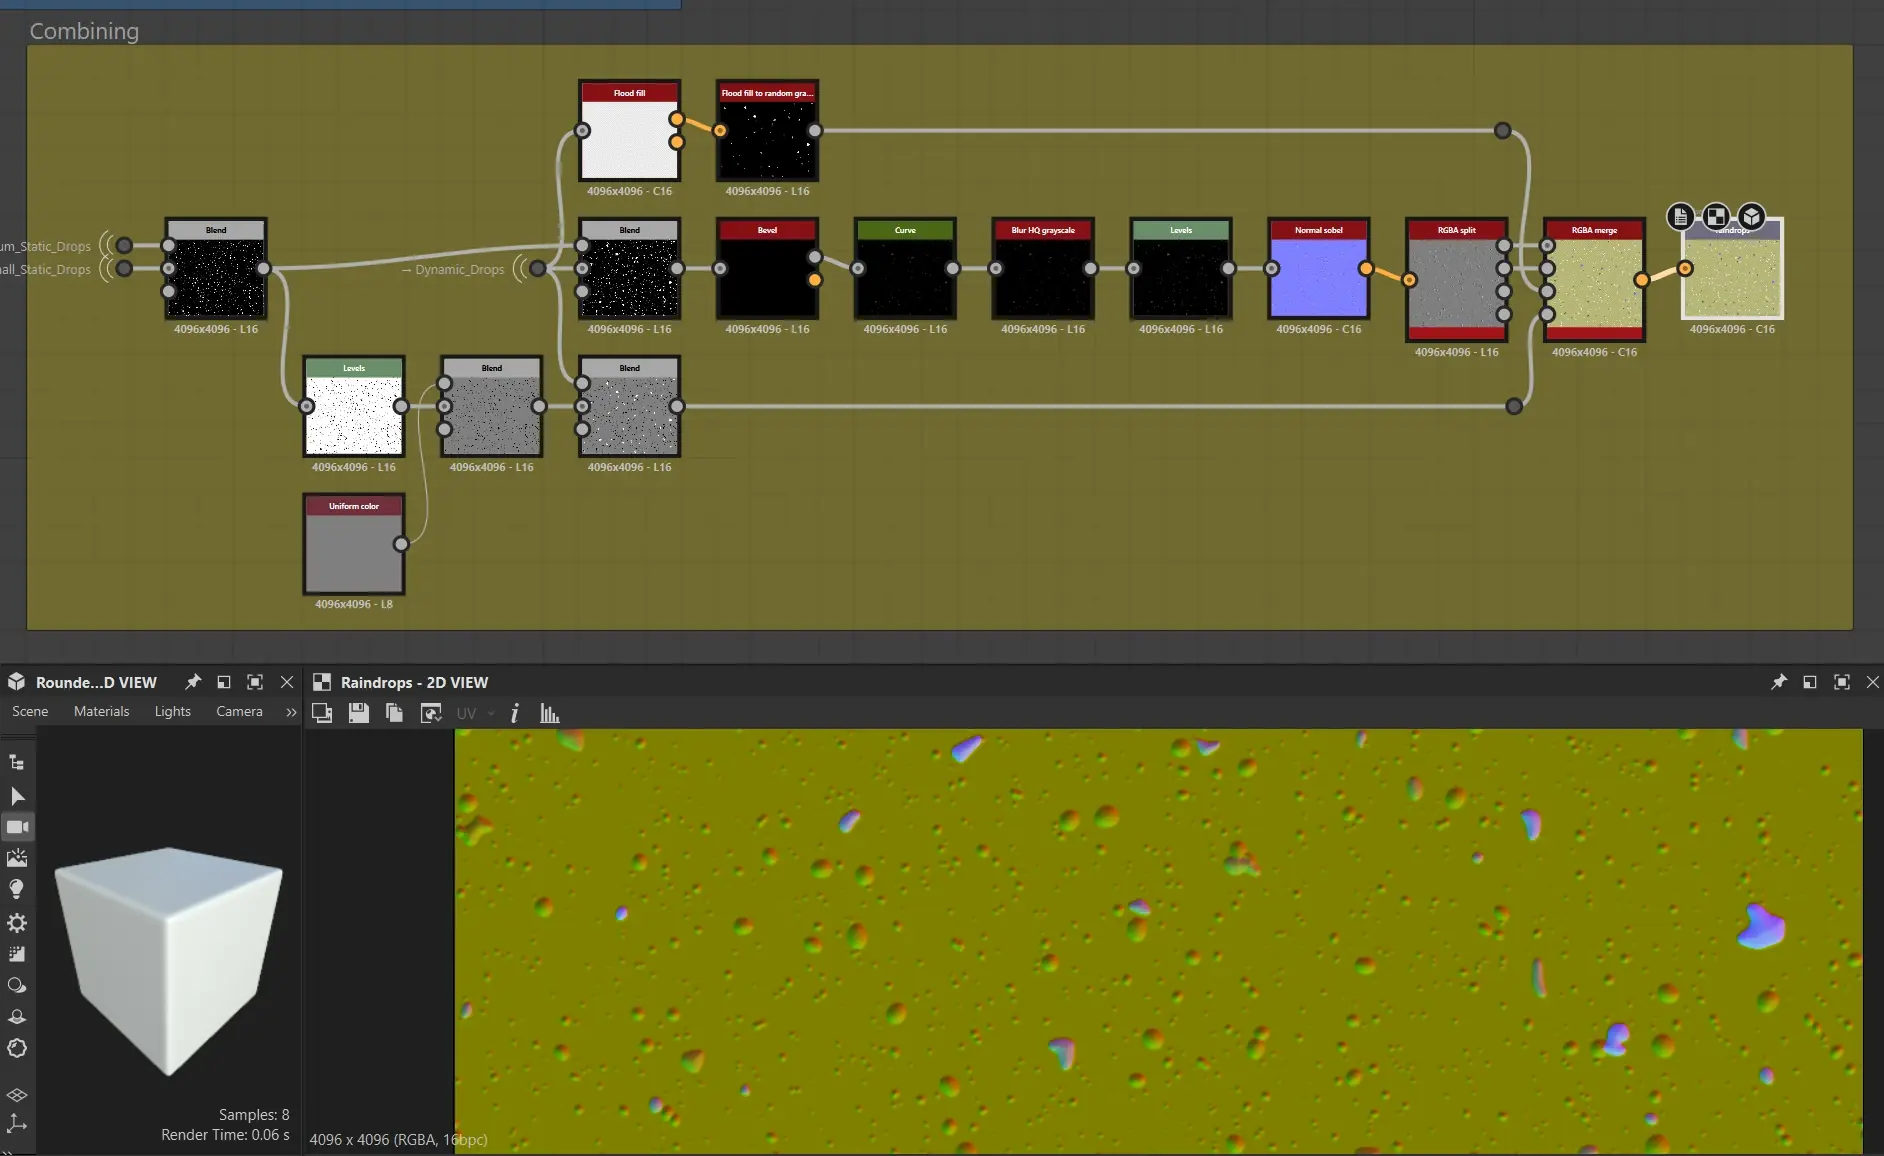
end of rain drops graph
The rain drips map was a much simpler process, since it was essentially the same-ish graph without the awkward small batch process.
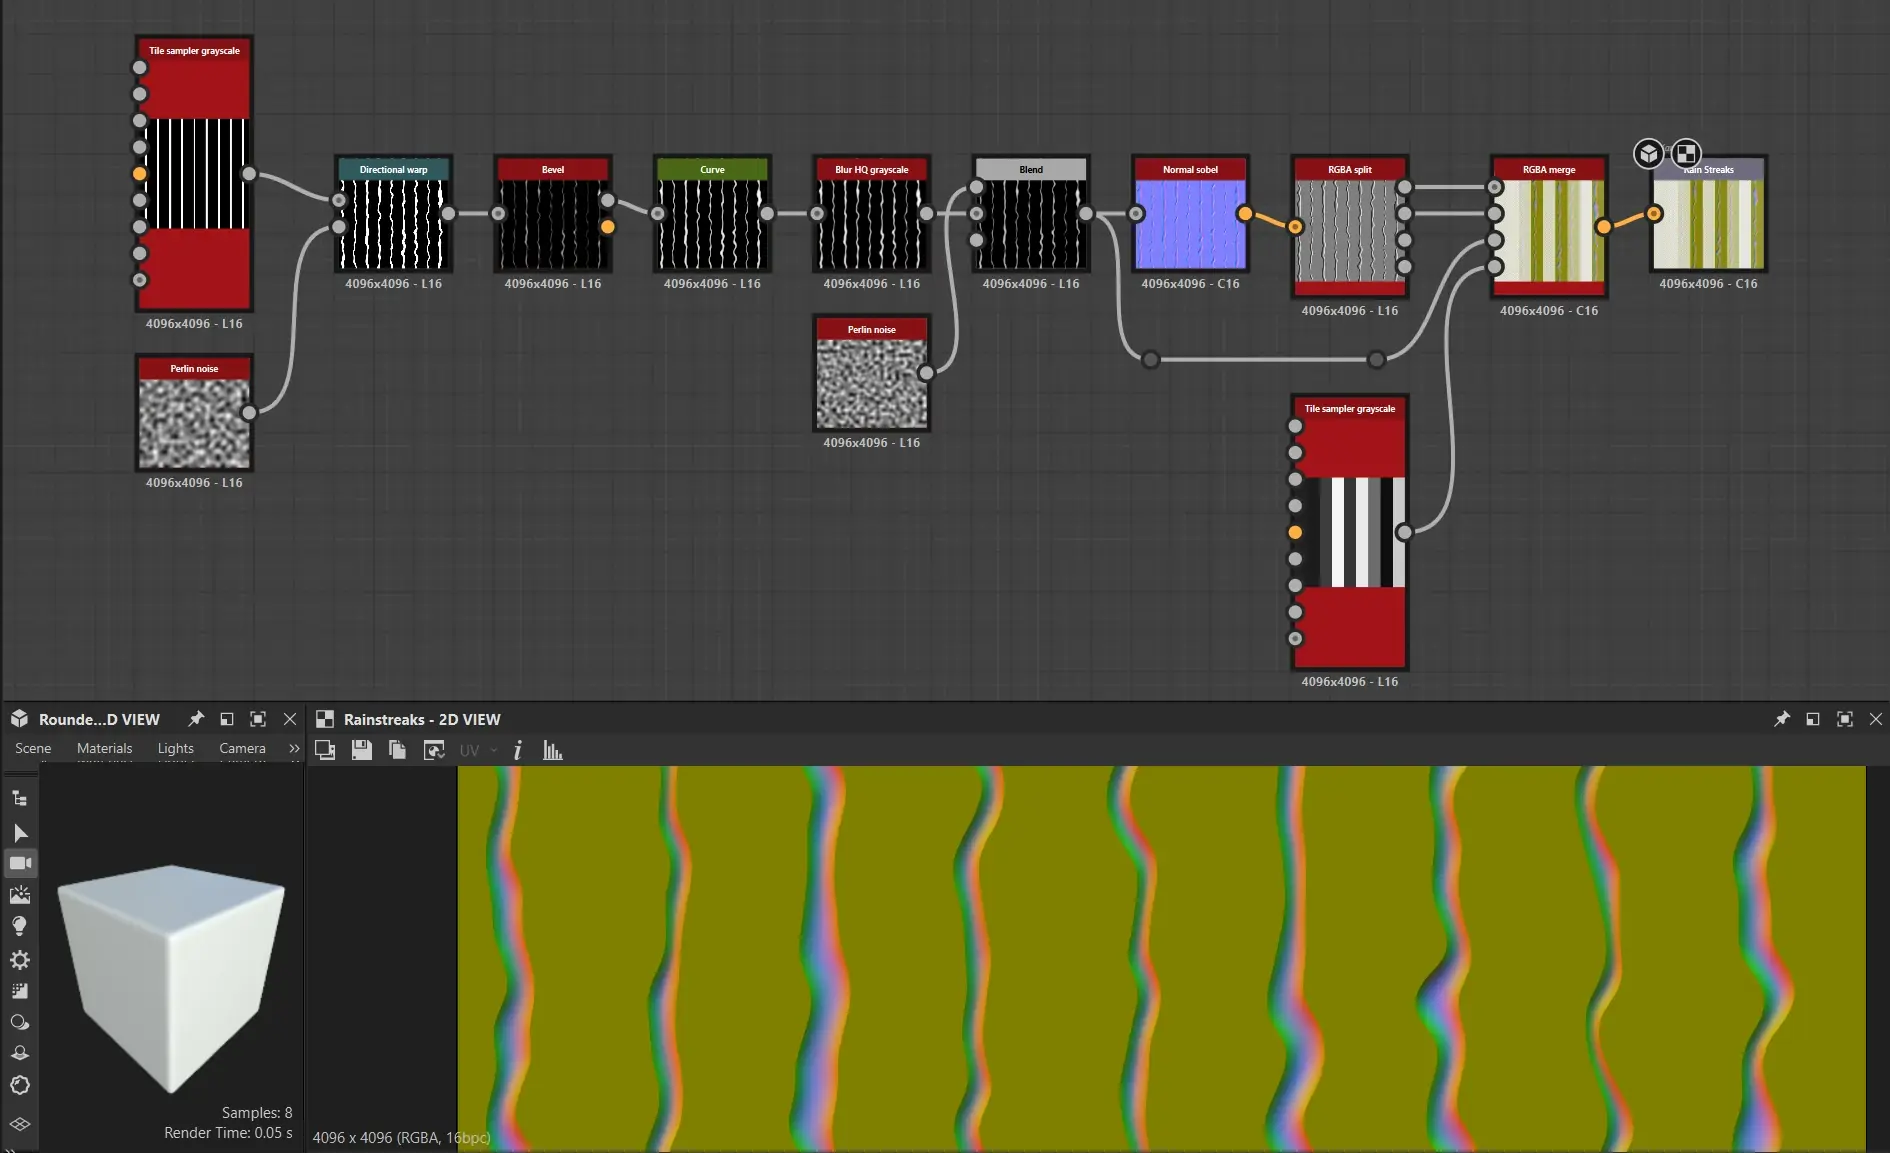
this is the entire rain drips graph
Once I set all of it up, my rain shader looked like this.

Rain Shader Demo
Since I had an actual turntable with crevices, I decided to create a dedicated puddle map instead of the randomly-generated one in the series. For this, I started with a Curvature generator in Substance Painter for a base.
Afterwards, I manually painted onto it to touch it up. I removed areas of the mask which were on impossible surfaces, and added a few larger puddles.
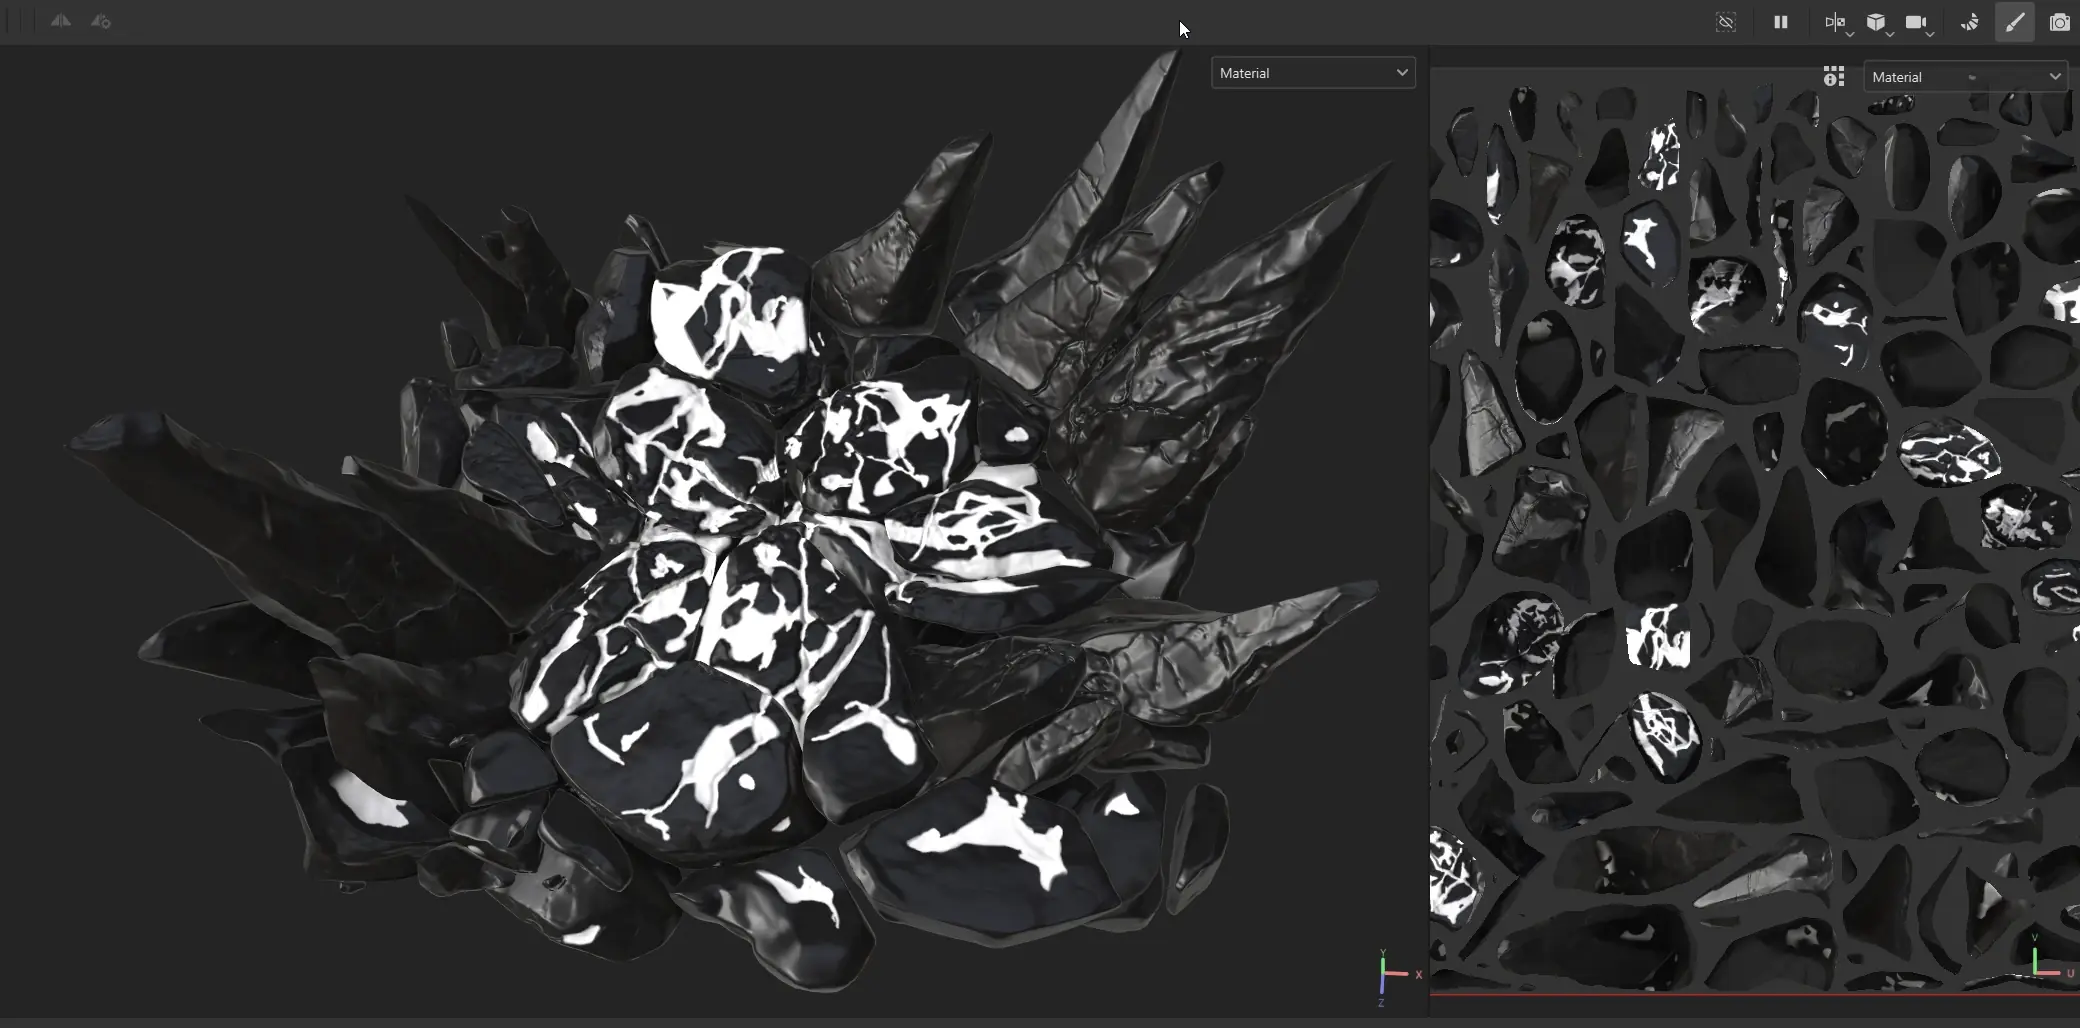
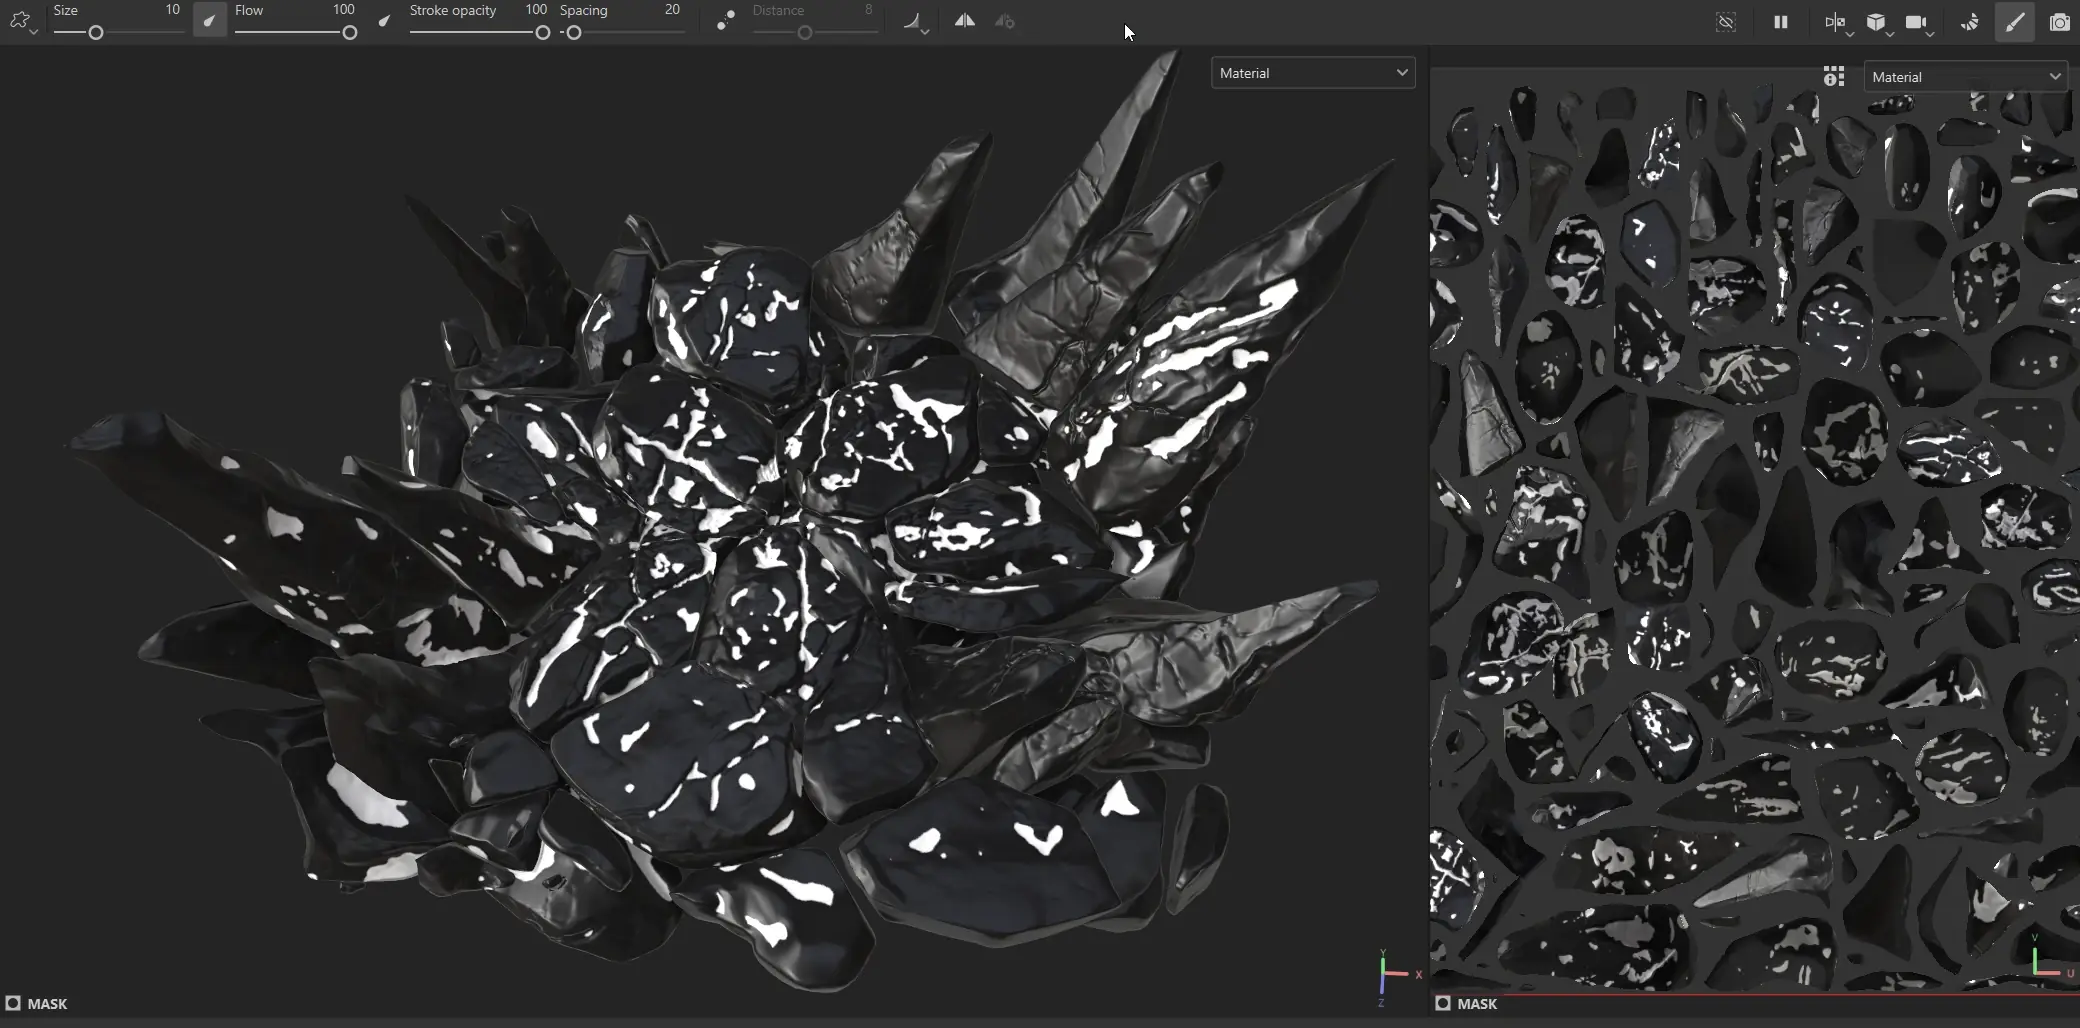
curvature base
painted adjustments
puddle mask

puddles in UE
The actual rain particles were much simpler to setup in comparison to the shaders.
I used this video by SoftTofuVFX as a reference and tweaked the particle size and spawn rate of the rain to my liking.

Rain Particles VFX in UE
render.
Once my shaders were complete, I went to create a short cinematic showcase for my character. In other words, lights and cameras.
I liked using light function materials to add a bit more variance to my lights, namely in the form of Strobe and Gobo lights.
I found this approach by Josh Toonen, which was quite straightforward to implement.
For the gobo mask, I created a simple abstract pattern in Substance Designer using Directional Warp.
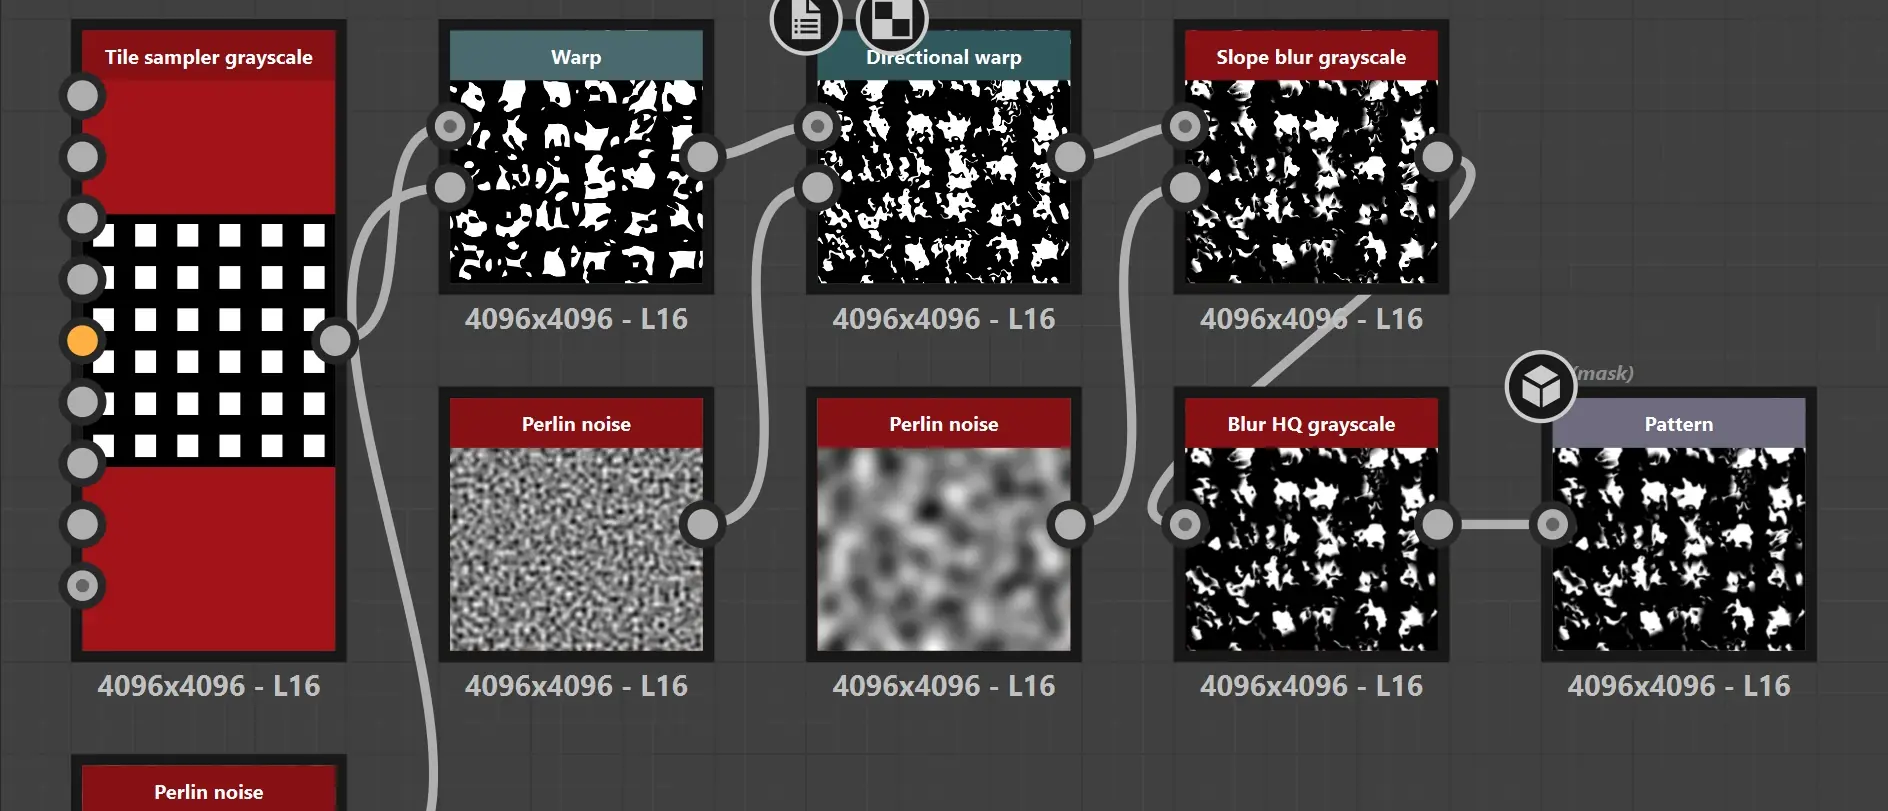
simple abstract pattern in SD
This left me with the more creative process of lighting the scene and planning the shots.
It seemed to fit the concept art better, so I started with a strong spotlight from above instead of a conventional 3/4 key light, then added fill and rim lights to support it.
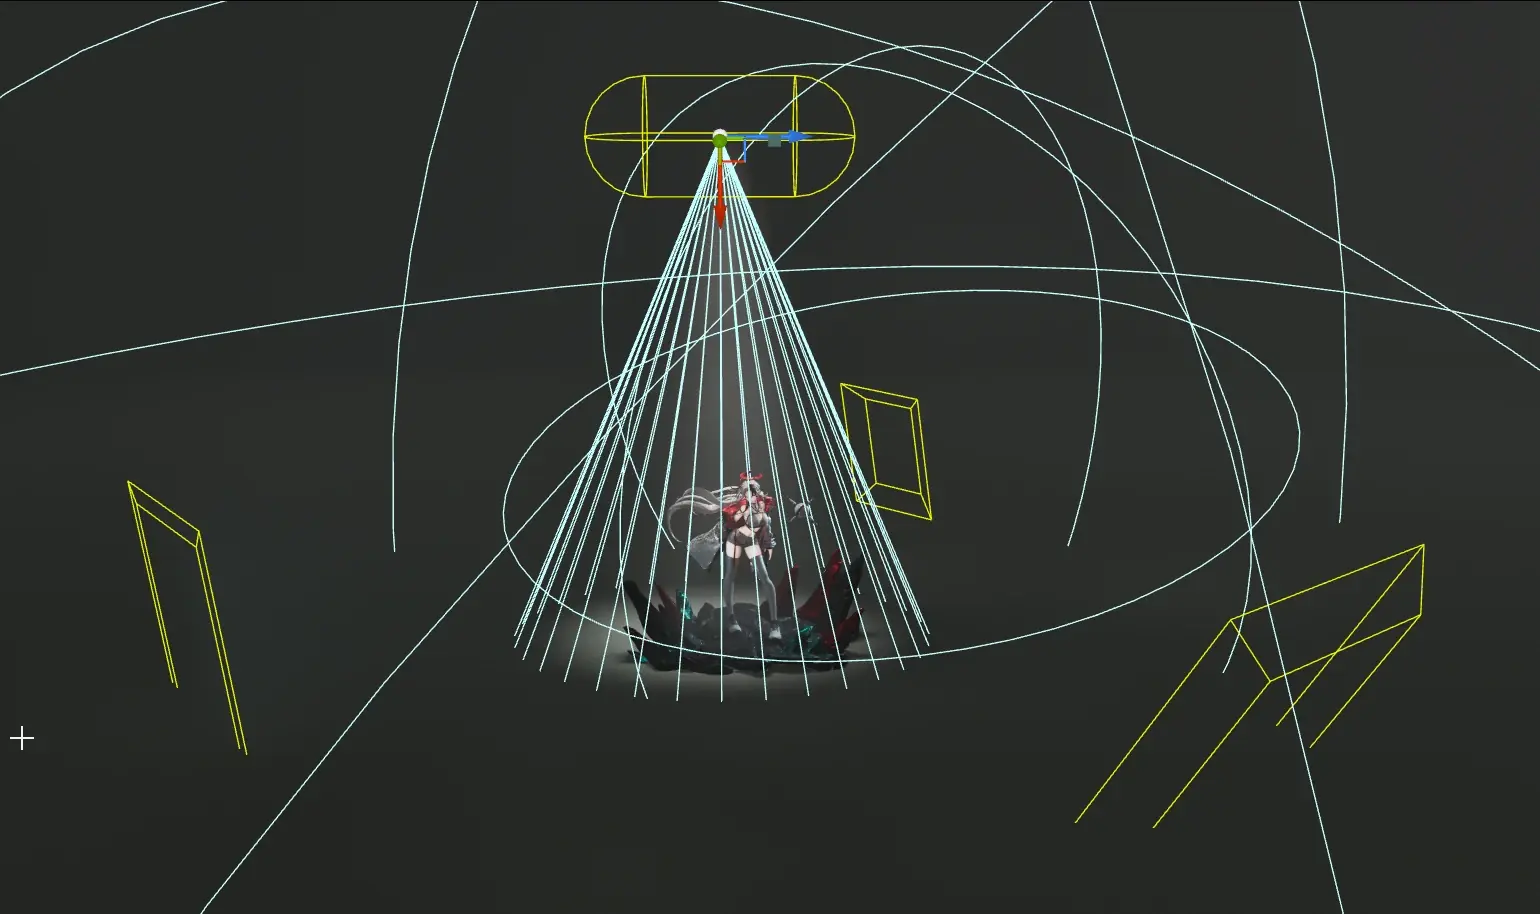
base lighting
I also added an area light behind the neck to colour the inside of the hair.

Hair Light
At first, I had to think about what I wanted from a cinematic, rather than settling for a simple few beauty renders and a turntable.
The solution I landed on was to have a proper introduction to the character, like a pitch or an essay. I decided to give a structured, ordered feeling to the cinematic, like a 3-act structure.
The first section (before the cut to black) consists of camera pans to the right. I started with more abstract shots to give a bit of a sneak peek to the character, together with increasing the speeds of the shots up till the cut to black.

Intro
For the last shot in this section, I decided to designate the spotlight as a gobo, moving diagonally overhead.

Spotlight gobo seen from viewport
The second section serves as a clearer introduction to the character.
I used two dolly-in shots to slowly do so, then moved on to showcase the rain shader, which could be seen as the highlight. I also switched the camera pan direction to move towards the left, to create a sense of progression from the previous section.

Section 2

Rain Showcase
Finally, I gave a brief denouement with a dolly-out, using an identical angle to the dolly-in shot to tie it together.

Outro
conclusion.
While I usually lean towards realistic pieces, I'm glad that I decided to create a stylized character instead, as it allowed me to dive much further into shader creation, and enlighten myself on just how technical stylized shaders can get.
Given more time, I might polish the skin and rain shaders further for use in other projects, as they're not very versatile as is.
Thank you for taking the time to read this project breakdown!
Make sure to check out the artstation post.